#quick string alignment kit
Explore tagged Tumblr posts
Visit Tumblr Blog
Explore Tumblr blogs with no restrictions, modern design and the best experience.
Last Seen Tumblr Blogs


Fun Fact
Tumblr’s reach among the 26-to-35-year-olds in the US is 11%.
Text
NEW 5th Gen QuickTrick QuickString Alignment: Shop Online

Take control of your car’s alignment with the all-new 5th Gen QuickTrick QuickString — the ultimate DIY alignment kit for automotive enthusiasts. This comprehensive tool lets you check caster, camber, toe (at each tire!), and thrust angle, ensuring your vehicle tracks perfectly for optimal performance and tire life.
Everything You Need in One Box:
4 Caster/Camber Verticals: Track vertical wheel angles for proper suspension geometry.
4 Toe Bars with QuickTrick Stringer & String: Measure individual tire toe for precise adjustments.
2 QuickTrick Digital Gauges: Get accurate readings for all alignment angles.
Complete Hardware Kit: Includes gauge brackets, attachment pins, bungee cords, and a handy carrying case.
Detailed Instructions & Video Tutorials: Learn the ropes quickly and confidently.
Unmatched Versatility & Value:
The 5th Gen QuickString is the only DIY kit that offers comprehensive alignment checks at an affordable price. It works on any hard surface, saving you time and money on shop visits. Plus, its modular design ensures compatibility with previous-generation QuickTrick kits — maximizing your investment.
Don’t settle for uneven tire wear and compromised handling. Invest in the 5th Gen QuickTrick QuickString and experience the satisfaction of DIY wheel alignment done right. Order yours online today!
youtube
#string alignment#quicktrick string kit#string alignment kit#quick string alignment kit#quicktrickalignment#Youtube
0 notes
Note
💙 - Describe their bedroom! Is it personalized, unchanged? Messy, neat?
Thank you so much for the Ask, @zackprincebooks!!! I'll answer for some of my OCs from a few of my WIPs for this one!
(Supernova Initiative)
Jack and Cassiopeia Tithus - Jack shares a room with his sister, Cassiopeia, in their spaceship (there isn't much space for multiple bedrooms on a non-cargo class spaceship, so they simply share one). The room itself is personalized to their tastes, with decorations such as posters from their favorite movies and bands, string lights, and a few old plushies from their childhood which they still kept. There is a bunk bed in one of the corners of the room - Jack's bed is the top bunk and Cassie's bed is the bottom bunk. He prefers the colors bright purple and orange for pillows and bedsheets, while most of Cassie's pillows are some shade of pastel, especially blue and yellow. The room is a bit messy, mostly because neither of them has the patience to constantly make it neat. The room has a bulletproof stargazing roof. There is a built-in wardrobe in the opposite corner of the room, which spins and doubles as a writing table, and there are also a few small storage boxes around the room.
Deimos Soll - Deimos' room is cold and plain. He doesn't bother much with decorations and feels overwhelmed when in a cluttered space. His room is small and built for functionality - there is a bed with perfectly aligned bedsheets (in the colors white, light grey, and a very very faint lilac), built into the wall of the room (the bed can also fully close into a small pod and has a holographic tablet built into its metallic "roof" which Deimos uses to make his to-do lists for the day, do research and watch movies). There is a small closet in one of the corners of the room, where he stores his clothes, armor, and weapons (mainly his knives, guns, and his favorite sniper rifle). He keeps his video game console in a box under his bed. The room also has an automatic perfume dispenser (his preferred scent for the room is lavender). This room had been converted into a storage space a few years prior when he left the crew, but now that he has returned to the group his room is back to the way it was.
Gabi Ophirya - Her room - in the dwarf planet she lives in for most of the story - has a strong futuristic aesthetic, with most of its decorations in shades of dark pink and purple and metallic colors. There are neon lights built into the room, which give the place a dark lighting that Gabi prefers. The room is very messy, with clothes and gadgets thrown around randomly, and the bedsheets tangled chaotically. She keeps most of her stuff in storage boxes or small containers around the room, which have wheels and can be stacked on top of each other. As a brawler, she has an extra first aid kit always at hand in the room, and always keeps her gauntlets in top shape - she has a desk for repairs beside the bed. On that same desk, there is a picture of her and her sister, Morgan. She also has a bed for her wolf somewhere between the desk and her own bed.
(Enchanted Illusions)
Augustus Grimmure - As a necromancer, his room is also his magical laboratory and study room. His room is located in the basement of an old wooden building in the center of the city of Ansburke. The room has an old wardrobe, where he keeps his clothes and a satchel ready for travel in case he needs to make a quick escape. On one side of the room is his bed, which has white linen bedsheets, a thick dark red blanket, and two pillows. On the other side of the room is an ornate wooden desk, which has multiple pieces of scribbled parchment (and a study on human anatomy) scattered on top of it, an inkwell, and a few quills as well as fountain pens and a few sketchbooks. There are wooden shelves on the wall on the desk's side of the room - on the shelves there are multiple books/scrolls, a heavy necromancy tome, jars with leeches, and bone samples from animals, mainly skulls. On the corner of one of the shelves, there is a flower pot with forget-me-nots and wolfsbane and another flower pot with a carnivorous plant. He also has a few jars with dried-out herbs and botany samples. On the other side of the room, a door leads to the other living quarters of his house, mainly a kitchen, a small bathroom, and a reading room. There is a portrait of his grandmother on his desk, close to a portable lamp.
Sam Delaways - Sam rents a room in a lodging house in the slums of Strystead, where he lives with his two younger brothers, Charlie and Tim. The room is small and rather cramped, with only two - very old - beds, there is a compact, dusty wardrobe where they keep what belongings they have and a rickety desk on the wall opposite the door. They have managed to make the room feel homey and comfortable to the best of their budget, and it looks happily lived in. There is an old music box on the desk, colorful drawings on scattered parchment around the floor of the room, and old blankets piled on top of the beds, Charlie and Tim's side of the room also has their plushies and toys, which are second hand but very loved. There is an old chair next to the desk that Sam usually places in front of the door at night for a bit more safety because he doesn't trust his neighbors or the landlords quite a lot.
Evangeline Daemitya - Evie has a large room in her family manor, with an ornate canopy bed in the middle of the room, in shades of pastel blue, gold, and pastel pink. There is a vast (stark white and gold) walk-in wardrobe on one side of the room, where her gowns, dresses, and all items of clothing are kept. Across the other side of the room, there is a balcony, which can be accessed or closed by two stained glass doors. There is a small vanity desk beside her bed, with a medium-sized mirror and a ballerina music box. Across the room, there is a door that leads to her reading and study space, a small room where she keeps her books, tomes, and scrolls, which has a spiral staircase that leads to her drawing and painting room, and a small window that overlooks the orchard. Finally, there is a painting of Evie and her father on the wall close to the bed.
(Song of Thorns)
Kane Mylestrom - Kane's room is practical but also beautiful. Located in the towers of the Order of Storm's Keep, the room is built on cobblestone in the shade of dark grey. There is a medium canopy bed in the middle of the room, with sheets and pillows in the colors of dark red and faded gold, with olive green embroidery. The wood of the bed is oak. There is a sword rack on the other side of the room. Close to it there is a stern wooden wardrobe where Kane keeps his armor and shield, alongside a few amulets. On another wardrobe in the other side of the room, he keeps his clothes and books. On one wall there is a simple balcony with ornate wooden doors that overlooks the grounds below and on the wall opposite to it there is a fireplace. There are a few tapestries on the walls, which have intricate symbols and designs, mostly in the shapes of dragons and storms.
Cyriel and Dimya Staryn - The twins have a simple room in the mercenary-owned building where they spend most of their time. The room is simple, built for practicality, but also homey and messy. There are two beds each on one side of the room, and a small fireplace between them. Each bed has a small wardrobe on the wall in front of it, with each wardrobe belonging to one of the twins. The colors of the room are simple and folkish, with a few differences between each twin's side of the room. Cyriel prefers copper and green tones and keeps her bow and arrow underneath her bed, while Dimya prefers dark blue and white tones for his side of the room and keeps a lute under his bed. The room has stone walls and Dimya's side of the room has a window with a few wilted flower pots.
#wip song of thorns#wip enchanted illusions#wip supernova initiative#ask games!#writers on tumblr#writers#writerblr#my wips#my characters#my writing#asked and answered#writing#character writing#writeblr#ask game
3 notes
·
View notes
Text
Book Binding Update: Text Block Sewn

I made a quick video update of my book binding progress! Watch it here! I have sewn the signatures into a text block. It is currently drying from its first coat of glue along the spine. THINGS ARE HAPPENING AND IT LOOKS AMAZING AHHHH!
Also, so far everything has been really manageable! It’s not as scary as it seems!
Some things I’ve learned:
-I chose really high quality cream paper to make this luxurious, but she THICC. After August is about 50K words long. If you’re trying to print a longfic beast, this paper might be... too much.
-I poked the holes quite big, thinking... That it would help. Smaller would be better, go small. Also, put the holes exactly on the crease of each signature, not to the side of the crease.
-Next time, I want to align the page numbers center, not left
-I want to decrease the interior margin, I left a bit too much space by the spine.
-Maybe size up the font one? This is Times New Roman size 12. My eyes are crap. It might be worth trying to generate a little more space between lines, too? I don’t know, this is all personal preference. I’d recommend printing a single signature and playing around with margins and sizing, but obviously, upping the font size and line distance will make your book “longer.”
-The video I used to sew this text block was excellent, but one thing I found unclear was that I’m pretty sure she was tying a knot at the end of sewing each signature (ie, the final step before adding another signature). She only verbally said this the first and last time. I could be wrong, but I really had to stare at the video over and over to figure out what to do at the “add a new signature” stage.
-You’ll often see folks recommend thick, wax-covered string for book binding, and that’s what came in my beginner’s book binding kit. I tried it, and it was immediately clear that this would mess up everything and be a terrible idea; it was so bulky and had a gross residue, I think it would have more than doubled the thickness of my text block. I swapped to ordinary string.
-The biggest problem I ran into was the string “ballooning” as I sewed, coming up and away from the crease of the signature. Check each stich as you go to make sure it’s flush against the crease; do not move on until the stitch is flush.
6 notes
·
View notes
Text
The Shot That Tore Through The BAU
This feels unwanted and kind of dumb but I wrote it so it might as well be seen. Don’t hit me too hard because I’m just not vibing this afternoon. Feeling rather down in the dumps. (I’m not even sure this fic makes sense)
Warning: for graphic whump, language probably
Hotch gets shot
Some people are just born to fight.
There are no cosmic gifts bestowed to help shoulder the weight of the world nestled against their breasts. The stars, it seems, have just aligned, and instead of some star sign expecting a brush with love, there are just trials and tribulations. Pain.
Some people are born to hurt.
Deep aches in their lungs, fire consuming their eternities.
“I hate you!”
The air thickens and Hotch is left swept in the smoke. Lungs choking in the smog. His chest is unbearably tight. There’s a hand clenching his throat, his back pressed to the wall. His knees tremble beneath him. Weak and absent. “Go-- Go,” he manages. Can’t think. Can’t breathe. “Go to your room,” he says, eyes anywhere but the red-faced teenager in front of him. All that anger, as misplaced and cruel as it is, is aimed at him. He hasn’t got the will to fight him. To see the reason.
Jack, teeth clenched, and body shaking can’t. He’s here. He’s angry. He’s blinded. “You could have saved her,” he seethes. “If Foyet had just killed you then none of this would have ever happened!” His voice has graduated to a strangled shout. Twisted with his raw emotion. His truth. “Jessica, and mom, and me! We’d be happy. Instead of miserably stuck here with you!”
He… doesn’t--
“Look at me.”
His bones feel melted. By the collar of his shirt, he’s being shaken. Neck going limply to the left until a warm palm-- Dave. Dave’s warm palm. His neck is limp until Dave’s warm palm is placed against his freezing skin. Someone keeps calling his name but Dave grounds him.
Dave is scared.
Hotch looks to the side, jaw slacked and a soft grunting noise leaving his mouth. He can’t… he doesn’t…
“Aaron. Aaron!” Eyes rolling back into his head, Dave’s voice breaks. The fear and the emotion sinking into the desperation that they all feel. The radio cracks with the sound. Morgan shivers at the sound.
Reid falls down beside them, hands clutching at the blood uselessly. Unable to find the flow. Where’s it all coming from? Reid makes a choked sound as he finds the wound. His heart hitting the floor. “His neck,” he rasps. “His neck, he--” Reid wraps his hand over the wound. Wild fear in his eyes. “He’s not going to make it. The ambulance-- the ambulance is-- is ten minutes out!”
Dave wipes at his face with his hand. A motion meant to wipe the sweat from his brow but all it does is drag blood across his forehead. Like a broken, half-finished ritual. “What--” he shakes his head. Eyes moving frantically as he worries with his hands. “What do we do? We can’t move him.”
Hotch kicks out, a choked gurgled sound leaving his mouth as he tries to pull away from Reid’s hand. His eyes blink open, confusion laced in the dilated pupils. His foot moves, uselessly trying to find traction and push himself away.
Emily comes storming up. She comes with hellfire and a kit that seems to have come from nowhere. She grunts, throwing the red kit at Dave’s chest. She falls to her knees beside them. Her dark brows furrowed as she settles herself for what she’s about to do. “Hold him down, Reid.”
Reid shakes his head. “What?” He looks at Dave and then at Emily. “Derek,” Emily barks. “Hold him down.”
Morgan positions himself at Hotch’s head, catching Hotch’s hand when the man reaches up blindly seeking grounding. “What are we doing,” Morgan asks, paling as he watches Emily open the kit and pull out gauze. She’s wrapping it into a ball, making it look like a tampon. Forming it and shaping it quickly.
“Hold him tight, Derek,” is all she says before she throws her hips over Hotch’s. There’s no warning as she pulls Reid’s hand away from the wound. Emily starts packing the gauze in.
“Oh, God!”
Hotch comes back to them, a choked gasp leaving his pale lips. He fights against them. His knees hit Emily’s back as he tries to get away. Morgan holds him in place, his shoulder’s pinned to the ground. Tears fall down his face, pinched out of his eyes as he writhes. The veins on his face stand up, straining. His hand finds Emily’s shoulder but it only gives the softest push. Too weak to put enough strength into, unable to move her away from him.
“I’m almost done,” Emily promises, tears pooling in her eyes at the sight of her friend. “I’m sorry,” she manages, voice breaking as Hotch chokes. “I’m so sorry,” she shakes her head, roughly wiping her tears with the back of her wrist. Her actions do not reflect her words. She’s merciless, harsh as she forces the gauze into the wound. She has to be. If she can’t pack it in thick enough, she’ll stop and he’ll keep bleeding. He’ll die, right here, all over them. Slowly and, yet, so quickly.
Hotch manages to grab onto Emily’s shirt, pushing his hips to the side. It’s strength Emily hasn’t felt yet. He lifts her but she squeezes her thighs around his, he can’t get her off. “Easy, easy,” Emily grunts, steadying herself with a thrown out hand. She ends up overtop him, chest to chest. He looks terrified and she hates that she has to hurt him. “I’m almost done,” she promises when he whimpers and strangles out a cry as someone else settles their weight over his hips and she can resume her job.
She hits resistance and watches the blood still coming down his neck. Lifting her hands up they all watch and wait. One second, two… the blood has slowed. Just a little trickle of dark crimson snaking down his pale skin into the collar of his shirt. “I’m done,” she promises, leaning back over him. She wipes his tears away, shushing him gently. “It’s okay. It’s okay, I’m done. I’m done, I promise.”
He opens his mouth but he only manages the frantic sweep of his eyes. Confused and dazed. Blood coats his lips as he gasps wetly around the blood on the inside of his throat.
Morgan is sitting in blood. It’s soaked into his pants. He can’t imagine… he doesn’t know but he doesn’t want to say and jinx them but-- How are they going to make it? There is only so much luck they can push before this whole plan hits the roof? How life-saving can Emily’s plan be if Hotch is still wheezing and breathing blood into his lungs?
“Medics!” JJ screams, and they all look up. She ushers them in quickly and everyone but Reid and Emily tear themselves from Hotch.
Morgan’s knees are weak beneath him, nearly dropping him when Hotch cries out, trembling hand seeking Morgan. He’s been holding his hand this whole time. He can feel the cramp now, the blood finally getting to his fingers.
“What-- What--,” Dave pulls Emily to the side, her horrified question left unanswered as they all watch.
One medic lifts Hotch’s chin back while another prepares an IV.
“He’s choking,” Dave soothes her, going with her when she sinks to the floor sobbing. “They’re just tubing him, Emily. He’s okay. He’s okay.”
Hotch bucks away as the suction is placed down his throat, a horrible wet sound emitting from the tube as it does his job. Morgan goes without question to aide, holding his friend down. He whispers bland encouragements, his voice shaking and grip weak. He has to turn away as the silver curved blade is guided down Hotch’s throat. All he can do is offer meaningless condolences as Hotch gags and tries to scramble to remove the blade.
Morgan can’t keep up with the quick motions of what comes next. One minute Hotch is writhing and then he’s limp. Boneless. “Hotch!” He moves but is stopped quickly by an EMT grabbing his shoulder. Then he sees the quick squeeze the man at Hotch’s head is delivering onto the ballooned end of the tube.
Within a blink of an eye, Hotch is lifted away. Dark eyes, slipping shut as he passes, right hand limply hanging from the stretcher.
That escalated quickly.
As things typically go with Hotch-- they should have seen this coming.
Emily phones home and tells Jack. He’s too old to lie to, these days. A startling sort of development. Something they only just realized they don’t know how to deal with. Emily breaks the news to him. She’s sitting on the other side of the room covered in Hotch’s blood, hunched over as she speaks on the phone.
“Why would you say something like that?” she asks. JJ looks up, concerned with the tone of voice Emily’s taken with the boy. She must have found the root of Hotch’s behavior from the last few days. Whatever is, he hadn’t even told Dave. Just closed Dave’s attempts to talk to him down entirely.
“I know,” Emily soothes as she melts. The tension rolling off of her. “He knows, sweetheart.” She frowns as she lowers her head to her palm. “It’s not your fault, Jack. We’re adults. We’re a family, alright? It was an accident. You’re no more responsible than us.” She shakes her head, “just don’t worry about it, okay? We’ll call you as soon as we have something to say.” She smiles, “I love you too. I’ll tell them. Okay, bye.”
Sighing, Emily stands and rubs a hand down her face. Pulling away she grimaces, looking at her trembling blood-stained hands. God… they’ve really done this time. “They had a fight,” she supplies tiredly as she takes the empty seat between Reid and Dave. “Jack… Jack told him he wished Foyet had killed Hotch and not Haley.” There’s a fairly overlapping sigh shared between them.
Dave leans forward and puts his head in his hands.
“So he was distracted,” Morgan seethes. He’s leaned against the wall. Unable to sit or think right now. Just pace.
They’d known he was distracted. Understandably. Weren’t they all? Unable to recognize the strings bound to their friend, pulling his head back under the waves. Tired. Mad. Too caught up in their own misery to detect his. That’s not their fault but they can’t shake the thought that they should have known.
“What were they fighting about,” Reid asks softly. He’s shifted his entire body back on the chair. Drawn his knees to his chest and wrapped his arms around them, looking at Emily now where his head is dipped resting atop them.
Emily shakes her head. Jack had sounded heartbroken. Upset with what he’d said, regardless and unknowing of the weight it had on his father. Besides, he had no way of knowing how much damage it would do. He’s a child, reckless and angry. Hotch is a grown man. As tormented and broken as he may be.
“Agents?”
The surgeon hadn’t seen the agents roll in with his patient but he’d listened to the nurse’s warning when he’d grabbed him by the arm and told him to take “special care with this one”. Now he can see why. Every human life is of great and equal importance but some people leave behind terrifying family members. His agent just happens to be one of those people.
Dave rises while the other’s hold on. JJ clutches Emily and Reid’s hand, the three of them watching intensely as Dave approaches the doctor. Morgan feels a great unease in his chest. Suddenly, his heart is pounding and he feels lightheaded.
“He’s going to be alright--”
And, God, does it matter after that? Alive. He’s alive and he’s breathing and he could be paralyzed for all they care. He’ll still be here, with them. Grumpy and tangled and Hotch.
“He’s got a complicated recovery ahead,” the doctor warns over their unshaken faith.
Dave shakes the doctor’s hand, “he’s stronger than he looks. Hardheaded and stubborn as a mule.”
The doctor nods his understanding, he wants to warn them that won’t be enough. Recovery is painful. It takes time no one wants to afford it. He just smiles and nods, something tells him they know this routine well. “I understand,” he says. “He’ll need you all but I think you all need him too.”
Then he tells them none of them can come back. Aaron needs to rest and he won’t rest if he’s being watched. That’s not as great of an idea as the doctor thinks.
There’s a deep, terrified scream from down the hall. The doors of the waiting room do well in swallowing the sound but they’ve been waiting for hours to get some word about the Unit Chief they lost hours ago to those doors. Now, they know. He’s alive all right.
Emily doesn’t look up from her nails. They’re well past the point of bleeding, her fingertips sting and her left foot bouncing quickly with her nerves. She can’t look up. She can’t face the others in fear that she might crack and reveal more than she intends to. So instead she just… “He’s awake,” she says softly, glancing at Dave out of the corner of her eye.
The older man’s shifting in his chair, not getting up but moving his body as much as he can to see through the small window in the door. The way the scream cuts off, not dying slowly but just stopping tells them all they know. Sedating Aaron will only work superficially and Dave needs to make sure someone understands that. The sooner the better.
“Aaron--” a different doctor than before steps into the waiting room and quickly takes two steps back when he’s met with a swarm of angry looking people. He’s been doing this job long enough to understand that the force awaiting the agent he has right now in his ICU is a friendly one. However, they will not be his biggest fans. “Family of Aaron Hotchner, I’m assuming?”
Dave nods his head, wrapping his arms around his body as he looks the doctor over. “Agent Hotchner,” he corrects but it’s not flashy or anything-- it’s just to establish to the doctor who he’s dealing with.
The doctor nods, “okay then, Agent Hotchner.” He shifts the clipboard in his hand. “Uhm,” he combs over the file. “He’s sedated right now--”
Emily cuts him off. “We know,” she says. None of them miss the half-wince the doctor fails to hide. “Unless you can keep him sedated for the rest of his life,” her tone takes on an edge that says while her words reflect dark humor she is not being funny. “You have to let someone back there.” She crosses her arms on her chest. “He hates hospitals and unless one of us is back there--”
“-- he’s going to try and get himself out.” Morgan finishes. He’s seen it himself. After Boston Morgan had stood by and watched as Haley stood selflessly by Hotch’s side for days. The only person who could take to him in his delirious, fearful state. Morgan knows plenty of people who hate hospitals but he’s never met someone who hates them as much as Hotch. He does not just hate hospitals… it’s unhinged, unwavering fear.
The doctor nods his understanding. That certainly places him one step closer to understanding everything that just happened back in the room. “He’s just been moved to a room and I can allow one or two of you back for now.” Looking at the sheer size of the group before him he’s expecting that not to blow over well.
It turns out fine.
Dave turns around and looks his group over. “Alright,” he scratches at the back of his neck. “Reid, Derek, and, JJ go back to the hotel. Get some sleep. Call Garcia and tell her he’s alright.” Glancing at Emily he motions for her to follow him. “You can come with me.”
He doesn’t wake while Emily and Dave sit to watch.
Gently, ragged warmed in water from the sink, Emily wipes the blood from Hotch’s lips. She’s careful to keep the bandages dry. Mostly, they just sit. Wait.
Emily’s napping when she feels something hit her arm. She wakes up dazed, pushing the hair up out of her face. Normally, she might be embarrassed to be caught sleeping but she finds Hotch’s half-lidded eyes looking back at her. She’d been sleeping on his thigh, the perfect kind of boney pillow the moment could afford. “You okay,” she asks, rubbing at her eyes. In the other chair, Dave’s still out. His legs are kicked up on the edge of the bed, arms crossed on his chest.
He motions her closer.
“What is it,” she asks, softly, leaning down and brushing his hair back.
“Thirsty,” he manages, croaked and pain. His voice is hardly a whisper at all. Just a broken crack.
She pours him a small cup of water from the pitcher by the bed. Hesitating only a moment when she wonders if ice chips would be better. She doesn’t have any though so she gives him the water. She has to hold his hand, guiding it to his lips.
She frowns as she thinks about the accident. His blood going everywhere. The stained blouse she just threw away. He’ll be okay, she knows. In two days, the world will have calmed down once again.
Reid will be bringing Hotch books to read and the walkman he keeps in his go-bag.
Dave will be up his ass about taking care of himself. Dotting on how Emily always listens to him, why can’t you? “Is it that hard to just listen, Aaron? Do you have to worry me to death? Can’t you just behave?”
All the while, Emily sneaks him out of this awful room. Probably to go watch TV or outside, anywhere they won’t be found. If she’s tired of hearing them all worry and groans, then he will be too.
Give Garcia ten minutes and she’ll have this place covered in bright things. Trolls and balloons.
The key is Jack. No amount of snacks from JJ can save him if they don’t let him see Jack. If they don’t fix whatever was said between the two of them. Whatever it is, Emily isn’t too worried.
“Get some sleep,” she whispers. With any luck, she’ll wake up and this will all have been a dream.
She’s just afraid she won’t be able to forget the feeling of his blood rushing over her hands.
#criminal minds#aaron hotchner#hotch whump#emily prentiss#david rossi#spencer reid#jennifer jareua#penelope garcia#jack hotchner#derek morgan
87 notes
·
View notes
Photo

New Post has been published on https://www.vividracing.com/blog/top-5-best-tonneau-covers-for-the-toyota-tacoma/
Top 5 Best Tonneau Covers for the Toyota Tacoma
An open truck bed is dangerous and somewhat careless as it leaves your belongings at the mercy of the elements and passersby. The contents as well as the truck bed itself can fade from exposure to the sun, rust from moisture damage, and fall victim to the hands of criminals. That doesn’t have to be the case though, as a tonneau cover can protect your belongings from harsh weather and sticky fingers to keep your bed looking its best for longer and give you peace of mind wherever you go. A weathertight bed cover will not only provide a line of defense against the aforementioned, but it can also elevate the rugged appeal of your truck with a streamlined look and OEM-type fit.
With so many different options on the aftermarket ranging from fold-up covers to roll-up covers and retractable ones in soft and hard varieties, it can be quite challenging figuring out which tonneau cover may be best for you. We here at Vivid Racing conducted research to find a list of the top 5 bed covers for your Toyota Tacoma in order to take some of the guesswork out of it. The following five products are in no particular order, but have checked the boxes when it comes to quality, utility, durability, styling, and overall protection. You can also browse our complete inventory of truck bed covers for the Toyota Tacoma right here.
1. Tyger Auto T1 Soft Roll-Up Tonneau Cover
Tyger Auto’s T1 Soft Roll-Up Tonneau Cover combines daily utility with clean styling in a complete and affordable package. The cover sits only slightly above the Tacoma truck bed to complement the sleek lines of your pickup for a seamless low-profile look that also increases gas mileage with 13 percent savings! Made from tear-resistant vinyl for longevity, this cover offers superior resistance against wear so you can be sure it will last for years and years. After all, it is guaranteed to withstand exposure to changing temperatures and harsh weather elements like UV rays, rain, and wind to keep it looking grat and performing optimally no matter what.
It comes with heavy-duty rails and crossbars that provide maximum support and strength for a secure fit that will keep all your cargo safe and dry. The adjustable tension and latching system allow you to firmly secure and tighten the cover for added protection. Opening and closing this bed cover is made super simple by way of a quick-release mechanism. Such allows for the Velcro-secured, marine-grade 24-ounce vinyl tarp to be rolled up and locked to the back of the cab to maximize access to the bed. This soft rolling and lockable tonneau cover mounts on top of the Tacoma’s bed rails with the ease of a no-drill installation. All necessary hardware and instructions are included in the kit so you can install it in no time.
Features:
U.S. design patented tonneau cover
Made with marine-grade vinyl and aircraft-grade aluminum side rails
Cover is dual-coated for weather resistance and added durability
Seals with Velcro strip on the sides and secures with latch lock system
Tension system can be adjusted on the end of side rails to keep cover tight
Includes stainless steel clamps for mounting to the truck bed
Easy no-drilling installation with mounting hardware/instructions provided
2. Roll-N-Lock M-Series Retractable Tonneau Cover
Roll-N-Lock’s M-Series, the most advanced retractable bed cover on the market, has redefined the rules for truck bed security. From its retractable function, which allows for opening or closing in seconds, to its rigid, vinyl-over-aluminum laminated construction, this hybrid cover offers everything that the competition does not. There are no snaps to manipulate, no roll to lash down or stow, no crossbars to negotiate, no fabric shrinkage to struggle with, and, best of all, no worries about the security of your cargo. The Roll-N-Lock retractable bed cover is, by far, the most sophisticated and versatile truck bed cover available today.
This tonneau cover is made with heavy-duty aluminum slats that are laminated with premium-grade vinyl to provide high levels of strength. It also integrates a torsion spring for added toughness. In other words, this cover will serve you for years to come and will withstand road and weather abuse to protected and add value to your truck. The M-series is designed with great consideration for various weather conditions and includes a finger insulation grip that keeps your hands cool when operating the cover in high temperatures.
The M-Series tonneau cover provides you the security of a hard cover, the smooth appearance of a soft cover, and the convenience of a retractable cover. Its durable vinyl-over-aluminum hybrid cover design is dedicated to four-season protection and maximum bed security. It tackles durability while being extremely easy to operate with its unique frictionless construction and insulated grip lever. Simply use the key to unlock the cover and start to open it toward the cab as it retracts into its compact canister. The M-Series can open, lock, and close without ever having to open your Tacoma’s tailgate and locks in multiple open positions.
Features:
Made with heavy-duty aluminum slats and vinyl
Compact canister design to ensure usage of maximum space
Boosts the security of your cargo and keeps it in place
Multi-dimensional locking system on three sides
Insulated grip to protect your fingers from the heat
Installs quickly and effortlessly with no drilling
Easily opens and closes with rear twist latch
3. ACCESS LOMAX Tri-Fold Tonneau Cover
The LOMAX Tri-Fold Tonneau Cover from ACCESS Covers is a low-profile stunner that is ultra-lightweight and easy to operate. This tri-fold cover maximizes your truck’s appearance with a sleek design and superior protection against the elements. While it is very light in weight, it is also extremely strong and durable. It was designed for the utmost in strength, styling, and security while also improving your truck’s gas mileage. The LOMAX truck bed cover boasts an easy-to-use operation that is convenient enough for just one person to install and remove. It is equipped with a string latch that can be accessed from either side of the truck bed. The cover can be opened easily by pulling the string to release the latches. A built-in handle is used to return the cover to its closed position. The cover locks at ten points along the bed for superior security. Bolt-on clamps are used to secure the tonneau cover rails to your Tacoma’s truck bed. Once the rails are installed, the cover simply locks into place without the need for any drilling.
The LOMAX Hard Tri-Fold Cover uses durable aluminum panels with strong, waterproof hinges. Each panel is manufactured from top-grade aluminum alloy in either the textured matte black finish or diamond plate finish. Extruded aluminum channels support the panels, keeping the hard truck bed cover rigid and reducing its overall weight. More than 90 percent of LOMAX Hard Tri-Fold Covers can be recycled. Water-resistant hinges, rubber seals, and minimal metal-on-metal contact come together to reduce unwanted vibrations and noises for a quieter ride as well.
Features:
Low-profile design
Sleek aluminum construction
Ultra-lightweight and strong
Offers a weathertight seal
Incorporated storage kits
User-friendly operation
Easy to remove and reinstall
Simple installation process
4. BAK Industries Revolver X2 Rolling Tonneau Cover
The BAK Revolver X2 Roll-Up truck bed cover does it all with unrivaled strength, security, and styling. This tonneau cover offers more flexibility than paneled hard tonneaus as it allows you to roll the cover up and use every inch of the bed without blocking your rear window. This is an important feature as driving with your tonneau cover rolled up could be a hazard for your rear windshield. For this reason, BAK provides four D-shaped cab bumpers that are stuck to the cover when it is rolled up. They prevent the cover from bumping against your windshield and damaging it.
This hard roll-up tonneau features hinged, ¼-inch thick rust-proof slats made from aircraft-grade aluminum with a black powder-coated finish. Matte black rubber and bulkhead seals keep the train out and secure your belongings from nasty weather, while the premium vinyl finish keeps water from running through the aluminum slates. This cover has exclusive automatic rotational locking rails that secure the cover the entire length of the bed on each side. The automatic Patented Slam Latch system at the tailgate fastens the Revolver X2 along the length of your Tacoma bed to keep your cargo safe.
The Revolver X2 truck bed cover easily rolls up with one-handed operation and can carry up to 400 pounds of evenly distributed weight. To open, simply pull the hand release that is aligned with the Slam Latch system from either side. Underneath, there is an attached felt material to provide a soft and cool spot for your hands to operate the cover to keep them safeguarded from the rolling aluminum. Aluminum clamps hold the frame rails snug to the truck bed with mounting plates and secure bolts. Best of all, there is no drilling needed to install this tonneau cover.
Features:
Constructed of aluminum slats with vinyl overlay
Patented rotational locking rails
Side rail seals with a smooth flat design
Rear Corner Caps for a more refined appearance
Felt Replacement Cap System
Integrated Bulkhead Seal for superior sealing
Operate from either side with an automatic slam latch
Works with most 5th wheel hitches
Can hold 400 lbs of evenly distributed weight
Durable Safety Straps and buckles to secure cover when open
5. Extang Solid Fold 2.0 Hard Tonneau Cover
The Extang Solid Fold 2.0 Tonneau Cover is the brand’s latest generation of hard tri-fold truck bed covers with new design elements that you simply will not find anywhere else. The Solid Fold 2.0 includes Extang’s exclusive, patented Jaw-Grip and EZ-Lock clamps with 1-inch thick EnduraShield panels, and integrated corner and hinge seals. What’s more, revolutionary snap-on perimeter seals further protect your Tacoma’s bed from the elements to keep it looking and working like new for years to come.
The Solid Fold 2.0’s EnduraShield panels feature an automotive-grade polymer that resists dents, scratches, and harmful UV rays better than aluminum or fiberglass panels. The matte black textured finish not only looks rugged and aggressive, but also proves to be highly durable. Extang’s professionally engineered aluminum frame and hinges are also powder coated to match your truck’s bed caps for a more integrated appearance with incredible protection from unwanted wear.
The Solid Fold 2.0 comes fully assembled out of the box and installs in just seconds. Extang’s cab clamps attach directly to your Tacoma’s bed flanges without any damage or alteration to your bed caps. On top of that, this package includes a re-engineered patented EZ-Lock Clamp that requires minimal effort to operate and self-locks in position for added security.
Features:
Lightweight, 1-inch thick EnduraShield panels
Weight rating of 600 lbs evenly distributed
Matte black textured finish for added durability
Offers that OEM look for a streamlined appearance
Ultra-resistant against harsh weather conditions
Re-engineered patented EZ-Lock Clamp
Easy to operate and self-locks in position
3 notes
·
View notes
Text
The Sea Prince And The Shark Knight
Aka: The cherik kid!fic I had always wanted to write!
My contribution to the @cherikzine .
For a healthy dose of the physician prescribed cherik-y goodness, please order your copy of the zine here!
--------
Erik scowls as a gang of his classmates breeze past him. He skirts around the group and stands a little off to one side. Unfortunately, Erik cannot avoid them in the narrow tunnel of the aquarium like he avoids them in class-- where he sits alone on the last bench and glares at everybody with his height advantage.
He'd suspected that coming on this field trip would be a bad idea, but now, he’s completely sure of it. It doesn’t matter what he feels, anyway, because Mama wouldn’t have heard any of his pleas. She had been adamant on Erik being on the trip. “It's the perfect opportunity to make new friends,'' she had said.
The venue of the picnic isn’t so much of an issue as the company is. Really, Erik has absolutely no reason to like his third grade classmates. There’s that stupid Scott with his stupid face and stupid plasma glasses. Kitty would have been nice if she didn't tattle everything he did or said in class back to his Mama. Then there’s Sean, who treats Erik like he’s some villain. He might have pushed Sean off the basketball court once. Once! Accidents happen. Angel would have made a good friend if she would stop smirking every time she passed him-- like she knew the ending of Jurassic Park, and he didn't. Hank is scared of him; though, Erik doesn't know what for.
Then there’s Charles. Mr. Janos says that Charles was supposed to be in the second grade, but because he's so smart, he's in the third grade instead. Considering how Charles is smaller than everyone else in the class-- the top of his head only reaches Erik’s shoulder-- and extremely intelligent, it might be true.
Charles is… nice. He’s never been unkind to Erik, he always smiles at Erik whenever he looks his way, he doesn't mock Erik's accent like everyone else does (Charles, too, has an accent, but nobody seems to be mocking him for it. Not that Erik wishes for it. He doesn't like the idea of Charles being mocked-- for his accent or anything else. Then again, Erik likes Charles' accent, so he can't complain, he supposes). Charles even shared his spare pencil once when Erik’s had been broken. Erik can easily imagine Charles as his friend- eating lunch during recess and solving division problems together in class. Erik could show Charles his Hot Wheels collection and build tracks around his room. Or he could ask his father to build them a tree-house and go diving in the lake.
Yes, Erik decides he would like that very much.
Erik wants to walk over to Charles and talk to him, but Charles is surrounded by their classmates, where he's explaining something with his hands. Erik wants to listen, too. He wants to know what Charles is saying; but that would mean mingling with the rest of his classmates, and that simply cannot happen. So Erik sticks to the glass he’s leaning against and pokes at it to distract himself. A grey shark glides in front of him in the water; like a sentinel in grey armour, like it guards the waters of the entire aquarium. Maybe it does.
Erik raptly watches it move for a few more minutes before Miss Moira calls for their attention.
‘Alright, class, please follow me,’ she says, gesturing them to follow her a few feet along the railing from where they’re currently standing. Erik follows at the tail end of the crowd reluctantly, and sticks to the edge of it when they all stop in front of Miss Moira.
After taking a quick headcount, Miss Moira points to a fish beyond the glass. It’s a small, yellowish fish-- nowhere big or as beautiful as a shark-- but passable.
‘This is the Callipterus Cichlid fish, which is found mostly in Lake Tanganyika.’
‘Isn’t Lake Tanganyika in Africa, Miss Moira?’ Charles asks, standing beside her and smiling brightly. His eyes are bluer than the water beyond the glass and his cheeks and lips are the same shade of pink. He's very cute, Erik decides quickly.
‘Yes, Charles, it is.’ Miss Moira agrees, mirroring his smile.
‘These fishes are known for their skill of…’ Miss Moira stops. She frowns at the fish for a moment and then adds: ‘making new friends.’
Erik’s classmates murmur and whisper amongst themselves before Miss Moira bids them to maintain silence.
‘These fish have developed a unique way to find… friends. When a Cichlid fish wishes company, he collects shells form the lake floor and piles it up fashionably.’
As she speaks, the fish that had earlier wandered behind a rock, now returns with a conical shell in its mouth and drops it on the small bed of shells beside a rock.
‘And if another Cichlid fish likes the collection of shells made by this guy, he gets a new friend. Genius, isn’t it?’ Miss Moira completes with a big smile.
It’s stupid, really. Why would you need shells to make a new friend?
But everyone else seems to like it a lot, clapping and cheering as they follow Miss Moira along the railing. Even Charles seems very happy. Brilliant, absolutely brilliant! Erik hears Charles say to Scott as the group moves past him.
Erik stays back after everyone moves to the next spot trailing behind Miss Moira, because he wants to see if it’s really such a ‘brilliant’ plan.
As Erik observes, the yellow fish wanders for a few more minutes, adding more shells to the shell bed. Ten minutes pass before another, smaller fish comes wandering and hovers above the edge of the bed of shells. The smaller fish inspects the shells for a moment before swimming over to the shell-collector fish.
Mein Gott, it really works!
An idea forms quickly in Erik’s mind.
Miss Moira had reprimanded them from venturing on the beach behind the compound of the aquarium during the briefing earlier. But if he could sneak out now, he’d be able to return by the time they're scheduled to leave. Miss Moira wouldn’t suspect a thing.
It’s really difficult to get nice shells-- one’s which are not caked with mud or moss-- but Erik is determined. After scouring the beach for nearly an hour, he collects enough shells to fit in both his pockets. Mama will probably scold him for the dirt on his pants, though.
Despite what the fish did, he can’t just present Charles with a bunch of shells, it feels stupid to Erik. That evening, after returning from the aquarium, Erik holes up in his room. He places all the shells he'd collected on his desk and rattles his brain for ideas.
He could paste all the shells on a paper or cardboard. No, that's a stupid idea.
He could make a necklace… or a crown. Yes, a crown would be ideal. Charles does look like a Sea Prince with his blue eyes and all.
Erik quickly gets to work, selecting a thin metal wire to hold all the shells and then discards it after further thought. No. Metal would be uncomfortable to wear. Too cold.
‘What are you still doing up, liebling? You should be in bed. You have school tomorrow.’ His Mama enters his room when he’s rummaging through his toys-- surely, he should find something there to hold the shells.
'I'm making a shell crown, Mama,' he says, holding up a reel of aluminum string that's just as useless.
'A crown?'
Erik sighs and turns towards her. 'I want to make a new friend,' he says, and then dives in to explaining the remarkable method the Cichlid fish use to make new friends and how he's planning to be Charles' friend by gifting him shells. His Mama listens to it all with a smile. She's pleased that he's trying to mingle, Erik knows.
'He looks like a Sea Prince, you say?' she asks, and Erik nods vigorously.
Mama hums. 'A crown will slip away from the head if it's too large or small.'
Oh. Erik has not thought about that. Charles does have a small head, and his hair is silky-- Erik hasn't touched it, but he just knows-- so it may slip away either way.
'Why don't you just set the shells on a string and give it to him. He can decide whether he wants to wear it as a necklace, bracelet or a crown.'
Yes. That's the best idea. His Mama is a genius!
'I'll be right back.' His Mama leaves and returns a few minutes later with a brown string. It's thicker than the metal wire. 'Try this,' she says, 'It'll hold the shells together and not irritate the skin.'
Erik doesn't question her further. If his Mama says it'll work, then it'll work, because his Mama knows everything.
Kissing his cheek and telling him not to stay up too late, she leaves Erik to get back to the shells.
With the super glue that he had taken from the tools kit earlier, Erik begins to paste the shells on the string. One by one. Carefully.
*
Erik spends the next day eyeing Charles from his last bench seat. Charles is sitting in the first bench and laughing at something Scott is saying.
Erik scowls. Stupid Scott.
He feels for the shell crown in the right pocket of his trousers just to make sure it's all in one piece. It's safe, none of the shells have come out of their alignment. Satisfied, Erik goes back to drawing a shark for his essay on the Aquarium trip.
The day slogs on after that. Erik’s time is spent eyeing Charles, checking on the shell crown and waiting for the clock to strike four.
The class starts to thin as the school-day ends. Erik stays behind waiting for Charles to finish a math problem with Hank.
'Charles,' Erik calls out hesitantly when it's just Charles and him in the class.
'Erik!' Charles says with a wide smile turning towards him. 'I didn't realise you were still in class.'
'Yes, well…' Erik walks up to Charles and pulls out the shell crown gently from his pocket and cups it in his palms.
What is he going to say though? Erik had planned what he'd do- wait till school gets over, walk up to Charles and give the shell crown. But he hadn't planned what he'd say.
Hi Charles, I wanted to make a friend because I have no one to talk to or eat lunch with or play after class or swim in the lake, and I thought that you'd be a nice friend because you're always so nice. And then in the aquarium yesterday the fish made new friends by collecting shells, and so I thought that I'll do the same with you because you thought it was a brilliant idea.
No! That sounds stupid even in his head; like something Scott would say.
'What is this?' Charles asks eyeing the shell crown in his hands.
'Um…' Instead of answering, Erik holds out the two ends of the string between his thumb and forefinger and holds out the shells in front of Charles. 'For you,' he says nervously, because if Charles doesn't like it, then he may not want to be Erik's friend.
Charles looks at the loop of shells for a moment and breaks into a wide smile. 'For me?'
'Yes. I collected the shells myself from the beach behind the aquarium.' It's a very important for Charles to know that he collected the shells because the Cichlids collect the shells themselves, too.
'Ah, that's why you were missing when Ms. Moira took us on a tour of the shark tank. I was looking for you everywhere!'
'You were looking for me?' Erik asks, surprised, because he didn't think Charles would be.
'Yes, I know how much you like sharks.'
Charles knows he likes sharks?
Before Erik can respond, Charles comes forward and stretches his hands out, and Erik places the shells carefully into the cup of the smaller boy's palms.
'What is it anyway. Can I wear this?' Charles asks enthusiastically, like when he talks about how banana trees are related to humans.
It's a shell crown, Erik wants to say, but then he remembers his Mama's suggestion. Best leave it to Charles to decide what to do with it. 'It's up you. You can wear it as a crown, or a necklace, or a bracelet, or an armband.'
Charles concentrates on the shells in his hands like he concentrates at the math problems on the board, then holds up the string to his neck and ties it's ends clumsily. 'I think I'll wear it as a necklace,' he says with a bright smile. 'Thank you, my friend!'
Charles called him his friend. It worked!
Erik grins. Cichlids are amazing fish. Probably his favourite fish after sharks.
'- Raven was crying for ice cream for two days, so Mr. Andrews has made Earl Grey ice cream today. Do you want to come over?' Charles is asking as he's packing his books and pencils.
His Mama gets either chocolate or vanilla ice cream, so he doesn't know about this new ice cream Charles is talking about, but Erik nods vigorously, because he's Charles' friend now, and they can eat ice cream together.
'Come on, let's get going then-'
'Charles, wait!' Erik says, hesitant to move. The method works only if the intended friend likes the shells, so his friendship with Charles depends on Charles' approval of them. 'Do you like it?'
'Of course,' Charles grins easily, like it were obvious. 'Does it not look nice? I think it's groovy!'
Erik grins smugly. He's thrilled- the shells look brilliant on Charles, he has made a new friend, and best of all, his new friend is Charles! Mama is going to be so happy.
'Perfection,' he says.
*
'A Shark Knight!' Raven blurts before bursting into boisterous laughter.
'Did he say that?' Eddie asks, amusement crinkling the skin further around her grey eyes.
Still consumed by her laughter, Raven nods mutely.
'Well, my Erik was thoroughly convinced that Charles was a Sea Prince till he was in sixth grade,' Eddie provides smugly before biting down on her chicken.
'I'm sitting right here, you know,' Erik interjects. Maybe it was a mistake inviting Raven and his mother for lunch together.
Charles, the bonafide traitor that he is, is chuckling beside Erik, enjoying the conversation immensely.
The two women expertly ignore Erik's protests and get back to pulling his leg.
Oh, it's all in good fun, Erik, Charles soothes when Erik begins to protest again. More shyly, he adds: You didn't tell me that you thought I was a Sea Prince.
You didn't tell me that you thought that I was a Shark Knight either.
'Erik made a Shell Crown as well.' His Mama adds to the background banter.
'Which Charles has been safekeeping for over two decades now,' Raven chimes in all too gleefully.
Charles chuckles into Erik's mind again. You know that the Cichlid fish use that method to attract mates, not to make friends, don't you? Poor Ms. Moira just didn't know how to convey it to her third grade class.
Well, I can't say I fault their system. I got a friend and a mate out of it. Just to prove his point, Erik winds his hand below the table and squeezes Charles' fingers, heating the gold band with his powers.
Charles hums happily. The tale of the Sea Prince and his Shark Knight. We should write a book about it.
I wouldn't be opposed to enacting it out in the bedroom tonight, Erik all but purrs the thought into Charles mind, complete with illustrations.
He smiles smugly when Charles chokes on his wine. And if love comes in the form of primitive marine creatures, who's Erik to complain.
-
On A03 here!
#cherik#cherik fic#kid!cherik#kid fic#Charles Xavier#Erik Lehnsherr#:D#I had loads of fun writing this one#so I hope you guys like it!!#jjcherik
104 notes
·
View notes
Text
2019 Best Japanese OST Press/Repress: Elfen Lied by Tiger Lab Records

Like many late millennials with artistic pretensions, I used to have an “Anituber” channel back in the wild west days of youtube. From 2010-2013 — roughly corresponding with my first three years in university — I reviewed DVD releases from ADV, Manga Entertainment, Central Park Media, and Geneon — all the big players in Western anime releases at the time, all dead and gone now with the rise of streaming. Everyone but Funimation — a sad irony and perhaps telling about the nature of the dubbing industry that the studio with a serial rape problem and established casting couch was the only one to survive.
In the interest of maintaining my personal ethics, posterity, and sanity I’ve long since deleted that channel. While there was definitely a “moment” on the platform for a nineteen year-old cokehead film student in front of a MacBook webcam doing his best Slavoj Zizek impression, that moment has long since passed. I’ve long since cooled on “substantive” media critique anyway. The world doesn’t need another Eisenstein-aligned Marxist analysis of Neon Genesis Evangelion — or, a 6-part series on using Lacanian techniques to develop a leftist praxis for Fate/Stay Night. Media exists in the present moment to be a salve for the postmodern hellscape we inhabit together.
As an interesting sidebar, the most popular video on that channel — raking in just north of 10k views over its lifetime from 2011-2015, was a twelve minute video essay on the 1995 anime Elfen Lied, where I asserted that it was the ultimate expression of contemporary Japanese anti-modern rage. While I don’t find myself particularly nostalgic for any of the content on that channel, I’m actually kind of proud of that one in particular.
While most of my analysis was fixated on the visuals, narrative, and recent oeuvre of its mangaka, Lynn Okamoto, and series director, Mamoru Kanbei, I did lay out a framework on why I consider it to be one of the most successful soundtracks ever produced for an anime. I did not heap this praise lightly, as that roughly fifteen year period of 1995-2010 was bookended by the OSTs of Evangelion and K-On! — and certainly proved to be one of the most sonically iconic periods that the medium has ever produced.
it was also one of the first soundtracks that spurred my own history of Japanese OST collection.
And, then, almost a decade later, I found out that Tiger Lab was releasing a vinyl of Elfen Lied.
In spite of this, when I originally the news, I felt a tinge of trepidation. This is not to throw shade at Tiger Lab, however — but at the reputation of previous releases of the Elfen Lied soundtrack in Japan. A quick adventure with google translate across the Japanese net for various Elfen Lied OST roleases — especially on CD — will reveal for you a lot of contempt from Otaku and anime-enthusiast audiophiles for any number of reasons. Most hinge on the quality of the physicals. This is often because Japanese physical media releases of anime soundtracks are often laden with fresh, exceptionally crisp and clean-sounding masters for CDs, and usually exclusive posters and other content geared toward the “collector” nature of many Otaku. This has usually not been the case with Elfen Lied.
A friend of mine in Kanagawa quipped “Sometimes it sounds better on the DVD” in regard to a number of OST releases of soundtracks from anime produced by Studio Arms with CD releases published by VAP. Admittedly, some of it must have been born in resentment, but I’ve always trusted the man’s opinion — as he’s invested a small family fortune into building a shrine of sorts to that studio’s output. He chalks up the poor release quality to the studio’s inability or lack of funds to master the content properly for a CD or HQ digital release, and VAP’s decline in release quality during the early 2000s roughly corresponding to a sale to another Zaibatsu. “Studio Arms made hentai for many years to stay solvent, maybe they could not send a good master to VAP [the publisher]” he told me. While I can’t know if it’s VAP, Arms or another studio handling the CD-master work, a cursory check of their oeuvre seems to confirm confirms that claim of his — but I acknowledge I’m wandering into uncharted waters here.
In spite of all that — I ordered the wax from Tiger Lab and was duly impressed. In lieu of reviewing each track as per my usual review format, in the following section I want to talk about my listening experience from the two formats I own the soundtrack in — the SA/VAP published CD from 2004 and Tiger Lab’s release. Once we finish going into the core differences — and why this vinyl is absolutely worth your purchase over competing physicals — I’ll go into the virtues of the listening experience on the whole.
Part 1: Comparisons of Select Tracks
I suppose the expectation is that I start off by taking about the most iconic recording from the series — the OP, Lilium. In the spirit of defying expectations, I’ll begin with what I consider a better litmus test.
My personal shit-test for a good master and press is how well it can handle a track that is sonically robust and diverse, crossing genre and form — requiring an intensive, sufficiently wide mix and refined master. You don’t get that on every OST album — but Elfen Lied offers one such potential track in particular, and that particular track happens to be my favorite composition on the entire album. Uso Sora, composed by Kayo Konishi and Yukio Kondo is a truly magnificent piece, and it’s used brilliantly in the series — for those familiar, I only need to quote one line: “M-m-mommy…?”.
It begins with lulling piano chords that gradually build in tempo and energy with the addition of percussion, and then it undergoes a full metamorphosis in its last minute or so to become an aggressive, frenetic techno piece with distorted lows and an angry drum kit. Mirroring the evolution of its subject in the show with understated aplomb, and functioning as a robust and enjoyable composition divorced from its source — it really deserve more recognition than it receives, but I do not doubt it will ever step forth from the massive shadow cast from the haunting chorals of Lilium, and the brilliantly directed visual intro that accompanied it.
Needless to say, Tiger Lab more than passed muster here, to the point where I’m almost blown away by just how good it sounds compared to the rest of my Elfen Lied related physicals. I experienced a definite brightness from the vinyl master over my stereo that I don't get from a lot of other Western label releases, like say Milano, which tends to cash in on a Westerner’s preference for warmth. Tiger Lab deserves credit for this approach, because it genuinely feels like a more authentically “Japanese” sound. In my experience, the Western labels that care the most about the dedicated audiophile adhere to this sonic profile, and Tiger Lab deserves all due credit here.
Finally, I might as well include my thoughts on Lilium. In short, it sounds fantastic. The mix here really brings out the most of the chorals, and provides crisp and clean sounds where you want them most. It’s also one of those tracks where you can just feel the dynamic range before you even hear it. I ended up listening to these on my Cambridges, and I’ve got to say that’s there’s something in the way they treat this particular profile of song — strongly vocal dominated, extremely muted piano, and supporting string inhabiting the negative space — absolutely incredibly. It put the KEFs to shame. I’ve always asserted that you’ve got to pair certain songs with certain speaker pairs. I’ve never been a huge devotional music guy, and I’m not entirely sure that the Cambridge or KEFs provide ideal profiles for the track. That said, Lilium sounds great anyway.
But I can envision these on a pair of high end Yamahas, or a pair of vintage Blaupunkt bookshelves sounding as stone-cold killer as Lucy when Kouta’s threatened.
I sent a rip to my friend Hiroshi, the StudioArms Shrine man, who immediately snapped up a copy after listening. I also learned that it was actually the first vinyl purchase he’s ever made after two decades of serious collecting. So perhaps that is a testament in and of itself!
Part 2: Physicality
I rarely devote an entire section to talking about the vinyl/OBI itself, but then again, Tiger Lab has put out a release certainly worthy of this. First off, the cover, which pairs perfectly with the overall aesthetic of both the series and previous soundtrack releases. I can imagine this being a release that has already attracted some attention by Japanese collectors, as the cover seems to tap into a certain sense of continuity that I know are a huge hit with that community. It certainly pairs well with my two releases from VAP, and a laserdisc set that I have. They all opt for that very iconic Klimt Vienna Secession style with appropriate creative flourishes — but I like Tiger Lab’s take on it the most. The side characters populating the back in a choral array reminiscent of the Beethoven Frieze is also a really nice touch for any enthusiast of the fin-de-siècle style.
I picked up the pink vinyl on release, one of the few pink vinyls that I’ve bought that at least feels thematically consistent with the release and not just a default “vaporwave” or “city pop” or “future funk” styling. Diclonii rock the pink hair, after all. That all said, I’m wishing now that I got the “metallic gold” edition, as its another color that feels both apropos and stunningly beautiful. With all that in mind, this is also one of the better waxes that I’ve felt in-hand, and manages to feel robust. I’ve yet to find specific info, but it certainly feels like a 180g.
In conclusion, I’ve got to give immense credit to Tiger Lab for handling this release with a class and vigor that few Japanese publishers have given it. It certainly bodes well for the future of anime releases on vinyl, and makes me eager to fill out an emergent collection.
7 notes
·
View notes
Text
How to Make Jirou’s Earjacks
I figured I’d make a tutorial for those who want to make realistic earjacks that can be flimsy enough to twirl (1st image) and firm enough to bend for posing (2nd image). This was my first time experimenting with silicone and latex, so if you have any tips for me, let me know! Unfortunately I don’t have a ton of pictures because this stuff works quickly and I was in a time crunch for a convention, so i’ll tried to be detailed when needed (these images were a test run, the final result is on my Instagram at Sakine-cosplay).


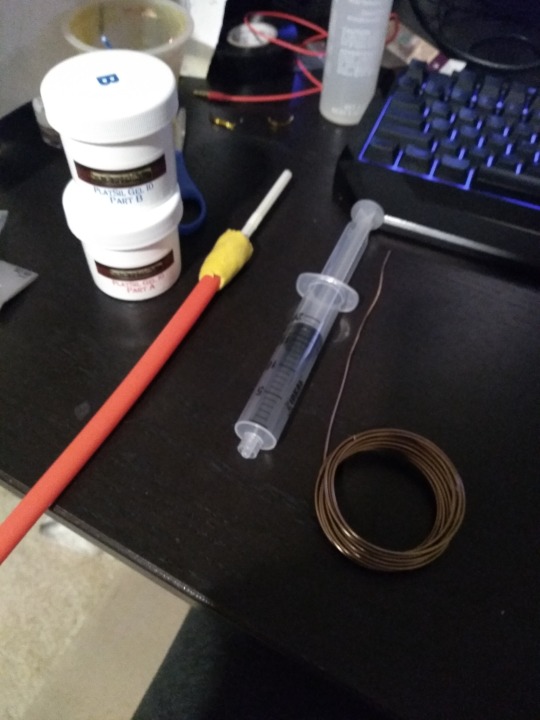
Materials (with apprx cost):
1. Platsil Gel 10 silicone ($17) https://www.ebay.com/itm/M00511-150-MOREZMORE-Try-PlatSil-Gel-10-Pourable-Silicone-Rubber-Liquid-150-g/142987077241?hash=item214ab1a679:g:-FgAAOSw2JxboBja
2. Flesh colored pigment ($5) https://www.ebay.com/itm/Concentrated-Silicone-Pigment-Flesh-Peach-Platsil-Gel/372628136273?hash=item56c25e2151:g:G38AAOSwyedbIBG8 (If you’re skin tone is darker than this, I’d suggest searching for brown pigment, I couldn’t find a skin tone set to share, but just a little goes a long way so i’d suggest one of the two)
3. Mold release spray ($11) (I bought my Castin Craft spray at Hobby Lobby. Look for coupons online!)
4. Rubber straw ($4 for a set at Target)
5. Regular straw (free at many fast food restaurants)
6. Wire ($3 optional but necessary for posing) https://www.hobbylobby.com/Beads-Jewelry/Bead-Stringing-Chains/Beading-Wire/Aluminum-Wire---22-Gauge/p/JL85073 (I threw out the package, so i forget exactly which size it is. I want to guess size 20 or 22. Go to Hobby Lobby or your craft store and feel the difference. It should be easy to bend, but strong enough to hold its shape)
7. Amazing Mold Putty kit ($8-$20) You don’t need a lot, but they only sell one size for about $20. It’s good if you plan on using more in the future, however, I’m including a link I found that gives you 4oz for $8. If used wisely it should be enough. https://www.etsy.com/listing/594123659/make-your-own-silicone-mold-food-safe?gpla=1&gao=1&utm_campaign=shopping_us_ClayPaperScissors_sfc_osa&utm_medium=cpc&utm_source=google&utm_custom1=0&utm_content=16561831&gclid=CjwKCAjw67XpBRBqEiwA5RCocd4_HioObmZud-27R8H16b_djgqcI3uObN-7GqEf1Vq5AqGV_6hDexoC7REQAvD_BwE
8. Liquid Latex ($8 at Walmart)
9. Earring studs ($3-$5) (if your ears are pierced, it helps with support, if not, only use latex. WARNING: make sure the back of the studs are not super tight on the posts. Try sliding them back and forth and see if it glides. Loosen the backs manually if they are very tight by gently pulling it apart)
10. Earphone/Aux jacks (x2) ($1-$5 each) (I used two headphones jacks as long as they aren’t the L shape)
11. Wire cutters ($2-$5) or see if you can borrow them from someone
12. Tape and scissors (look at a dollar store, I used electrical tape for flexibility)
13. Small mixing cups (x3)
14. Popsicle sticks or something similar to stir
15. Sandwich baggies (2-3)
16. Very small disposable measuring cups (x2) (check dollar store)
17. Piece of carboard/plastic/newspaper to work on top of (it’s gonna get messy, a thicker material is best if you have it)
18. Q-tips (preferably the pointy ones they use on nails)
19. Vaseline (travel size should be cheap)
20. Hair dryer
(you can ignore the syringe in the picture. The amount of pressure it created inside didn’t allow me to use it with the material because of how thick it was, I replaced it with a baggy as a piping bag)
Step 1: Use the mold putty to create the earjack shape.
Since we are using a rubber straw (tube) to create the extended lobes, we need to enlarge the nub at the end (that yellow bit in the above image). If you look at your headphones/aux cord you’ll see the nub that that connects the wire to the plug is larger, so we need to make that so we can attach it.
-Take a small amount of your molding putty in a 1:1 ratio (equal amounts) and use your hands to mush them together and blend it until its a light yellow.
-Once evenly mixed, flatten it until its about 1.5″ (inches) wide (measure it out, you may under estimate how small an inch is) and then pull it until its long enough to fully wrap around the rubber tube. You don’t want it to be too thin, make sure it’s about 1/8″.
-Wrap it around the edge like shown in the above image. Smooth out the end that is covering the body, as if blending it into the tube (not where the tube ends, other side), that way its less likely any silicone will leak through later.
-Wait about 30 minutes or so until it hardens to a rubber like texture (try lightly pinching it towards the bottom and see if it tries to return to its shape)
- Once it’s done, you’re gonna have a bit of a difficult time wiggling the tube out of it. Be patient, just squish and pull it until its out (it should look similar to the one a couple images down).
Step 2: Align the wire to the center of the tube.
This part depends on how bendable you want them to be. For mine, I used wire that went down one fully for posing, and the other about a 3rd of the way so it could be adjusted by the ear if necessary and 2/3rds of it flimsy and flesh-like. You can also opt to not use wire at all, but you wont be able to pose it (although without wire will make it a lot easier to apply to your ears due to the lack of weight. Even for the flimsy one, I still use a little bit of wire just in case, but its not necessary). If you don’t want it to pose, skip step 2 and step 5.
-Using the wire cutters, either cut about 4″ of wire for a partial pose, or cut enough to match the same length of the tube for full pose.
-Find a small flat surface that you can tape one end of the tube to (small square of cardboard works well. You can probably use one of the containers your materials came in). Take the cut wire and tape it so it is standing vertically on the flat square as straight as possible (I’m sorry I dont have a picture of this). Try not to have the tape too far up the wire since it will be poured over with silicone. Try bunching layers of it at the bottom to reinforce it instead.

Step 3: Cut the tube
-Take the yellow jack nub you created and slide it over one end of the tube. Make sure there’s at least one full inch that hangs over the tube edge, that’s the part that will be filled in (so only 1/2″ should actually be covering the tube).
-With the yellow nub attached, take scissors and make a straight cut through the yellow nub and the tube all the way towards the end, but leave about 1/2″ at the end uncut. This will help make sure the tube closes evenly since it’s still intact (nubless cut tube shown above). Now you can easily take the nub off, but I suggest leaving it on whenever you can so the seams from the cut stay aligned.
Step 4: Apply mold release and liquid latex
This next process is what takes the most time to do.
-Following the instructions on the bottle, shake the mold release well and then spray a couple inches of the inside of the tube, covering the center and edges completely. I find it easier to do sections at a time and keep it held open under a fan until it dries since its hard to keep the entire tube spread open.
-Shake, spray, and let dry until you have the entire tube coated. Make sure to spray enough at the end that isn’t cut so the bottom doesnt stick.
-Repeat this at least one more time (3 times total to be safe). The silicone doesn’t let go of the rubber very easily and sometimes will prefer to rip off if there’s not enough mold release applied, so if you are patient enough, spray multiple layers along the center and edges of the inside.
- Once 2-3+ coatings are applied, make sure the inside seams and the top seam is also covered.
Unfortunately silicone doesn’t like to separate from the mold putty, even with the mold release, so we’re going to use a layer of liquid latex to cover the inside of the yellow nub. This is IMPORTANT because without a full coat, the putty will attach to the silicone and you will need to cut it off, which we don’t want. I usually went back and forth between adding layers of latex and spraying mold release depending on when they dried so they can be worked on at the same time.
- Take the nub off the tube. I recommend using the small mixer tool they include with the silicone to apply the liquid latex. Dip the tool into the latex and only add a thick stripe starting at one side (starting from one end of the seam to the other end on the inside of the tube). You don’t want to coat the entire thing in one go because its round and the latex will spread out and bunch in the center. Also, when applying, be quick about it since it starts to dry relatively quickly. If you’re smoothing it out as it dries, it can begin sticking to the spreader and mess up the coat. The latex on the spreader will dry, make sure to remove it before each coating.
-Once the first portion is dried, slowly make your way coating (and drying) until there’s an even coat all inside the nub. It doesnt need to be a thick layer as long as the entire surface is covered. If you add too much thickness if could dry unevenly and make it look lumpy, so try to keep it smooth.
-Apply a layer of latex to the top of the nub and along the seam (save the inside of the seam for last). Once the inside is done, the outside edges are done, then we can apply a coat to the seam area where the nub was actually cut. We save this for last because if the two seams touch (even when dry), they’ll want to stick, and we don’t want that yet. All of these areas are being coated because its going to get messy and its better to have everything covered so there’s no accidental sticking. The only spots we aren’t covering are the outside center and bottom of the nub since silicone shouldn’t reach there (although its still good to add a little to the bottom just in case)
-Once the seams have their layers dry, make sure to keep them spread apart, if they touch you may need to peel that portion off and redo it.
-Add a spritz of the demold spray to the inside.
Step 5: Attach wire and tube
- Take the uncut end of the tube and place it over the standing wire and feed it through until the end meets the taped stand (you can tape the tube closed if it makes it easier). Now the wire is inside the tube and the bottom should be as close to the cardboard as possible.
-Look through the top of the tube down the tub to see where the wire is. You can gently move the tube around until you see the wire is in the center (if the wire isn’t straight enough, bend it until it is), if the wire is leaning against the side, then it will puncture through the silicone since it wont be coated properly.
-Once you think its centered enough, tape the tube to the flat surface the wire is attached to. Make sure the bottom of the tube is as flat as it can be so silicone doesnt seep through. Tape around it thoroughly.
-With your tube sprayed down and the nub coated, wrap the nub back over the tube (1/2″ covering the tube, 1″ hanging over) and align the seams, BUT DONT press the seams together yet, keep the nub open. You can tape the bottom of the nub to the straw so it doesnt move around.
Step 6: Mold your ear
-Using the mold putty again, make another small 1:1 mixture. Depending how much you have left from the nub, use about half each to mix together.
-Once blended- flatten it a bit, choose an ear, and wrap it around the earlobe (If you are not doing earrings, this step is optional). You dont need to cover a lot of the ear, just make sure to get it around the base of the ear, and the front and back of the lobe. If you make it too tall/big, we can always cut it down a bit.
-Hold/press it to your earlobe for at least 30 minutes while it sets. The finished product are the yellow pieces in the image below (one for each ear, make sure to label them with a marker RF-Right Front and LF-Left Front for later)
- These are also made out of the putty so they also need coats of latex within the entire mold (thats why they look shiny).

Step 6: Prepare your station
Now that the tube itself is prepped, we need to get the rest of the station prepped because once you mix the silicone it begins to dry quickly, so we don’t want any mistakes.
-Make several precut tape stripes (10 to be safe) and have them ready nearby (about the length of your thumb)
-Lay out your newspaper/cardboard for your work area
-Take the cords/earbuds you’re using for the plug tips and cut it as close to the tip as possible (most likely need to cut where the nub starts, so you have a nub and a tip).
-Cut just over an inch off from the regular straw and set the larger amount aside
- Have your baggy, regular straw (inch), mixing cups (3), measuring cups (2), and mixing materials nearby.
- Mark each of your mixing cups/measuring cups as A, B, and C (no C for measuring cups). Do the same if you’re using Popsicle sticks, otherwise make sure you keep the mixing items separated).
-Lay down the tube so the open seam is facing upwards. You will fill it like this and tape it closed as you work.
Step 7: Mix the Silicone/pigment
We don’t have a lot of silicone, so we need to be careful with how much we use at a time. I actually had to buy a second batch since i was new to it.
-Using your measuring cups and separate mixing sticks, pour about a third of the corresponding container into it (Part A to A cup, Part B to B cup.
-Open your pigment container. A little goes a long way, so start with just a small dot at a time and mix it into the Part A cup. Your ears tend to be darker than you might think since it has red mixed in it (feel free to buy some red pigment flecks if you want, but i think its unnecessary for this since the silicone wont blend well anyway when applying it)
-Once you think you have your skin tone, add a bit more until its a tone darker. Mixing it with Part B will lighten it up again. It doesnt have to be a perfect match, but make sure its not too light or you’ll see a big difference (compare my skin to the test i made in the first image).
-Add half of A and half of B into the corresponding mixing cups. Now we have 1/2 in the mixing cups and 1/2 in the measuring cups. Since it tends to dry quickly, and you dont want to work too fast, we’ll use half of the mixture at a time. Once you finish the first half, you can quickly mix up the second premade half and finish it. But make sure to keep some off to the side, we’re filling the tube and nub separately. It will be the same color so there should be no blending issues.
-It can be done by yourself, but if you have an extra pair of hands, I highly recommend getting help.
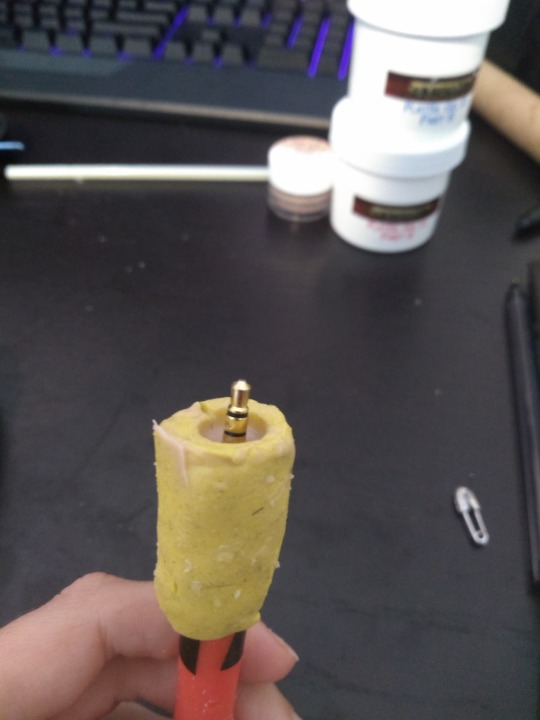
Step 8: Mixing and filling the tube
Before taking these steps, I highly suggest reading through them first to get familiar with what you will need to do so you don’t waste time.
-Pour the Parts A and B from the mixing cups into the C mixing cup and use the C mixing stick to stir it.
-Stir quickly and thoroughly to make sure its blended. If you still think you need a bit more pigment, carefully add a bit more, but try not to do this so we keep both mixtures the same tone. It’s harder to do that when you add extra color separately.
-Once it’s mixed, carefully take the mixing cup and pour it into a sandwich baggy as close to the corner as possible using your mixing stick. Make sure to push all the mix to the corner so it’s tightly packed and can be used as a piping bag.
-Cut a very small hole at the corner of the baggy (small enough to fit within a regular straw opening. Which is very small. This way the mix won’t overflow out of it from a large opening). If you have a friend available, have them hold open the tube and be in charge of closing it as you pipe in the silicone. If it is only you, use one hand to hold open the tube while the other pipes it in. It will be messy.
-Starting from the bottom of the tube (taped), you’re going to open the nearest seam and insert the piping bag into it as far as you can and squeeze the mixture towards the end until it fills up. Basically squeeze until you see it coming towards the seam.
-Continue slow piping underneath the wire until it begins to fill to the top.
-As you pipe, let the seams close as evenly as they can and take a piece of tape and throw it over the seam to keep it in place. You can go over it with more tape after you finish. As you close the seam along the way, it will seep through the seam. That’s fine, you’d rather have too much mix instead of air bubbles from not being filled enough.Just try to smooth out the top of the seam from the mix so its only a thin layer of silicone instead of a gob. the tape will stick better and you can try to push the mix into the tube.
- As you pipe and tape up the tube, keep the wire in mind and make sure you’re piping under it so it’s not touching the tube itself.
-It’s likely you’ll run out midway. Now you can take an equal portion of A and B of the the premade mixture into cup C (Don’t use all of it, just enough to fill the tube, not the nub.). While that mixes, if you have a friend, have them fix up the tape and make sure the seams are smooth.
-Once the next batch it mixed, add it to the piping bag. If you noticed the old mix beginning to harden already, use the other corner of the baggy to pipe. Remember, cut a very small hole.
-Only fill up to the other end of the tube where the nub starts. Once you get to that point, you can tape that up as well as the press the nub seams together (make sure it’s pressed evenly for a seamless seam). Now that the tube is full of silicone mix, feel free to tape the nub together and add more tape to secure the seam.
-Once everything is taped up, let the tube stand vertically and lean it against something where it won’t fall over (I had a cardboard tube that fit over it to keep it straight while it leaned lightly against my monitor. Try to have items surround it to keep it standing straight).
- After about a half hour, it should be firm enough that liquid wont spill out (check any leftovers in the C cup and see how firm it is, it should be similiar), so you can now mix the remaining mixture and add it to a new piping bag (or a clean corner).
-Cut a very small hole. This time you will use the inch long straw to help pipe the mix through the nub from the top.
- With the hole cut, place the straw into the nub (make sure there's still enough sticking out so you can hold it.) and place the baggy tip (with its tiny hole) over the top of it. You will be filling it vertically from the nub opening.
-Pipe the mix into the straw and slowly bring it up as it fills. By using the straw, it ensures no air bubbles from where you left off. If you run low of mix in the bag, remember to squeeze out the mix trapped in the straw.
- DO NOT fill it to the top of the nub, stop short.
Step 9: Insert the jack tip
- Once it is 85% full, while still holding it vertically, take the jack tip you cut off earlier and slowly insert it into the middle of the mix from the top until only the metal it showing (image above). If you get some mix on the metal, you can peel it off, but try to keep it clean.
- Hold the jack tip steady so as much metal is showing while hiding the nub attached to it. This requires patience, you cannot let it move until it hardens after a few minutes. If you let it go, it will sink down. If you tilt it to the side to make it straight, make sure to check all the sides. It’s best to hold it by the tip if possible to ensure it stays int he middle and doesnt move.
Step 10: Opening the tube and touch ups
After about a half hour, you can check the top of the nub to check the firmness (remember, check the C cup to check the firmness without touching the actual pieve first).
-Once it is done setting, you can remove all the tape.
-Carefully and slowly begin to pry open the nub seam. You may need to cut it a little if its resistant.
- As you open the nub, the latex should peel off with the silicone. peel the latex off once detached.
-Very delicately, wedge open the seam for the tube. Depending on how even and how much it was sprayed will decide how easily it comes off. sometimes there are tough spots that want to stick, you need to slowly pull at it and use your finger to jab at the stuck silicone to nudge it off. If you pull too much it may rip, so pull and nudge. Take your time if needed, it will be a waste if you rush this part.
-As you gently make your way down, you can undo the tape securing the tube to the flat surface to free it along with the wire.
-Once it’s all freed, snip off the end to make it flat (use wire cutters to snip excess wire).
-As long as everything came out okay, you can use scissors to cut the seam excess. Boom, main body is done
(If you have bubbles, tears, or other issues, it’s possible to make a small of amount of mix, recoat the tube in spray, pipe a thin line down the center, and use that as a layer to cover up imperfections, but you need to make sure the skin tone matches up, so make sure you have references to match it. This isn’t recommended because it makes the earjacks thicker and only complicates it more, but when trying to cover imperfections in other ways, it didnt turn out smooth and it came out shiny which was noticeable. Use only if needed.)
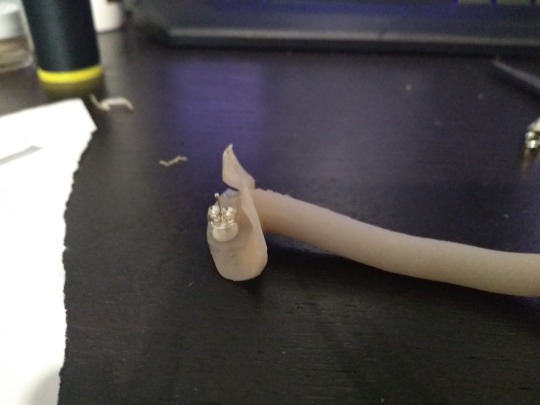
Step 11: Add the earlobes
-Now that the main body is done, use the same process for the ear molds. Make sure they are properly coated with latex, spray the demold in it.
-Make small batches for the ear and apply thin layers, one side at a time. If its too thick, it will build up and make it thick along the bottom instead.
-Continue on the front, back, and bottom of the ear until if has a decent thickness to it from several layers.
-Once done setting, remove it along with the latex.
-Take the main body and the lobe, and see how they should line up in the mirror for where you should attach them.
- Cut out a slit on the top of the end of the body where the lobe will be attached. This way it will sit in a small slit comfortably instead of on top of it.
- Mix more silicone to use as glue. You shouldn’t need that much. Add some in the sit before placing the lobe there, and around both of them to help blend the lobe of body together. Once done, it will look like the image above (minus the earring).
Step 12: Add the earring studs
-Go back to the mirror and see approximately where the stud should go on the inside of the lobe where it fits in your ear. If you don’t have earrings, skip this step.
WARNING: make sure the back of the studs are not super tight on the posts. Try sliding them back and forth and see if it glides. Loosen the backs manually if they are very tight by gently pulling it apart. It will be impossible to take them off if they are super tight, please check and adjust them before testing them out. Once they slide easily on the posts with minimal friction, then you can try them on and go from there.
-Make another very small batch of silicone and place the stud where it belongs on the inside of the front of the lobe. Use the silicone as glue to attach the stud all around it (make sure the stud is attached to the front so the pole can go through your ear and to the back). It should look like the image above when dried.
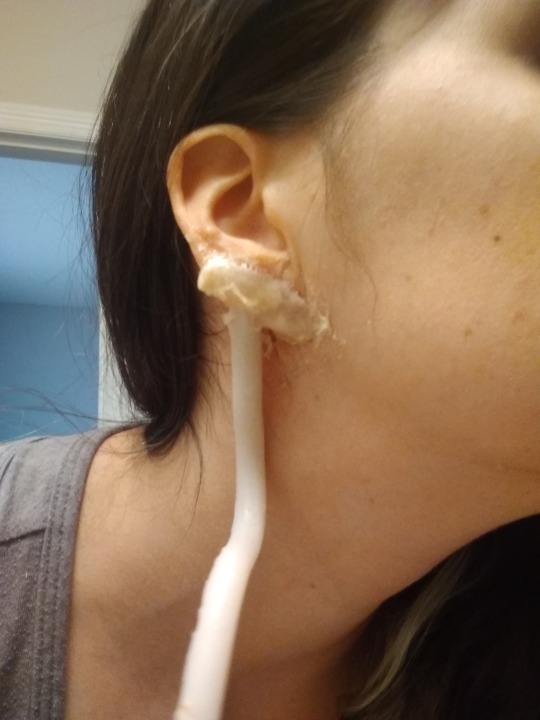
Step 13: Attaching the earjack to your ear
I know it doesnt look pretty, but your wig should cover it anyway. This also takes a long time (about an hour each ear from my experience)
-Pull your hair up away from your ears (wig cap is best)
-Generously apply Vaseline all over your ear (front, back, sides and bottom) and an inch or so around it by your jaw and hair line. This is the only way you will get the latex to come off without absolutely ripping all your facial hair off.
-Align the correct earjack to the correct ear.
-With a Q-tip (preferably the pointed ones they use on nails), take a bit of latex and apply it inside the edges of the lobe on both sides of the earring stud. Make sure not to get any on the earring itself, only the edges of the lobe
-With the wet latex, insert your ear to fit within the piece properly and push the earring through and secure it with the backing.
-With one hand, hold the lobe in place so the edges are as close to your ear as possible for the best seamless fit. Let it dry for ten or so minutes.
-Once the inside dried a little bit, take the Q-tip and apply a layer of latex around the seam on the lobe and on your ear. MAKE SURE to not add latex to the earring! otherwise you’re gluing it to yourself. You want the latex and your earring always separate.
-Let it dry using the hairdryer on cool. It’s best to wait until its completely dry before adding a new layer.
-Keep adding thin layers and letting them dry. Add latex along the seams in the front, along the bottom, and along the top where the lobe is suppose to blend in. You can add a little bit to the back as long as it does not touch your earring, you might want help with this part (If you’re not wearing earrings, just slather the latex on everywhere, but still in layers).
After layers upon layers, it’s done! Just repeat the process for the second one. Be careful though, latex will fall off after awhile if it moves around too much. The more layers and the more ear it’s attached to, the better, but I still had issues when using them. It’s not comfortable when they start coming off and hard to fix on your own if you’re at a con. When taking it off, just start peeling off the latex and take off the earring. It’s still probably gonna hurt a bit, but not nearly as much if you didn’t use the Vaseline. It’s not gonna be blend in very nicely, and make up didn’t work well for me, but rely on the wig to cover that and try to take front facing pictures.
For the flimsy ones, it’s a little easier. Full wired ears take more latex and more time to dry because of the added weight. (then again, the one i made was thicker overall so that probably didn’t help). For the wired ones, I suggest making a pose where you can walk around and have the wire rest against your collarbone. I kept the wire straight down until it was resting against me, then curved it up and forward like a U shape, then twisted the jack-tip from there. The U is what sits on your collerbone though which helps support it’s weight. To see some examples (if I posted them) you can see me finished cosplay at Sakine-cosplay on Instagram.
It’s not perfect, but it served me well for the con (as long as you have time in the morning). If you have any suggestions on how to improve it, let me know! If you have any problems or questions feel free to ask. And if you make some or any other silicone related projects you may have used this for, I’d love to see how they turn out!
#cosplay#props#makeup#costume#jirou kyouka#tutorial#my hero academia#boku no hero academia#earphone jack#mha#bnha#how to#my art#convention
11 notes
·
View notes
Text

How To String Align Your Wheels with QuickString from QuickTrick Alignment!
Proper wheel alignment is crucial for optimal vehicle performance, tire longevity, and safety. However, aligning your wheels at a professional shop can be costly and time-consuming. Fortunately, with the 5th Gen QuickTrick QuickString 4-Wheel Kit from QuickTrick Alignment, you can easily perform wheel alignment at home with accuracy and affordability.
In this blog post, we will guide you through string aligning your wheels using the QuickString kit, ensuring precise alignment for your vehicle.
Components of the QuickTrick QuickString 4-Wheel Kit
Before we dive into how to do a string alignment with Quick Trick string alignment kit, let's familiarize ourselves with the components included in the QuickTrick QuickString 4-Wheel Kit:
Caster/Camber Verticals: These vertical bars help you measure the caster and camber angles accurately.
Toe Bars with QuickTrick Stringer and String: The toe bars, along with the stringer and string, allow you to measure the toe angle of each tire. It is recommended to position the string as close to the edge of the tire as possible without being too long.
QuickTrick Digital Gauge: A digital gauge is a crucial tool for measuring various alignment angles, including caster, camber, toe, and thrust angle.
Gauge Attachment Brackets: These brackets attach the digital gauge securely to the toe bars.
Attachment Pins with Caps and Allen Wrench: The attachment pins connect the toe bars with the digital gauge brackets. The caps ensure a secure connection, and the Allen wrench helps tighten them.
QuickTrick Backup Bungees: The backup bungees provide additional stability by keeping the toe bars in place during the alignment process.
QuickTrick Carrying Case: This handy carrying case lets you conveniently store and transport the QuickString kit.
Alignment Process with QuickTrick QuickString
Step 1: Set up the equipment
Begin by assembling the QuickString kit according to the provided instructions. Attach the caster/camber verticals to each wheel and secure them tightly. Then, connect the toe bars to the verticals using the attachment pins and brackets. Ensure all connections are secure.
Step 2: Position the strings
Extend the strings from the toe bars and align them as close to the edge of each tire as possible without being too long. Make sure the strings are taut and parallel to the vehicle's centerline.
Step 3: Measure caster, camber, and toe
Using the QuickTrick digital gauge, measure the caster and camber angles by aligning the gauge with the corresponding verticals. Adjust the alignment as necessary to achieve the desired values. Next, measure the toe angle by observing the string's position relative to the tire at the front and rear. Adjust the tie rods until the toe angles meet the specifications provided by your vehicle manufacturer.
Step 4: Check the thrust angle
The QuickTrick QuickString 5th Gen kit allows you to check the thrust angle, which helps square your vehicle. Use the digital gauge to measure the thrust angle, ensuring it aligns with the desired specifications. Adjust the rear axle if needed to achieve proper alignment.
Step 5: Repeat for all wheels
Repeat the alignment process for all four wheels, adjusting as necessary to achieve the desired caster, camber, toe, and thrust angles.
By following these steps and using the QuickTrick QuickString 4-Wheel Kit, you can perform accurate wheel alignments at home without needing expensive equipment or professional assistance.
Regularly checking and maintaining proper wheel alignment will improve your vehicle's performance and extend the life of your tires. Consider your vehicle's manual for specific alignment specifications and recommended intervals for alignment checks. If you are a DIY car alignment enthusiast, get your QuickTrick String kit today. Check it out now!
Visit here- https://quicktrickalignment.com/product/qsb/
#quicktrick string kit#quick string alignment kit#string alignment kit#string alignment#how to do a string alignment
0 notes
Text
The Best Sushi Roller for 2021
The Best Sushi Roller for 2021
Your Ultimate Guide to Sushi Rollers
Sushi is arguably the most popular Japanese dish outside of Japan. This traditional dish is composed of vinegared rice with sugar and salt, along with vegetables and often raw seafood wrapped up in a neat little roll. Sushi making is an art, and Sushi chefs are the masters that make each roll with a deliciously amazing, melt-in-your-mouth quality.
While sushi making can seem complicated — and it is — did you know that you can still try your hand at making your own sushi at home? Here are the best sushi rollers that can make home-made roll-making easy peasy!
In a Hurry? This is the Best Sushi Roll Maker:
AYA Bazooka

Click here for best price!
Our Overall Rating:
4/5
Make your rolls in an instant with the use of the AYA Bazooka! With this handy tool, you won’t have to fumble around in your kitchen just to make delicious and presentable sushi. Having this roll bazooka can turn you into a magician in the kitchen, and you’ll be able to have rolls anytime you want.
It’s something convenient to use: just open up the bazooka, fill it with your preferred ingredients, close it up, and with a push, you’ll have a perfectly-shaped roll without all the mess. More than that, this set from AYA also includes a mat, a paddle, spreader, chopsticks, and even a premium-grade knife.
Which Sushi Roll Maker is Best?
THE BEST OVERALL
AYA Bazooka Kit
Check Price
This sushi making kit is probably all you’ll ever need when making your own rolls at home. With the use of the sushi bazooka, all you’ll have to do is fill its inside…
BEST BAZOOKA

Camp Chef Sushezi
Check Price
If you’re looking for a no-frills bazooka roller, then this one’s for you. The Sushezi is simple to use and straight to the point. Creating…
BEST KIT

SushiQuik Sushi Making Kit
Check Price
Roll making kits have everything and anything you need to be able to make the perfect rolls in your very own kitchen. A highly-rated product…
BEST ROLLER

EasySushi 3.5cm Roller
Check Price
If making multiple professional-looking rolls in minutes is what you need, then this item is the one for you. The EasySushi roller allows you to make rolls…
BEST SHAPER

Meidong Sushi Shaper
Check Price
Find the traditional circular rolls too ordinary and want to liven things up? These Meidong shaping molds are the ones that you need! Made for beginners…
BEST FOR BEGINNERS

Leifheit Perfect Roll Machine
Check Price
There are numerous choices when it comes to rollers, but if you’re a beginner looking for a quick and easy product to make your rolls, this item from Leifheit can help you…
MOST VERSATILE

INOO Rolling Tool
Check Price
There are several items that you can use to make your rolls, but not all of them can also be used for other food products. The INOO roller is an item that lets you roll…
BEST MINI ROLLER

Billioteam Roll Maker
Check Price
Craving for rolls but don’t want to make numerous ones that you won’t end up eating at all? A mini roller is what you need! With the Billioteam roll maker…
BEST BUDGET

Daiso Rice Roller
Check Price
Here’s a unique way to make a roll without all those fancy contraptions! There are a ton of shops out there that offer affordable products, but Daiso is truly that…
BEST MAT

Pat & Doris Plastic Sushi Mat
Check Price
Here’s the simplest device that you can use to make your rolls. The Pat & Doris rolling mat is made from a food-grade PP material and has a non-stick surface…
What is a Sushi Roller Called?
A traditional roller used is called a makisu, which is a bamboo mat woven with cotton string. It’s usually used for sushi, however it can also be used to shape other soft food and can also be used to squeeze excess liquid from food.
Do You Need a Sushi Roller to Make Sushi?
You don’t exactly need a roller. However, not using any may not result in the best-looking sushi. It may not even hold up together if you don’t use a tool to close and seal your roll perfectly.
How Much is a Sushi Roller?
Bamboo mats can have a price as low as $2 USD while other tools can go for as high as $30 USD or more.
Can You Roll Sushi by Hand?
Yes, you can. But instead of perfectly rolled sushi, what you’ll make instead is temaki, or a hand roll. This type is usually a seaweed shaped like a cone wrapped around rice and various fillings.
How Do You Roll Sushi Step by Step?
Here’s a step by step on rolling sushi at home with the use of a bamboo sushi mat.
Step 1. Place a sheet of nori (seaweed) on your mat. Make sure that the rough side is facing up.
Step 2. Spread your sushi rice on top. It should evenly cover near the edge and about an inch from the far edge. Make sure to keep your hands wet as you spread the rice.
Step 3. Place your ingredients in a line, beginning from the near edge of your rice layer. Each ingredient should be its own line.
Step 4. Using your thumbs, hold the edge of the mat. Begin with the edge that has your first ingredient. Lift the nori and fold it over your first ingredient.
Step 5. Make sure to keep the ingredients sticking together as you continue to roll.
Step 6. Remove the mat as you continue to roll. Roll slowly so that it will be even.
Step 7. Tighten the roll with the use of the mat. Roll it back and forth in the mat to tighten and seal it more.
Step 8. Let the roll sit for a minute so that the grains can moisten the nori, lessening the risk of tearing.
Step 9. Cut your roll with a sharp, wet knife. Serve.
Best Sushi Rollers
ImageProductDetailsCheck Price
AYA Bazooka Kit• Comes as a set • Convenient • Proportionally-made rolls

Camp Chef Sushezi• Create rolls in an instant • Easy to use • Can also be used for other food
SushiQuik Sushi Making Kit • All-in-one set • Comes with a variety of tools • Comes with a free recipe book
EasySushi 3.5cm Roller• For long, multiple rolls • User-friendly • Durable
Meidong Sushi Shaper • Make sushi in various shapes • Easy to clean • Family-friendly
Leifheit Perfect Roll Machine• Beginner-friendly • Quick to use • Made with food-grade materials
INOO Rolling Tool• Can be used for other food • Convenient • Can be washed easily
Billioteam Roll Maker • For small quantities • Quick and easy • Washer-friendly
Daiso Rice Roller• Very affordable • Easy to use • Clean up is a breeze
Pat & Doris Plastic Sushi Mat • Non-stick design • Comes in various colors • Dishwasher-safe
#footable_7925.ninja_stacked_table > tbody, #footable_7925.ninja_stacked_table { background: transparent !important; } #footable_7925 td.ninja_column_0 { text-align: center; }#footable_7925 th.ninja_column_0 { text-align: center; }#footable_7925 td.ninja_column_1 { text-align: center; }#footable_7925 th.ninja_column_1 { text-align: center; }#footable_7925 td.ninja_column_2 { text-align: left; }#footable_7925 th.ninja_column_2 { text-align: center; }#footable_7925 td.ninja_column_3 { text-align: center; }#footable_7925 th.ninja_column_3 { text-align: center; }
Let’s Go Over Each Sushi Roll Maker
Best Overall: AYA Bazooka
Click here for best price!
Our Overall Rating:
4/5
This sushi making kit is probably all you’ll ever need when making your own rolls at home. With the use of the sushi bazooka, all you’ll have to do is fill its inside with your favorite ingredients. Once you push it out from the bazooka, your ingredients are now in a perfect tight roll.
The only thing you’ll have to do is to wrap it up in nori, cut, and serve! This package also includes more accessories, including a makisu, a rice paddle and spreader, chopsticks, and an AYA premium grade sushi knife.
Pros and Cons of the AYA Bazooka
ProsCons✔️ Comes as a set ✔️ Easy to use ✔️ Makes perfect rolls ✖️ Expensive
#footable_7925.ninja_stacked_table > tbody, #footable_7925.ninja_stacked_table { background: transparent !important; } #footable_7925 td.ninja_column_0 { text-align: center; }#footable_7925 th.ninja_column_0 { text-align: center; }#footable_7925 td.ninja_column_1 { text-align: center; }#footable_7925 th.ninja_column_1 { text-align: center; }#footable_7925 td.ninja_column_2 { text-align: left; }#footable_7925 th.ninja_column_2 { text-align: center; }#footable_7925 td.ninja_column_3 { text-align: center; }#footable_7925 th.ninja_column_3 { text-align: center; } #footable_7936.ninja_stacked_table > tbody, #footable_7936.ninja_stacked_table { background: transparent !important; } #footable_7936 td.ninja_column_0 { text-align: left; }#footable_7936 th.ninja_column_0 { text-align: center; }#footable_7936 td.ninja_column_1 { text-align: left; }#footable_7936 th.ninja_column_1 { text-align: center; }#footable_7936 thead tr th.ninja_column_0,#footable_7936 tbody tr td.ninja_column_0{ background-color: rgba(137, 218, 129, 1); }#footable_7936 thead tr th.ninja_column_1,#footable_7936 tbody tr td.ninja_column_1{ background-color: rgba(227, 96, 96, 1); }
Best Bazooka: Camp Chef Sushezi
Click here for best price!
Our Overall Rating:
3.8/5
If you’re looking for a no-frills bazooka roller, then this one’s for you. The Sushezi is simple to use and straight to the point. Creating perfectly-formed rolls is easy and quick with this reliable tool.
Simply open up the bazooka, fill it with your choice of ingredients, push it out, and voila! Out comes an excellently-made roll that you can just lay over nori, wrap, and cut. The Sushezi bazooka can also be used to create a variety of dessert items.
Pros and Cons of the Sushezi
ProsCons✔️ Creates perect rolls ✔️ Convenient ✔️ Can be used for desserts ✖️ Pricey
#footable_7925.ninja_stacked_table > tbody, #footable_7925.ninja_stacked_table { background: transparent !important; } #footable_7925 td.ninja_column_0 { text-align: center; }#footable_7925 th.ninja_column_0 { text-align: center; }#footable_7925 td.ninja_column_1 { text-align: center; }#footable_7925 th.ninja_column_1 { text-align: center; }#footable_7925 td.ninja_column_2 { text-align: left; }#footable_7925 th.ninja_column_2 { text-align: center; }#footable_7925 td.ninja_column_3 { text-align: center; }#footable_7925 th.ninja_column_3 { text-align: center; } #footable_7936.ninja_stacked_table > tbody, #footable_7936.ninja_stacked_table { background: transparent !important; } #footable_7936 td.ninja_column_0 { text-align: left; }#footable_7936 th.ninja_column_0 { text-align: center; }#footable_7936 td.ninja_column_1 { text-align: left; }#footable_7936 th.ninja_column_1 { text-align: center; }#footable_7936 thead tr th.ninja_column_0,#footable_7936 tbody tr td.ninja_column_0{ background-color: rgba(137, 218, 129, 1); }#footable_7936 thead tr th.ninja_column_1,#footable_7936 tbody tr td.ninja_column_1{ background-color: rgba(227, 96, 96, 1); } #footable_7937.ninja_stacked_table > tbody, #footable_7937.ninja_stacked_table { background: transparent !important; } #footable_7937 td.ninja_column_0 { text-align: left; }#footable_7937 th.ninja_column_0 { text-align: center; }#footable_7937 td.ninja_column_1 { text-align: left; }#footable_7937 th.ninja_column_1 { text-align: center; }#footable_7937 thead tr th.ninja_column_0,#footable_7937 tbody tr td.ninja_column_0{ background-color: rgba(137, 218, 129, 1); }#footable_7937 thead tr th.ninja_column_1,#footable_7937 tbody tr td.ninja_column_1{ background-color: rgba(227, 96, 96, 1); }
Best Kit: SushiQuik Sushi Making Kit
Click here for best price!
Our Overall Rating:
3.7/5
Roll making kits have everything and anything you need to be able to make the perfect rolls in your very own kitchen. A highly-rated product with rave reviews is the SushiQuik making kit. It includes a silicone mat, a rice paddle, a roll slicer, and even a detailed sushi recipe book to help you create your own restaurant-quality rolls.
The roll slicer ensures you get evenly proportioned rolls, making them presentable. Each item in the set is easy to use and easy to wash as well.
Pros and Cons of the SushiQuik
ProsCons✔️ Comes as a set ✔️ Includes various tools ✔️ Includes a free recipe book with cooking details ✖️ Pricey
#footable_7925.ninja_stacked_table > tbody, #footable_7925.ninja_stacked_table { background: transparent !important; } #footable_7925 td.ninja_column_0 { text-align: center; }#footable_7925 th.ninja_column_0 { text-align: center; }#footable_7925 td.ninja_column_1 { text-align: center; }#footable_7925 th.ninja_column_1 { text-align: center; }#footable_7925 td.ninja_column_2 { text-align: left; }#footable_7925 th.ninja_column_2 { text-align: center; }#footable_7925 td.ninja_column_3 { text-align: center; }#footable_7925 th.ninja_column_3 { text-align: center; } #footable_7936.ninja_stacked_table > tbody, #footable_7936.ninja_stacked_table { background: transparent !important; } #footable_7936 td.ninja_column_0 { text-align: left; }#footable_7936 th.ninja_column_0 { text-align: center; }#footable_7936 td.ninja_column_1 { text-align: left; }#footable_7936 th.ninja_column_1 { text-align: center; }#footable_7936 thead tr th.ninja_column_0,#footable_7936 tbody tr td.ninja_column_0{ background-color: rgba(137, 218, 129, 1); }#footable_7936 thead tr th.ninja_column_1,#footable_7936 tbody tr td.ninja_column_1{ background-color: rgba(227, 96, 96, 1); } #footable_7937.ninja_stacked_table > tbody, #footable_7937.ninja_stacked_table { background: transparent !important; } #footable_7937 td.ninja_column_0 { text-align: left; }#footable_7937 th.ninja_column_0 { text-align: center; }#footable_7937 td.ninja_column_1 { text-align: left; }#footable_7937 th.ninja_column_1 { text-align: center; }#footable_7937 thead tr th.ninja_column_0,#footable_7937 tbody tr td.ninja_column_0{ background-color: rgba(137, 218, 129, 1); }#footable_7937 thead tr th.ninja_column_1,#footable_7937 tbody tr td.ninja_column_1{ background-color: rgba(227, 96, 96, 1); } #footable_7938.ninja_stacked_table > tbody, #footable_7938.ninja_stacked_table { background: transparent !important; } #footable_7938 td.ninja_column_0 { text-align: left; }#footable_7938 th.ninja_column_0 { text-align: center; }#footable_7938 td.ninja_column_1 { text-align: left; }#footable_7938 th.ninja_column_1 { text-align: center; }#footable_7938 thead tr th.ninja_column_0,#footable_7938 tbody tr td.ninja_column_0{ background-color: rgba(137, 218, 129, 1); }#footable_7938 thead tr th.ninja_column_1,#footable_7938 tbody tr td.ninja_column_1{ background-color: rgba(227, 96, 96, 1); }
Best Roller: EasySushi 3.5cm Roller
Click here for best price!
Our Overall Rating:
3.5/5
If making multiple professional-looking rolls in minutes is what you need, then this item is the one for you. The EasySushi roller allows you to make rolls as long as 24 centimeters so that you can make multiple rolls in an instant.
It includes a reusable traction sheet for you to create your rolls. Made in France, this roller is constructed with food grade plastic that can be easily cleaned and is even dishwasher safe. EasySushi claims that it can be used by novices and even kitchen connoisseurs.
Pros and Cons of the EasySushi
ProsCons✔️ Can make long rolls ✔️ Easy to use ✔️ Durable ✖️ Expensive ✖️ Traction sheet may need to be replaced over time
#footable_7925.ninja_stacked_table > tbody, #footable_7925.ninja_stacked_table { background: transparent !important; } #footable_7925 td.ninja_column_0 { text-align: center; }#footable_7925 th.ninja_column_0 { text-align: center; }#footable_7925 td.ninja_column_1 { text-align: center; }#footable_7925 th.ninja_column_1 { text-align: center; }#footable_7925 td.ninja_column_2 { text-align: left; }#footable_7925 th.ninja_column_2 { text-align: center; }#footable_7925 td.ninja_column_3 { text-align: center; }#footable_7925 th.ninja_column_3 { text-align: center; } #footable_7936.ninja_stacked_table > tbody, #footable_7936.ninja_stacked_table { background: transparent !important; } #footable_7936 td.ninja_column_0 { text-align: left; }#footable_7936 th.ninja_column_0 { text-align: center; }#footable_7936 td.ninja_column_1 { text-align: left; }#footable_7936 th.ninja_column_1 { text-align: center; }#footable_7936 thead tr th.ninja_column_0,#footable_7936 tbody tr td.ninja_column_0{ background-color: rgba(137, 218, 129, 1); }#footable_7936 thead tr th.ninja_column_1,#footable_7936 tbody tr td.ninja_column_1{ background-color: rgba(227, 96, 96, 1); } #footable_7937.ninja_stacked_table > tbody, #footable_7937.ninja_stacked_table { background: transparent !important; } #footable_7937 td.ninja_column_0 { text-align: left; }#footable_7937 th.ninja_column_0 { text-align: center; }#footable_7937 td.ninja_column_1 { text-align: left; }#footable_7937 th.ninja_column_1 { text-align: center; }#footable_7937 thead tr th.ninja_column_0,#footable_7937 tbody tr td.ninja_column_0{ background-color: rgba(137, 218, 129, 1); }#footable_7937 thead tr th.ninja_column_1,#footable_7937 tbody tr td.ninja_column_1{ background-color: rgba(227, 96, 96, 1); } #footable_7938.ninja_stacked_table > tbody, #footable_7938.ninja_stacked_table { background: transparent !important; } #footable_7938 td.ninja_column_0 { text-align: left; }#footable_7938 th.ninja_column_0 { text-align: center; }#footable_7938 td.ninja_column_1 { text-align: left; }#footable_7938 th.ninja_column_1 { text-align: center; }#footable_7938 thead tr th.ninja_column_0,#footable_7938 tbody tr td.ninja_column_0{ background-color: rgba(137, 218, 129, 1); }#footable_7938 thead tr th.ninja_column_1,#footable_7938 tbody tr td.ninja_column_1{ background-color: rgba(227, 96, 96, 1); } #footable_7939.ninja_stacked_table > tbody, #footable_7939.ninja_stacked_table { background: transparent !important; } #footable_7939 td.ninja_column_0 { text-align: left; }#footable_7939 th.ninja_column_0 { text-align: center; }#footable_7939 td.ninja_column_1 { text-align: left; }#footable_7939 th.ninja_column_1 { text-align: center; }#footable_7939 thead tr th.ninja_column_0,#footable_7939 tbody tr td.ninja_column_0{ background-color: rgba(137, 218, 129, 1); }#footable_7939 thead tr th.ninja_column_1,#footable_7939 tbody tr td.ninja_column_1{ background-color: rgba(227, 96, 96, 1); }
Best Shaper: Meidong Sushi Shaper
Click here for best price!
Our Overall Rating:
3.5/5
Find the traditional circular rolls too ordinary and want to liven things up? These Meidong shaping molds are the ones that you need! Made for beginners and professionals, these shapers can provide professional-looking rolls with a unique touch.
Aside from the circular roller, this set includes a rectangle shape, square, heart, triangle, semicircle, fan, and even an animal shape. With your choice of roller, simply lay down your ingredients, tighten it with the appropriate cover, slice, and you’ll have the shaped rolls that you desire. The set also includes a spatula and a serving fork.
Pros and Cons of the Meidong Shaper
ProsCons✔️ Offers various shape molds ✔️ Easy to use ✔️ Easy to clean ✖️ Pricey
#footable_7925.ninja_stacked_table > tbody, #footable_7925.ninja_stacked_table { background: transparent !important; } #footable_7925 td.ninja_column_0 { text-align: center; }#footable_7925 th.ninja_column_0 { text-align: center; }#footable_7925 td.ninja_column_1 { text-align: center; }#footable_7925 th.ninja_column_1 { text-align: center; }#footable_7925 td.ninja_column_2 { text-align: left; }#footable_7925 th.ninja_column_2 { text-align: center; }#footable_7925 td.ninja_column_3 { text-align: center; }#footable_7925 th.ninja_column_3 { text-align: center; } #footable_7936.ninja_stacked_table > tbody, #footable_7936.ninja_stacked_table { background: transparent !important; } #footable_7936 td.ninja_column_0 { text-align: left; }#footable_7936 th.ninja_column_0 { text-align: center; }#footable_7936 td.ninja_column_1 { text-align: left; }#footable_7936 th.ninja_column_1 { text-align: center; }#footable_7936 thead tr th.ninja_column_0,#footable_7936 tbody tr td.ninja_column_0{ background-color: rgba(137, 218, 129, 1); }#footable_7936 thead tr th.ninja_column_1,#footable_7936 tbody tr td.ninja_column_1{ background-color: rgba(227, 96, 96, 1); } #footable_7937.ninja_stacked_table > tbody, #footable_7937.ninja_stacked_table { background: transparent !important; } #footable_7937 td.ninja_column_0 { text-align: left; }#footable_7937 th.ninja_column_0 { text-align: center; }#footable_7937 td.ninja_column_1 { text-align: left; }#footable_7937 th.ninja_column_1 { text-align: center; }#footable_7937 thead tr th.ninja_column_0,#footable_7937 tbody tr td.ninja_column_0{ background-color: rgba(137, 218, 129, 1); }#footable_7937 thead tr th.ninja_column_1,#footable_7937 tbody tr td.ninja_column_1{ background-color: rgba(227, 96, 96, 1); } #footable_7938.ninja_stacked_table > tbody, #footable_7938.ninja_stacked_table { background: transparent !important; } #footable_7938 td.ninja_column_0 { text-align: left; }#footable_7938 th.ninja_column_0 { text-align: center; }#footable_7938 td.ninja_column_1 { text-align: left; }#footable_7938 th.ninja_column_1 { text-align: center; }#footable_7938 thead tr th.ninja_column_0,#footable_7938 tbody tr td.ninja_column_0{ background-color: rgba(137, 218, 129, 1); }#footable_7938 thead tr th.ninja_column_1,#footable_7938 tbody tr td.ninja_column_1{ background-color: rgba(227, 96, 96, 1); } #footable_7939.ninja_stacked_table > tbody, #footable_7939.ninja_stacked_table { background: transparent !important; } #footable_7939 td.ninja_column_0 { text-align: left; }#footable_7939 th.ninja_column_0 { text-align: center; }#footable_7939 td.ninja_column_1 { text-align: left; }#footable_7939 th.ninja_column_1 { text-align: center; }#footable_7939 thead tr th.ninja_column_0,#footable_7939 tbody tr td.ninja_column_0{ background-color: rgba(137, 218, 129, 1); }#footable_7939 thead tr th.ninja_column_1,#footable_7939 tbody tr td.ninja_column_1{ background-color: rgba(227, 96, 96, 1); } #footable_7940.ninja_stacked_table > tbody, #footable_7940.ninja_stacked_table { background: transparent !important; } #footable_7940 td.ninja_column_0 { text-align: left; }#footable_7940 th.ninja_column_0 { text-align: center; }#footable_7940 td.ninja_column_1 { text-align: left; }#footable_7940 th.ninja_column_1 { text-align: center; }#footable_7940 thead tr th.ninja_column_0,#footable_7940 tbody tr td.ninja_column_0{ background-color: rgba(137, 218, 129, 1); }#footable_7940 thead tr th.ninja_column_1,#footable_7940 tbody tr td.ninja_column_1{ background-color: rgba(227, 96, 96, 1); }
Best for Beginners: Leifheit Perfect Roll Machine
Click here for best price!
Our Overall Rating:
3.5/5
There are numerous choices when it comes to rollers, but if you’re a beginner looking for a quick and easy product to make your rolls, this item from Leifheit can help you out. This roller comes with a mold that you can easily fit your ingredients into.
All you’ll need to do is pull the lever to tighten them all up together, pull up the end tab to finish, and you’ll have an ideal quality roll in your hands. This item from Chonshop uses food-grade polypropylene so you can be sure that your rolls are definitely safe and non-toxic.
Pros and Cons of the Leifheit Perfect Roll
ProsCons✔️ Can be used by beginners ✔️ Quick to use ✖️ Need to cut nori to size
#footable_7925.ninja_stacked_table > tbody, #footable_7925.ninja_stacked_table { background: transparent !important; } #footable_7925 td.ninja_column_0 { text-align: center; }#footable_7925 th.ninja_column_0 { text-align: center; }#footable_7925 td.ninja_column_1 { text-align: center; }#footable_7925 th.ninja_column_1 { text-align: center; }#footable_7925 td.ninja_column_2 { text-align: left; }#footable_7925 th.ninja_column_2 { text-align: center; }#footable_7925 td.ninja_column_3 { text-align: center; }#footable_7925 th.ninja_column_3 { text-align: center; } #footable_7936.ninja_stacked_table > tbody, #footable_7936.ninja_stacked_table { background: transparent !important; } #footable_7936 td.ninja_column_0 { text-align: left; }#footable_7936 th.ninja_column_0 { text-align: center; }#footable_7936 td.ninja_column_1 { text-align: left; }#footable_7936 th.ninja_column_1 { text-align: center; }#footable_7936 thead tr th.ninja_column_0,#footable_7936 tbody tr td.ninja_column_0{ background-color: rgba(137, 218, 129, 1); }#footable_7936 thead tr th.ninja_column_1,#footable_7936 tbody tr td.ninja_column_1{ background-color: rgba(227, 96, 96, 1); } #footable_7937.ninja_stacked_table > tbody, #footable_7937.ninja_stacked_table { background: transparent !important; } #footable_7937 td.ninja_column_0 { text-align: left; }#footable_7937 th.ninja_column_0 { text-align: center; }#footable_7937 td.ninja_column_1 { text-align: left; }#footable_7937 th.ninja_column_1 { text-align: center; }#footable_7937 thead tr th.ninja_column_0,#footable_7937 tbody tr td.ninja_column_0{ background-color: rgba(137, 218, 129, 1); }#footable_7937 thead tr th.ninja_column_1,#footable_7937 tbody tr td.ninja_column_1{ background-color: rgba(227, 96, 96, 1); } #footable_7938.ninja_stacked_table > tbody, #footable_7938.ninja_stacked_table { background: transparent !important; } #footable_7938 td.ninja_column_0 { text-align: left; }#footable_7938 th.ninja_column_0 { text-align: center; }#footable_7938 td.ninja_column_1 { text-align: left; }#footable_7938 th.ninja_column_1 { text-align: center; }#footable_7938 thead tr th.ninja_column_0,#footable_7938 tbody tr td.ninja_column_0{ background-color: rgba(137, 218, 129, 1); }#footable_7938 thead tr th.ninja_column_1,#footable_7938 tbody tr td.ninja_column_1{ background-color: rgba(227, 96, 96, 1); } #footable_7939.ninja_stacked_table > tbody, #footable_7939.ninja_stacked_table { background: transparent !important; } #footable_7939 td.ninja_column_0 { text-align: left; }#footable_7939 th.ninja_column_0 { text-align: center; }#footable_7939 td.ninja_column_1 { text-align: left; }#footable_7939 th.ninja_column_1 { text-align: center; }#footable_7939 thead tr th.ninja_column_0,#footable_7939 tbody tr td.ninja_column_0{ background-color: rgba(137, 218, 129, 1); }#footable_7939 thead tr th.ninja_column_1,#footable_7939 tbody tr td.ninja_column_1{ background-color: rgba(227, 96, 96, 1); } #footable_7940.ninja_stacked_table > tbody, #footable_7940.ninja_stacked_table { background: transparent !important; } #footable_7940 td.ninja_column_0 { text-align: left; }#footable_7940 th.ninja_column_0 { text-align: center; }#footable_7940 td.ninja_column_1 { text-align: left; }#footable_7940 th.ninja_column_1 { text-align: center; }#footable_7940 thead tr th.ninja_column_0,#footable_7940 tbody tr td.ninja_column_0{ background-color: rgba(137, 218, 129, 1); }#footable_7940 thead tr th.ninja_column_1,#footable_7940 tbody tr td.ninja_column_1{ background-color: rgba(227, 96, 96, 1); } #footable_7941.ninja_stacked_table > tbody, #footable_7941.ninja_stacked_table { background: transparent !important; } #footable_7941 td.ninja_column_0 { text-align: left; }#footable_7941 th.ninja_column_0 { text-align: center; }#footable_7941 td.ninja_column_1 { text-align: left; }#footable_7941 th.ninja_column_1 { text-align: center; }#footable_7941 thead tr th.ninja_column_0,#footable_7941 tbody tr td.ninja_column_0{ background-color: rgba(137, 218, 129, 1); }#footable_7941 thead tr th.ninja_column_1,#footable_7941 tbody tr td.ninja_column_1{ background-color: rgba(227, 96, 96, 1); }
Most Versatile: INOO Rolling Tool
Click here for best price!
Our Overall Rating:
3.2/5
There are several items that you can use to make your rolls, but not all of them can also be used for other food products. The INOO roller is an item that lets you roll not just sushi but your other favorites as well. It’s also suitable for vegetables, meat, grape leaves, cabbages, and the like.
It’s a time saver too. With this, you don’t have to roll each food one by one, making your time in the kitchen greatly efficient. The INOO roller is easy to use as well. Simply put your nori in the flat area, spoon a little of your ingredients inside, push the lever, and finish.
Pros and Cons of the INOO Rolling Tool
ProsCons✔️ Can be used for other food items ✔️ Convenient ✖️ Must not overload with ingredients
#footable_7925.ninja_stacked_table > tbody, #footable_7925.ninja_stacked_table { background: transparent !important; } #footable_7925 td.ninja_column_0 { text-align: center; }#footable_7925 th.ninja_column_0 { text-align: center; }#footable_7925 td.ninja_column_1 { text-align: center; }#footable_7925 th.ninja_column_1 { text-align: center; }#footable_7925 td.ninja_column_2 { text-align: left; }#footable_7925 th.ninja_column_2 { text-align: center; }#footable_7925 td.ninja_column_3 { text-align: center; }#footable_7925 th.ninja_column_3 { text-align: center; } #footable_7936.ninja_stacked_table > tbody, #footable_7936.ninja_stacked_table { background: transparent !important; } #footable_7936 td.ninja_column_0 { text-align: left; }#footable_7936 th.ninja_column_0 { text-align: center; }#footable_7936 td.ninja_column_1 { text-align: left; }#footable_7936 th.ninja_column_1 { text-align: center; }#footable_7936 thead tr th.ninja_column_0,#footable_7936 tbody tr td.ninja_column_0{ background-color: rgba(137, 218, 129, 1); }#footable_7936 thead tr th.ninja_column_1,#footable_7936 tbody tr td.ninja_column_1{ background-color: rgba(227, 96, 96, 1); } #footable_7937.ninja_stacked_table > tbody, #footable_7937.ninja_stacked_table { background: transparent !important; } #footable_7937 td.ninja_column_0 { text-align: left; }#footable_7937 th.ninja_column_0 { text-align: center; }#footable_7937 td.ninja_column_1 { text-align: left; }#footable_7937 th.ninja_column_1 { text-align: center; }#footable_7937 thead tr th.ninja_column_0,#footable_7937 tbody tr td.ninja_column_0{ background-color: rgba(137, 218, 129, 1); }#footable_7937 thead tr th.ninja_column_1,#footable_7937 tbody tr td.ninja_column_1{ background-color: rgba(227, 96, 96, 1); } #footable_7938.ninja_stacked_table > tbody, #footable_7938.ninja_stacked_table { background: transparent !important; } #footable_7938 td.ninja_column_0 { text-align: left; }#footable_7938 th.ninja_column_0 { text-align: center; }#footable_7938 td.ninja_column_1 { text-align: left; }#footable_7938 th.ninja_column_1 { text-align: center; }#footable_7938 thead tr th.ninja_column_0,#footable_7938 tbody tr td.ninja_column_0{ background-color: rgba(137, 218, 129, 1); }#footable_7938 thead tr th.ninja_column_1,#footable_7938 tbody tr td.ninja_column_1{ background-color: rgba(227, 96, 96, 1); } #footable_7939.ninja_stacked_table > tbody, #footable_7939.ninja_stacked_table { background: transparent !important; } #footable_7939 td.ninja_column_0 { text-align: left; }#footable_7939 th.ninja_column_0 { text-align: center; }#footable_7939 td.ninja_column_1 { text-align: left; }#footable_7939 th.ninja_column_1 { text-align: center; }#footable_7939 thead tr th.ninja_column_0,#footable_7939 tbody tr td.ninja_column_0{ background-color: rgba(137, 218, 129, 1); }#footable_7939 thead tr th.ninja_column_1,#footable_7939 tbody tr td.ninja_column_1{ background-color: rgba(227, 96, 96, 1); } #footable_7940.ninja_stacked_table > tbody, #footable_7940.ninja_stacked_table { background: transparent !important; } #footable_7940 td.ninja_column_0 { text-align: left; }#footable_7940 th.ninja_column_0 { text-align: center; }#footable_7940 td.ninja_column_1 { text-align: left; }#footable_7940 th.ninja_column_1 { text-align: center; }#footable_7940 thead tr th.ninja_column_0,#footable_7940 tbody tr td.ninja_column_0{ background-color: rgba(137, 218, 129, 1); }#footable_7940 thead tr th.ninja_column_1,#footable_7940 tbody tr td.ninja_column_1{ background-color: rgba(227, 96, 96, 1); } #footable_7941.ninja_stacked_table > tbody, #footable_7941.ninja_stacked_table { background: transparent !important; } #footable_7941 td.ninja_column_0 { text-align: left; }#footable_7941 th.ninja_column_0 { text-align: center; }#footable_7941 td.ninja_column_1 { text-align: left; }#footable_7941 th.ninja_column_1 { text-align: center; }#footable_7941 thead tr th.ninja_column_0,#footable_7941 tbody tr td.ninja_column_0{ background-color: rgba(137, 218, 129, 1); }#footable_7941 thead tr th.ninja_column_1,#footable_7941 tbody tr td.ninja_column_1{ background-color: rgba(227, 96, 96, 1); } #footable_7945.ninja_stacked_table > tbody, #footable_7945.ninja_stacked_table { background: transparent !important; } #footable_7945 td.ninja_column_0 { text-align: left; }#footable_7945 th.ninja_column_0 { text-align: center; }#footable_7945 td.ninja_column_1 { text-align: left; }#footable_7945 th.ninja_column_1 { text-align: center; }#footable_7945 thead tr th.ninja_column_0,#footable_7945 tbody tr td.ninja_column_0{ background-color: rgba(137, 218, 129, 1); }#footable_7945 thead tr th.ninja_column_1,#footable_7945 tbody tr td.ninja_column_1{ background-color: rgba(227, 96, 96, 1); }
Best Mini Roller: Billioteam Roll Maker
Click here for best price!
Our Overall Rating:
3/5
Craving for rolls but don’t want to make numerous ones that you won’t end up eating at all? A mini roller is what you need! With the Billioteam roll maker, you can make as few as two pieces of rolls and never have any go to waste.
It’s also convenient to use and you’ll be able to make rolls in a short amount of time. This roller from Billioteam is made from durable plastic material, making it easy to wash as well.
Pros and Cons of the Billioteam Roll Maker
ProsCons✔️ For small quantities of rolls ✔️ Quick and easy ✖️ Must not overload with ingredients
#footable_7925.ninja_stacked_table > tbody, #footable_7925.ninja_stacked_table { background: transparent !important; } #footable_7925 td.ninja_column_0 { text-align: center; }#footable_7925 th.ninja_column_0 { text-align: center; }#footable_7925 td.ninja_column_1 { text-align: center; }#footable_7925 th.ninja_column_1 { text-align: center; }#footable_7925 td.ninja_column_2 { text-align: left; }#footable_7925 th.ninja_column_2 { text-align: center; }#footable_7925 td.ninja_column_3 { text-align: center; }#footable_7925 th.ninja_column_3 { text-align: center; } #footable_7936.ninja_stacked_table > tbody, #footable_7936.ninja_stacked_table { background: transparent !important; } #footable_7936 td.ninja_column_0 { text-align: left; }#footable_7936 th.ninja_column_0 { text-align: center; }#footable_7936 td.ninja_column_1 { text-align: left; }#footable_7936 th.ninja_column_1 { text-align: center; }#footable_7936 thead tr th.ninja_column_0,#footable_7936 tbody tr td.ninja_column_0{ background-color: rgba(137, 218, 129, 1); }#footable_7936 thead tr th.ninja_column_1,#footable_7936 tbody tr td.ninja_column_1{ background-color: rgba(227, 96, 96, 1); } #footable_7937.ninja_stacked_table > tbody, #footable_7937.ninja_stacked_table { background: transparent !important; } #footable_7937 td.ninja_column_0 { text-align: left; }#footable_7937 th.ninja_column_0 { text-align: center; }#footable_7937 td.ninja_column_1 { text-align: left; }#footable_7937 th.ninja_column_1 { text-align: center; }#footable_7937 thead tr th.ninja_column_0,#footable_7937 tbody tr td.ninja_column_0{ background-color: rgba(137, 218, 129, 1); }#footable_7937 thead tr th.ninja_column_1,#footable_7937 tbody tr td.ninja_column_1{ background-color: rgba(227, 96, 96, 1); } #footable_7938.ninja_stacked_table > tbody, #footable_7938.ninja_stacked_table { background: transparent !important; } #footable_7938 td.ninja_column_0 { text-align: left; }#footable_7938 th.ninja_column_0 { text-align: center; }#footable_7938 td.ninja_column_1 { text-align: left; }#footable_7938 th.ninja_column_1 { text-align: center; }#footable_7938 thead tr th.ninja_column_0,#footable_7938 tbody tr td.ninja_column_0{ background-color: rgba(137, 218, 129, 1); }#footable_7938 thead tr th.ninja_column_1,#footable_7938 tbody tr td.ninja_column_1{ background-color: rgba(227, 96, 96, 1); } #footable_7939.ninja_stacked_table > tbody, #footable_7939.ninja_stacked_table { background: transparent !important; } #footable_7939 td.ninja_column_0 { text-align: left; }#footable_7939 th.ninja_column_0 { text-align: center; }#footable_7939 td.ninja_column_1 { text-align: left; }#footable_7939 th.ninja_column_1 { text-align: center; }#footable_7939 thead tr th.ninja_column_0,#footable_7939 tbody tr td.ninja_column_0{ background-color: rgba(137, 218, 129, 1); }#footable_7939 thead tr th.ninja_column_1,#footable_7939 tbody tr td.ninja_column_1{ background-color: rgba(227, 96, 96, 1); } #footable_7940.ninja_stacked_table > tbody, #footable_7940.ninja_stacked_table { background: transparent !important; } #footable_7940 td.ninja_column_0 { text-align: left; }#footable_7940 th.ninja_column_0 { text-align: center; }#footable_7940 td.ninja_column_1 { text-align: left; }#footable_7940 th.ninja_column_1 { text-align: center; }#footable_7940 thead tr th.ninja_column_0,#footable_7940 tbody tr td.ninja_column_0{ background-color: rgba(137, 218, 129, 1); }#footable_7940 thead tr th.ninja_column_1,#footable_7940 tbody tr td.ninja_column_1{ background-color: rgba(227, 96, 96, 1); } #footable_7941.ninja_stacked_table > tbody, #footable_7941.ninja_stacked_table { background: transparent !important; } #footable_7941 td.ninja_column_0 { text-align: left; }#footable_7941 th.ninja_column_0 { text-align: center; }#footable_7941 td.ninja_column_1 { text-align: left; }#footable_7941 th.ninja_column_1 { text-align: center; }#footable_7941 thead tr th.ninja_column_0,#footable_7941 tbody tr td.ninja_column_0{ background-color: rgba(137, 218, 129, 1); }#footable_7941 thead tr th.ninja_column_1,#footable_7941 tbody tr td.ninja_column_1{ background-color: rgba(227, 96, 96, 1); } #footable_7945.ninja_stacked_table > tbody, #footable_7945.ninja_stacked_table { background: transparent !important; } #footable_7945 td.ninja_column_0 { text-align: left; }#footable_7945 th.ninja_column_0 { text-align: center; }#footable_7945 td.ninja_column_1 { text-align: left; }#footable_7945 th.ninja_column_1 { text-align: center; }#footable_7945 thead tr th.ninja_column_0,#footable_7945 tbody tr td.ninja_column_0{ background-color: rgba(137, 218, 129, 1); }#footable_7945 thead tr th.ninja_column_1,#footable_7945 tbody tr td.ninja_column_1{ background-color: rgba(227, 96, 96, 1); } #footable_7946.ninja_stacked_table > tbody, #footable_7946.ninja_stacked_table { background: transparent !important; } #footable_7946 td.ninja_column_0 { text-align: left; }#footable_7946 th.ninja_column_0 { text-align: center; }#footable_7946 td.ninja_column_1 { text-align: left; }#footable_7946 th.ninja_column_1 { text-align: center; }#footable_7946 thead tr th.ninja_column_0,#footable_7946 tbody tr td.ninja_column_0{ background-color: rgba(137, 218, 129, 1); }#footable_7946 thead tr th.ninja_column_1,#footable_7946 tbody tr td.ninja_column_1{ background-color: rgba(227, 96, 96, 1); }
Best Budget: Daiso Rice Roller
Click here for best price!
Our Overall Rating:
3/5
Here’s a unique way to make a roll without all those fancy contraptions! There are a ton of shops out there that offer affordable products, but Daiso is truly that one-stop shop for all the Japanese knick-knacks that you want and need. The store has categories for almost everything — be it the kitchen, office supplies, clothing, plants, pets, home decor, beauty, and more.
Among all their offers is this wonder of a roller called the roll shaker. To make your rolls, simply fill the shaker with your ingredients and shake for about 20 times. Insert the sheet of nori in the thin slot, shake again, and voila, you now have your perfectly made roll!
Pros and Cons of the Daiso Roller
ProsCons✔️ Highly affordable price ✔️ Convenient ✖️ Nori might be difficult to slip in slot
#footable_7925.ninja_stacked_table > tbody, #footable_7925.ninja_stacked_table { background: transparent !important; } #footable_7925 td.ninja_column_0 { text-align: center; }#footable_7925 th.ninja_column_0 { text-align: center; }#footable_7925 td.ninja_column_1 { text-align: center; }#footable_7925 th.ninja_column_1 { text-align: center; }#footable_7925 td.ninja_column_2 { text-align: left; }#footable_7925 th.ninja_column_2 { text-align: center; }#footable_7925 td.ninja_column_3 { text-align: center; }#footable_7925 th.ninja_column_3 { text-align: center; } #footable_7936.ninja_stacked_table > tbody, #footable_7936.ninja_stacked_table { background: transparent !important; } #footable_7936 td.ninja_column_0 { text-align: left; }#footable_7936 th.ninja_column_0 { text-align: center; }#footable_7936 td.ninja_column_1 { text-align: left; }#footable_7936 th.ninja_column_1 { text-align: center; }#footable_7936 thead tr th.ninja_column_0,#footable_7936 tbody tr td.ninja_column_0{ background-color: rgba(137, 218, 129, 1); }#footable_7936 thead tr th.ninja_column_1,#footable_7936 tbody tr td.ninja_column_1{ background-color: rgba(227, 96, 96, 1); } #footable_7937.ninja_stacked_table > tbody, #footable_7937.ninja_stacked_table { background: transparent !important; } #footable_7937 td.ninja_column_0 { text-align: left; }#footable_7937 th.ninja_column_0 { text-align: center; }#footable_7937 td.ninja_column_1 { text-align: left; }#footable_7937 th.ninja_column_1 { text-align: center; }#footable_7937 thead tr th.ninja_column_0,#footable_7937 tbody tr td.ninja_column_0{ background-color: rgba(137, 218, 129, 1); }#footable_7937 thead tr th.ninja_column_1,#footable_7937 tbody tr td.ninja_column_1{ background-color: rgba(227, 96, 96, 1); } #footable_7938.ninja_stacked_table > tbody, #footable_7938.ninja_stacked_table { background: transparent !important; } #footable_7938 td.ninja_column_0 { text-align: left; }#footable_7938 th.ninja_column_0 { text-align: center; }#footable_7938 td.ninja_column_1 { text-align: left; }#footable_7938 th.ninja_column_1 { text-align: center; }#footable_7938 thead tr th.ninja_column_0,#footable_7938 tbody tr td.ninja_column_0{ background-color: rgba(137, 218, 129, 1); }#footable_7938 thead tr th.ninja_column_1,#footable_7938 tbody tr td.ninja_column_1{ background-color: rgba(227, 96, 96, 1); } #footable_7939.ninja_stacked_table > tbody, #footable_7939.ninja_stacked_table { background: transparent !important; } #footable_7939 td.ninja_column_0 { text-align: left; }#footable_7939 th.ninja_column_0 { text-align: center; }#footable_7939 td.ninja_column_1 { text-align: left; }#footable_7939 th.ninja_column_1 { text-align: center; }#footable_7939 thead tr th.ninja_column_0,#footable_7939 tbody tr td.ninja_column_0{ background-color: rgba(137, 218, 129, 1); }#footable_7939 thead tr th.ninja_column_1,#footable_7939 tbody tr td.ninja_column_1{ background-color: rgba(227, 96, 96, 1); } #footable_7940.ninja_stacked_table > tbody, #footable_7940.ninja_stacked_table { background: transparent !important; } #footable_7940 td.ninja_column_0 { text-align: left; }#footable_7940 th.ninja_column_0 { text-align: center; }#footable_7940 td.ninja_column_1 { text-align: left; }#footable_7940 th.ninja_column_1 { text-align: center; }#footable_7940 thead tr th.ninja_column_0,#footable_7940 tbody tr td.ninja_column_0{ background-color: rgba(137, 218, 129, 1); }#footable_7940 thead tr th.ninja_column_1,#footable_7940 tbody tr td.ninja_column_1{ background-color: rgba(227, 96, 96, 1); } #footable_7941.ninja_stacked_table > tbody, #footable_7941.ninja_stacked_table { background: transparent !important; } #footable_7941 td.ninja_column_0 { text-align: left; }#footable_7941 th.ninja_column_0 { text-align: center; }#footable_7941 td.ninja_column_1 { text-align: left; }#footable_7941 th.ninja_column_1 { text-align: center; }#footable_7941 thead tr th.ninja_column_0,#footable_7941 tbody tr td.ninja_column_0{ background-color: rgba(137, 218, 129, 1); }#footable_7941 thead tr th.ninja_column_1,#footable_7941 tbody tr td.ninja_column_1{ background-color: rgba(227, 96, 96, 1); } #footable_7945.ninja_stacked_table > tbody, #footable_7945.ninja_stacked_table { background: transparent !important; } #footable_7945 td.ninja_column_0 { text-align: left; }#footable_7945 th.ninja_column_0 { text-align: center; }#footable_7945 td.ninja_column_1 { text-align: left; }#footable_7945 th.ninja_column_1 { text-align: center; }#footable_7945 thead tr th.ninja_column_0,#footable_7945 tbody tr td.ninja_column_0{ background-color: rgba(137, 218, 129, 1); }#footable_7945 thead tr th.ninja_column_1,#footable_7945 tbody tr td.ninja_column_1{ background-color: rgba(227, 96, 96, 1); } #footable_7946.ninja_stacked_table > tbody, #footable_7946.ninja_stacked_table { background: transparent !important; } #footable_7946 td.ninja_column_0 { text-align: left; }#footable_7946 th.ninja_column_0 { text-align: center; }#footable_7946 td.ninja_column_1 { text-align: left; }#footable_7946 th.ninja_column_1 { text-align: center; }#footable_7946 thead tr th.ninja_column_0,#footable_7946 tbody tr td.ninja_column_0{ background-color: rgba(137, 218, 129, 1); }#footable_7946 thead tr th.ninja_column_1,#footable_7946 tbody tr td.ninja_column_1{ background-color: rgba(227, 96, 96, 1); } #footable_7947.ninja_stacked_table > tbody, #footable_7947.ninja_stacked_table { background: transparent !important; } #footable_7947 td.ninja_column_0 { text-align: left; }#footable_7947 th.ninja_column_0 { text-align: center; }#footable_7947 td.ninja_column_1 { text-align: left; }#footable_7947 th.ninja_column_1 { text-align: center; }#footable_7947 thead tr th.ninja_column_0,#footable_7947 tbody tr td.ninja_column_0{ background-color: rgba(137, 218, 129, 1); }#footable_7947 thead tr th.ninja_column_1,#footable_7947 tbody tr td.ninja_column_1{ background-color: rgba(227, 96, 96, 1); }
Best Mat: Pat & Doris Plastic Sushi Mat
Click here for best price!
Our Overall Rating:
2.5/5
Here’s the simplest device that you can use to make your rolls. The Pat & Doris rolling mat is made from a food-grade PP material and has a non-stick surface, allowing you to make all professional-looking rolls. Since it has a non-stick surface, you don’t need a plastic wrap, making it ideal to make inside-out rolls such as California maki.
It’s also durable, flexible, and doesn’t retain any odor or flavor. Pat & Doris also claims that this mat can last for over 5 years with proper care. Best of all, its smooth surface resists moisture, dirt, and can be cleaned in a breeze.
Pros and Cons of the Pat & Doris Mat
ProsCons✔️ Non-stick surface ✔️ Durable ✔️ Easy to clean✖️ Expensive
#footable_7925.ninja_stacked_table > tbody, #footable_7925.ninja_stacked_table { background: transparent !important; } #footable_7925 td.ninja_column_0 { text-align: center; }#footable_7925 th.ninja_column_0 { text-align: center; }#footable_7925 td.ninja_column_1 { text-align: center; }#footable_7925 th.ninja_column_1 { text-align: center; }#footable_7925 td.ninja_column_2 { text-align: left; }#footable_7925 th.ninja_column_2 { text-align: center; }#footable_7925 td.ninja_column_3 { text-align: center; }#footable_7925 th.ninja_column_3 { text-align: center; } #footable_7936.ninja_stacked_table > tbody, #footable_7936.ninja_stacked_table { background: transparent !important; } #footable_7936 td.ninja_column_0 { text-align: left; }#footable_7936 th.ninja_column_0 { text-align: center; }#footable_7936 td.ninja_column_1 { text-align: left; }#footable_7936 th.ninja_column_1 { text-align: center; }#footable_7936 thead tr th.ninja_column_0,#footable_7936 tbody tr td.ninja_column_0{ background-color: rgba(137, 218, 129, 1); }#footable_7936 thead tr th.ninja_column_1,#footable_7936 tbody tr td.ninja_column_1{ background-color: rgba(227, 96, 96, 1); } #footable_7937.ninja_stacked_table > tbody, #footable_7937.ninja_stacked_table { background: transparent !important; } #footable_7937 td.ninja_column_0 { text-align: left; }#footable_7937 th.ninja_column_0 { text-align: center; }#footable_7937 td.ninja_column_1 { text-align: left; }#footable_7937 th.ninja_column_1 { text-align: center; }#footable_7937 thead tr th.ninja_column_0,#footable_7937 tbody tr td.ninja_column_0{ background-color: rgba(137, 218, 129, 1); }#footable_7937 thead tr th.ninja_column_1,#footable_7937 tbody tr td.ninja_column_1{ background-color: rgba(227, 96, 96, 1); } #footable_7938.ninja_stacked_table > tbody, #footable_7938.ninja_stacked_table { background: transparent !important; } #footable_7938 td.ninja_column_0 { text-align: left; }#footable_7938 th.ninja_column_0 { text-align: center; }#footable_7938 td.ninja_column_1 { text-align: left; }#footable_7938 th.ninja_column_1 { text-align: center; }#footable_7938 thead tr th.ninja_column_0,#footable_7938 tbody tr td.ninja_column_0{ background-color: rgba(137, 218, 129, 1); }#footable_7938 thead tr th.ninja_column_1,#footable_7938 tbody tr td.ninja_column_1{ background-color: rgba(227, 96, 96, 1); } #footable_7939.ninja_stacked_table > tbody, #footable_7939.ninja_stacked_table { background: transparent !important; } #footable_7939 td.ninja_column_0 { text-align: left; }#footable_7939 th.ninja_column_0 { text-align: center; }#footable_7939 td.ninja_column_1 { text-align: left; }#footable_7939 th.ninja_column_1 { text-align: center; }#footable_7939 thead tr th.ninja_column_0,#footable_7939 tbody tr td.ninja_column_0{ background-color: rgba(137, 218, 129, 1); }#footable_7939 thead tr th.ninja_column_1,#footable_7939 tbody tr td.ninja_column_1{ background-color: rgba(227, 96, 96, 1); } #footable_7940.ninja_stacked_table > tbody, #footable_7940.ninja_stacked_table { background: transparent !important; } #footable_7940 td.ninja_column_0 { text-align: left; }#footable_7940 th.ninja_column_0 { text-align: center; }#footable_7940 td.ninja_column_1 { text-align: left; }#footable_7940 th.ninja_column_1 { text-align: center; }#footable_7940 thead tr th.ninja_column_0,#footable_7940 tbody tr td.ninja_column_0{ background-color: rgba(137, 218, 129, 1); }#footable_7940 thead tr th.ninja_column_1,#footable_7940 tbody tr td.ninja_column_1{ background-color: rgba(227, 96, 96, 1); } #footable_7941.ninja_stacked_table > tbody, #footable_7941.ninja_stacked_table { background: transparent !important; } #footable_7941 td.ninja_column_0 { text-align: left; }#footable_7941 th.ninja_column_0 { text-align: center; }#footable_7941 td.ninja_column_1 { text-align: left; }#footable_7941 th.ninja_column_1 { text-align: center; }#footable_7941 thead tr th.ninja_column_0,#footable_7941 tbody tr td.ninja_column_0{ background-color: rgba(137, 218, 129, 1); }#footable_7941 thead tr th.ninja_column_1,#footable_7941 tbody tr td.ninja_column_1{ background-color: rgba(227, 96, 96, 1); } #footable_7945.ninja_stacked_table > tbody, #footable_7945.ninja_stacked_table { background: transparent !important; } #footable_7945 td.ninja_column_0 { text-align: left; }#footable_7945 th.ninja_column_0 { text-align: center; }#footable_7945 td.ninja_column_1 { text-align: left; }#footable_7945 th.ninja_column_1 { text-align: center; }#footable_7945 thead tr th.ninja_column_0,#footable_7945 tbody tr td.ninja_column_0{ background-color: rgba(137, 218, 129, 1); }#footable_7945 thead tr th.ninja_column_1,#footable_7945 tbody tr td.ninja_column_1{ background-color: rgba(227, 96, 96, 1); } #footable_7946.ninja_stacked_table > tbody, #footable_7946.ninja_stacked_table { background: transparent !important; } #footable_7946 td.ninja_column_0 { text-align: left; }#footable_7946 th.ninja_column_0 { text-align: center; }#footable_7946 td.ninja_column_1 { text-align: left; }#footable_7946 th.ninja_column_1 { text-align: center; }#footable_7946 thead tr th.ninja_column_0,#footable_7946 tbody tr td.ninja_column_0{ background-color: rgba(137, 218, 129, 1); }#footable_7946 thead tr th.ninja_column_1,#footable_7946 tbody tr td.ninja_column_1{ background-color: rgba(227, 96, 96, 1); } #footable_7947.ninja_stacked_table > tbody, #footable_7947.ninja_stacked_table { background: transparent !important; } #footable_7947 td.ninja_column_0 { text-align: left; }#footable_7947 th.ninja_column_0 { text-align: center; }#footable_7947 td.ninja_column_1 { text-align: left; }#footable_7947 th.ninja_column_1 { text-align: center; }#footable_7947 thead tr th.ninja_column_0,#footable_7947 tbody tr td.ninja_column_0{ background-color: rgba(137, 218, 129, 1); }#footable_7947 thead tr th.ninja_column_1,#footable_7947 tbody tr td.ninja_column_1{ background-color: rgba(227, 96, 96, 1); } #footable_7948.ninja_stacked_table > tbody, #footable_7948.ninja_stacked_table { background: transparent !important; } #footable_7948 td.ninja_column_0 { text-align: left; }#footable_7948 th.ninja_column_0 { text-align: center; }#footable_7948 td.ninja_column_1 { text-align: left; }#footable_7948 th.ninja_column_1 { text-align: center; }#footable_7948 thead tr th.ninja_column_0,#footable_7948 tbody tr td.ninja_column_0{ background-color: rgba(137, 218, 129, 1); }#footable_7948 thead tr th.ninja_column_1,#footable_7948 tbody tr td.ninja_column_1{ background-color: rgba(227, 96, 96, 1); }
Best Sushi Rollers Comparison
Sushi RollerBrandPriceFunctionalityQualityTotal RatingCheck Price on Amazon
AYA Bazooka Kit710109
Camp Chef Sushezi7.51098.9
SushiQuik Sushi Making Kit 7.599.58.7
EasySushi 3.5cm Roller79.58.58.3
Meidong Sushi Shaper 8988.3
Leifheit Perfect Roll Machine8988.3
INOO Rolling Tool88.588.2
Billioteam Roll Maker 88.57.58
Daiso Rice Roller10778
Pat & Doris Plastic Sushi Mat 77.587.5
#footable_7925.ninja_stacked_table > tbody, #footable_7925.ninja_stacked_table { background: transparent !important; } #footable_7925 td.ninja_column_0 { text-align: center; }#footable_7925 th.ninja_column_0 { text-align: center; }#footable_7925 td.ninja_column_1 { text-align: center; }#footable_7925 th.ninja_column_1 { text-align: center; }#footable_7925 td.ninja_column_2 { text-align: left; }#footable_7925 th.ninja_column_2 { text-align: center; }#footable_7925 td.ninja_column_3 { text-align: center; }#footable_7925 th.ninja_column_3 { text-align: center; } #footable_7936.ninja_stacked_table > tbody, #footable_7936.ninja_stacked_table { background: transparent !important; } #footable_7936 td.ninja_column_0 { text-align: left; }#footable_7936 th.ninja_column_0 { text-align: center; }#footable_7936 td.ninja_column_1 { text-align: left; }#footable_7936 th.ninja_column_1 { text-align: center; }#footable_7936 thead tr th.ninja_column_0,#footable_7936 tbody tr td.ninja_column_0{ background-color: rgba(137, 218, 129, 1); }#footable_7936 thead tr th.ninja_column_1,#footable_7936 tbody tr td.ninja_column_1{ background-color: rgba(227, 96, 96, 1); } #footable_7937.ninja_stacked_table > tbody, #footable_7937.ninja_stacked_table { background: transparent !important; } #footable_7937 td.ninja_column_0 { text-align: left; }#footable_7937 th.ninja_column_0 { text-align: center; }#footable_7937 td.ninja_column_1 { text-align: left; }#footable_7937 th.ninja_column_1 { text-align: center; }#footable_7937 thead tr th.ninja_column_0,#footable_7937 tbody tr td.ninja_column_0{ background-color: rgba(137, 218, 129, 1); }#footable_7937 thead tr th.ninja_column_1,#footable_7937 tbody tr td.ninja_column_1{ background-color: rgba(227, 96, 96, 1); } #footable_7938.ninja_stacked_table > tbody, #footable_7938.ninja_stacked_table { background: transparent !important; } #footable_7938 td.ninja_column_0 { text-align: left; }#footable_7938 th.ninja_column_0 { text-align: center; }#footable_7938 td.ninja_column_1 { text-align: left; }#footable_7938 th.ninja_column_1 { text-align: center; }#footable_7938 thead tr th.ninja_column_0,#footable_7938 tbody tr td.ninja_column_0{ background-color: rgba(137, 218, 129, 1); }#footable_7938 thead tr th.ninja_column_1,#footable_7938 tbody tr td.ninja_column_1{ background-color: rgba(227, 96, 96, 1); } #footable_7939.ninja_stacked_table > tbody, #footable_7939.ninja_stacked_table { background: transparent !important; } #footable_7939 td.ninja_column_0 { text-align: left; }#footable_7939 th.ninja_column_0 { text-align: center; }#footable_7939 td.ninja_column_1 { text-align: left; }#footable_7939 th.ninja_column_1 { text-align: center; }#footable_7939 thead tr th.ninja_column_0,#footable_7939 tbody tr td.ninja_column_0{ background-color: rgba(137, 218, 129, 1); }#footable_7939 thead tr th.ninja_column_1,#footable_7939 tbody tr td.ninja_column_1{ background-color: rgba(227, 96, 96, 1); } #footable_7940.ninja_stacked_table > tbody, #footable_7940.ninja_stacked_table { background: transparent !important; } #footable_7940 td.ninja_column_0 { text-align: left; }#footable_7940 th.ninja_column_0 { text-align: center; }#footable_7940 td.ninja_column_1 { text-align: left; }#footable_7940 th.ninja_column_1 { text-align: center; }#footable_7940 thead tr th.ninja_column_0,#footable_7940 tbody tr td.ninja_column_0{ background-color: rgba(137, 218, 129, 1); }#footable_7940 thead tr th.ninja_column_1,#footable_7940 tbody tr td.ninja_column_1{ background-color: rgba(227, 96, 96, 1); } #footable_7941.ninja_stacked_table > tbody, #footable_7941.ninja_stacked_table { background: transparent !important; } #footable_7941 td.ninja_column_0 { text-align: left; }#footable_7941 th.ninja_column_0 { text-align: center; }#footable_7941 td.ninja_column_1 { text-align: left; }#footable_7941 th.ninja_column_1 { text-align: center; }#footable_7941 thead tr th.ninja_column_0,#footable_7941 tbody tr td.ninja_column_0{ background-color: rgba(137, 218, 129, 1); }#footable_7941 thead tr th.ninja_column_1,#footable_7941 tbody tr td.ninja_column_1{ background-color: rgba(227, 96, 96, 1); } #footable_7945.ninja_stacked_table > tbody, #footable_7945.ninja_stacked_table { background: transparent !important; } #footable_7945 td.ninja_column_0 { text-align: left; }#footable_7945 th.ninja_column_0 { text-align: center; }#footable_7945 td.ninja_column_1 { text-align: left; }#footable_7945 th.ninja_column_1 { text-align: center; }#footable_7945 thead tr th.ninja_column_0,#footable_7945 tbody tr td.ninja_column_0{ background-color: rgba(137, 218, 129, 1); }#footable_7945 thead tr th.ninja_column_1,#footable_7945 tbody tr td.ninja_column_1{ background-color: rgba(227, 96, 96, 1); } #footable_7946.ninja_stacked_table > tbody, #footable_7946.ninja_stacked_table { background: transparent !important; } #footable_7946 td.ninja_column_0 { text-align: left; }#footable_7946 th.ninja_column_0 { text-align: center; }#footable_7946 td.ninja_column_1 { text-align: left; }#footable_7946 th.ninja_column_1 { text-align: center; }#footable_7946 thead tr th.ninja_column_0,#footable_7946 tbody tr td.ninja_column_0{ background-color: rgba(137, 218, 129, 1); }#footable_7946 thead tr th.ninja_column_1,#footable_7946 tbody tr td.ninja_column_1{ background-color: rgba(227, 96, 96, 1); } #footable_7947.ninja_stacked_table > tbody, #footable_7947.ninja_stacked_table { background: transparent !important; } #footable_7947 td.ninja_column_0 { text-align: left; }#footable_7947 th.ninja_column_0 { text-align: center; }#footable_7947 td.ninja_column_1 { text-align: left; }#footable_7947 th.ninja_column_1 { text-align: center; }#footable_7947 thead tr th.ninja_column_0,#footable_7947 tbody tr td.ninja_column_0{ background-color: rgba(137, 218, 129, 1); }#footable_7947 thead tr th.ninja_column_1,#footable_7947 tbody tr td.ninja_column_1{ background-color: rgba(227, 96, 96, 1); } #footable_7948.ninja_stacked_table > tbody, #footable_7948.ninja_stacked_table { background: transparent !important; } #footable_7948 td.ninja_column_0 { text-align: left; }#footable_7948 th.ninja_column_0 { text-align: center; }#footable_7948 td.ninja_column_1 { text-align: left; }#footable_7948 th.ninja_column_1 { text-align: center; }#footable_7948 thead tr th.ninja_column_0,#footable_7948 tbody tr td.ninja_column_0{ background-color: rgba(137, 218, 129, 1); }#footable_7948 thead tr th.ninja_column_1,#footable_7948 tbody tr td.ninja_column_1{ background-color: rgba(227, 96, 96, 1); } #footable_7929.ninja_stacked_table > tbody, #footable_7929.ninja_stacked_table { background: transparent !important; } #footable_7929 td.ninja_column_0 { text-align: center; }#footable_7929 th.ninja_column_0 { text-align: center; }#footable_7929 td.ninja_column_1 { text-align: center; }#footable_7929 th.ninja_column_1 { text-align: center; }#footable_7929 td.ninja_column_2 { text-align: center; }#footable_7929 th.ninja_column_2 { text-align: center; }#footable_7929 td.ninja_column_3 { text-align: center; }#footable_7929 th.ninja_column_3 { text-align: center; }#footable_7929 td.ninja_column_4 { text-align: center; }#footable_7929 th.ninja_column_4 { text-align: center; }#footable_7929 td.ninja_column_5 { text-align: center; }#footable_7929 th.ninja_column_5 { text-align: center; }#footable_7929 td.ninja_column_6 { text-align: center; }#footable_7929 th.ninja_column_6 { text-align: center; }
Final Note
With all these choices, you won’t have a problem anymore when it comes to making your own rolls at home! You can have rolls for breakfast, lunch, dinner, or anytime that you want. Shop for the one that suits you best and make your favourite maki, uramaki, and more!
Frequently Asked Questions
What tools are needed to make sushi?
The usual tools needed are a rolling mat, cutting board, and a sharp chef’s knife. For ingredients, it’s up to you. There are numerous choices when it comes to sushi ingredients. You can look up recipes to know which kind of rolls that you prefer eating and making.
Making rolls the non-traditional way is more than fine too. There are a lot of choices when it comes to tools, but the ones that are most handy are rollers and shapers.
What can I use instead of a sushi mat/ roller?
If you don’t have rollers or a mat, you can use a folded-over tea towel. If you don’t have any, you can also use a hand towel.
How do you make homemade sushi rollers?
With your tea towel, fold it in half lengthwise and lay it on your counter. Cover the towel in plastic wrap, stack your ingredients, and then roll them up using the towel. Don’t press too hard or else your nori will tear up and your rolls will be ruined.
Can you wash bamboo sushi mats?
Yes, you can. Clean your mats with a hot water and vinegar solution. Doing this will rid the mat of any bacteria or germs.
source https://www.weknowrice.com/guides/best-sushi-roller/?utm_source=rss&utm_medium=rss&utm_campaign=best-sushi-roller
0 notes
Text
The Way To Set Up A Stopper Drain Pairing In A Bath Tub

A bathtub drain using a built-in stopper has different benefits over other types of drains. They are more durable and simpler to keep up than pop-up stoppers that work with linkage managing throughout the overflow tube. Of course when you've got an old-style tub having a rubber stopper held with means of a string, a integrated types of bathtub drains fitting will update your own fixture.
By substituting a tub shoe to get you personally using a stopper, you could be sure that your own types of tub drains will probably forever set up and operating when you need it.
Exactly What You'll Need:
Tools / Tools
Bathtub drain sander (dumbbell tool)
Channel-type pliers
Putty knife
Materials
Tub drain converter kit for a stopper drain
Plumber's putty
Have the Right Device and Pairing
In the event you really don't already own one, spend a few dollars to get a bath drain sander, also called a barbell software. This specialization tool makes quick use of the otherwise laborious career of unscrewing the drain fitting from the tub shoe under the tub. Tub drain wrenches normally possess 2 endings for different forms of drain openings. The end fits right into the opening and keys into the crosshairs of the drain strainer. Then you definitely turn the tool with pliers to loosen the drain fitting. If a drain doesn't always have crosshairs, you require a version in the drain sander referred to as a drain extractor.
Also be sure to this get the appropriate form of drain fitting for your tub shoe. If you're uncertain of the size of one's tub drain, you'll be able to get a package which can be adapted to two drain sizes.
Remove the Aged Bathtub Drain Pairing
Use the tub drain sander to remove the existing drain matching from the tub shoe. To begin with, establish which end of this wrench will fit inside the drain opening and across the drain fitting's cross hairs. Add the adhesive in to the tub drain and then align it with the crosshairsthen utilize channel-type pliers or an adjustable wrench to bend the drain matching counterclockwise and loosen the fitting. It will unthread from the tub shoe below the bath tub. Continue turning before matching stems entirely completely free.
Thoroughly clean the Tub Drain Opening
Pull the matching from the tub, also wash the ring off of plumber's putty that surrounds the opening of this bathtub drain. It is better to get a clear area to work with, therefore be certain to take out up to their putty as you can. If the plumber's putty is dried set up, you need to use a non-scratch scouring pad to take it off.
Figure out the Drain Thread Dimension
Make use of the older fitting to set the magnitude of your own drain. A bathtub drain cleaner kit offers drain threads in 2 dimensions to support different tub drains. Pick the ideal thread attachment.
Install the New Tub Drain Pairing
Remove the types of tub drains from your brand newest drain fitting. Apply a sizable group of plumber's putty to the base of the the flange on the new matching. Add the matching into the bathtub drain opening, which makes sure to centre it.
A superior means to steer clear of cross-threading is always to start tightening by hand . When it looks like the matching's threads have begun, you may continue tightening by using the tub drain sander. Make sure you screw the fitting right into the drain plumbing attentively.
Last, clean off any surplus plumber's putty out of drain matching, subsequently add the stopper.
0 notes
Text
How To Install A Stopper Drain Fitting At A Bathtub

A bathtub drain with an integrated stopper has different advantages over other types of drains. They are stronger and easier to maintain than pop-up stoppers that work with linkage managing through the flow tube. Of course, in case you've got an old-style bathtub with a rubber stopper held with a string, a builtin types of bathtub drains fitting will modernize your own fixture.
By replacing a bathtub shoe for one using a stopper, you can be sure that the bathtub stopper types will probably forever set up and functioning when you require it.
What You'll Want:
Products / Tools
Bathtub drain sander (dumbbell tool)
Channel-type pliers
Putty knife
Materials
Bathtub drain converter kit to get a stopper drain
Plumber's putty
Get the Perfect Instrument and Fitting
In the event you don't already possess one, then spend a couple bucks on a bath drain sander, also referred to as a dumbbell software. This specialization tool helps make quick use of this differently laborious task of unscrewing the drain fitting by the bathtub shoe below the bath tub. Toilet drain wrenches will often have 2 endings for various forms of drain openings. The ending fits into the opening and keys in to the cross hairs of the drain strainer. Then you definitely turn the device with pliers to loosen the drain matching. If a drain doesn't have crosshairs, then you necessitate a version on the drain wrench termed a drain extractor.
Also make sure to the purchase the appropriate size of drain fitting on your own bathtub shoe. In the event you are uncertain of this dimensions of one's tub drain, you're able to purchase a package that could be accommodated to two drain measurements.
Remove the Aged Bathtub Drain Fitting
Use the bathtub drain wrench to remove the existent drain matching out of the bathtub shoe. To begin with, establish that end of the wrench will probably fit within the drain opening and across the drain fitting's cross hairs. Insert the wrench into the tub drain and align it with the cross hairs , then use channel-type pliers or an adjustable wrench to rotate the drain matching and loosen the fitting. It will unthread from the tub shoe beneath the bath tub. Keep turning before fitting comes completely free.
Clean the Tub Drain Opening
Yank on the fitting from the tub, also then clean off the ring of the plumber's putty that surrounds the opening of this tub drain. It is ideal to have a clear area to operate with, therefore be sure to take out up to the putty as you possibly can. If the plumber's putty is dried in place, you can make use of a non-scratch scouring pad to take it off.
Establish the Drain Thread Size
Make use of the old fitting to set the magnitude of your own drain. A bathtub drain cleaner kit provides drain threads in two dimensions to allow for different bathtub drains. Select the acceptable thread attachment.
Install the New Tub Drain Fitting
Take out the types of bathtub drains in the brand new drain fitting. Employ a sizable group of plumber's putty into the underparts of the the flange to the brand newest matching. Add the fitting into the bathtub drain opening, which makes sure to centre .
A good way to steer clear of cross-threading would be always to get started tightening by hand . If it looks like the matching's threads have started, you can keep on tightening using the bathtub drain wrench. Make sure you thread the fitting into the drain plumbing carefully.
Lastly, clean off any surplus plumber's putty from around the drain matching, subsequently add the stopper.
1 note
·
View note
Photo

New Post has been published on https://magzoso.com/tech/asus-zenbook-duo-ux481-dual-screen-laptop-review/
Asus ZenBook Duo UX481 Dual Screen Laptop Review
Asus has never been shy about experimenting with form factors. We’ve seen a whole string of series 2-in-1 devices, the iconic Padfone series, the dual-screen Taichi, the desktop-tablet Transformer AIO, and even the truly bonkers 5-in-1 Windows-Android hybrid Transformer Book V. Many of these designs have been fanciful and impractical, and some of them such as last year’s Project Precog haven’t even made it to market. On the other hand, some experiments have stuck – remember that this is the company that pioneered the netbook. If nothing else, these over-the-top concepts make for very entertaining showstoppers at Asus’ elaborate annual Computex keynotes.
This year’s big reveals were the ZenBook Duo and ZenBook Pro Duo, two similar laptops with huge secondary screens right below their primary ones. These 14-inch and 15-inch models are part of a larger industry-wide push to experiment with multiple displays, but they are so far potentially the slickest and most seemingly practical implementations we’ve seen. Besides, they’ve just been launched in India.
How much utility can a second screen bring to your laptop, and how practical is it to have one that’s always there? What are the tradeoffs in terms of ergonomics, battery life, and ease of use? Will the ZenBook Duo series completely rewrite the rules of the laptop market, or will this be just another flash in the pan? We’re reviewing the smaller ZenBook Duo UX481FL today to answer all those questions, and many more.
Asus ZenBook Duo UX481 design
The ZenBook Duo UX481 is not especially slim, like many of today’s premium models try to be, but it’s going to turn heads no matter what. As soon as people get over the initial wonder of what they’re looking at, they are going to do a double-take. After a very long time, we have something that makes people stop and rethink what they assume a laptop should look like and how it should work.
Its overall size is small for a 14-inch laptop because the borders around the two screens are relatively thin, and the hinge is designed so that its barrel pivots below the base. This props the lower deck up at an angle when the lid is opened. Asus calls this its ErgoLift design, and it makes a lot of sense here, giving you a better view of the lower screen.
Curiously, Asus has decided to include an adhesive folding stand. This lies flat against the bottom of the laptop when not needed, but can be folded into a triangle shape much like many tablet covers we’ve seen, to allow the base of the laptop to be propped up at an even greater angle. The company says it helps with cooling and makes typing more comfortable, but it seems like an afterthought – or perhaps a last-ditch solution to an unforeseen design issue. It also made the laptop slide around on our table when closed, since the rubber legs were lifted.
Asus offers this laptop in only one colour, a deep greenish-blue that it calls Celestial Blue. It definitely stands out, but not in a bad way. It’s actually quite understated without being boring, and we like it. Thankfully there are no garish gold accents like we’ve seen on previous ZenBook models.
The ZenBook Duo UX481 is available in only one colour, Celestial Blue
A signature ZenBook touch is the subtle concentric ring pattern on the lid radiating outwards from the Asus logo, which in this case is off-centre. Most of the body is made out of metal, and everything feels very solid. The lid doesn’t bend or flex much at all, and you can push the screen quite far back. You’ll need both hands to open and close this laptop, since the ErgoHinge design causes the entire base to move as the lid pivots.
The keyboard and trackpad have both been squeezed into the space below the ScreenPad Plus, and this is the biggest downside of the ZenBook Duo UX481. The vertical trackpad is far too narrow for comfortable use, and we constantly found our finger hitting the keys to the left or border to the right. As for quality, we found that it wasn’t particularly accurate, and the cursor would wobble a bit when we were trying to select something or just hover. Needless to say, left-handed users will find this arrangement extremely uncomfortable.
The keyboard is compressed into roughly as much space as on a 10- or 11-inch netbook, and those were never very good. Similarly, Asus has committed several sins here. There’s no palm rest area at all, and the keyboard deck is pretty high above whatever surface you have this laptop sitting on, which doesn’t make for comfortable typing posture at all.
You’ll have to keep your palms hovering rather than resting on something because there’s a raised lip that interferes with the bottom row. The keys are not too small, but are slightly squished together. The right Shift key is placed beyond the Up arrow, which means touch typing is out of the question. As for keyboard quality, the keys themselves are a bit mushy and unsatisfying. On the positive side, there’s white backlighting with three brightness settings.

The ErgoLift hinge (top) and the additional folding stand (bottom)
Asus ZenBook Duo UX481 specifications and software
There’s more big news than just the second screen – this is the first laptop in our lab with a 10th Gen Intel Core CPU. Sadly, it’s a 14nm ‘Comet Lake’ chip, which means it’s just a mildly refreshed 9th Gen ‘Coffee Lake‘ chip, not one of the all-new 10nm ‘Ice Lake’ varieties. Still, we should see some improvements in terms of battery life, performance, and heat dissipation. The chip in question is a 15W Core i7-10510U which has four cores with Hyper-Threading and runs between 1.8GHz and 4.9GHz.
The primary 14-inch screen has a full-HD 1920×1080 resolution. Asus says it is validated by Pantone and comes colour calibrated from the factory, but we detected a warm pink tinge that might just be because we’ve received an early review unit. 100 percent sRGB coverage is also promised.
Asus calls the secondary screen ScreenPad Plus, to set it apart from the ScreenPad enhanced trackpad of last year’s flagship ZenBook models. This screen has a resolution of 1920×515 and is touch-enabled. Both panels are said to have 178-degree viewing angles.
To supplement this CPU’s aged Intel UHD Graphics capabilities, there’s a discrete Nvidia GeForce MX250 GPU. You get support for the fast new Wi-Fi 6 standard as well as Bluetooth 5. The battery has a 70Wh capacity and a 65W charger is bundled in the box.
Our review unit was kitted out with 16GB of RAM and a 1TB PCIe SSD, and this configuration is priced at Rs. 1,09,990 in India. If that seems like overkill, Asus also offers this laptop with a Core i5-10210U CPU, 8GB of RAM and a 512GB SSD, starting at Rs. 89,990.

The ScreenPad Plus behaves exactly like an external secondary monitor under Windows 10
On the left, there’s the DC power inlet, an HDMI port, and a pair of USB 3.1 Gen2 (10Gbps) Type-A and Type-C ports. They’re joined by a Type-A USB 3.1 Gen1 (5Gbps) port, a 3.5mm audio combo socket, and a microSD card slot on the right. That isn’t a lot of connectivity, but it’s enough to work with. There’s also a webcam above the screen with an IR sensor for Windows Hello face recognition, multiple microphones designed for Cortana and Alexa, and stereo speakers that fire downwards as well as outwards from the sides. Alexa integration is one of the big selling points for this laptop, but Asus has confirmed to Gadgets 360 that it is not implemented in India, at least not yet.
Our review unit was running Windows 10 Home with the current May 2019 Update (v1903). We were often irritated by large, intrusive McAfee Livesafe popups urging us to subscribe to a plan. Asus also includes some software of its own. The MyAsus app combines several of the company’s smaller apps which used to clutter up our PCs. You can configure the main screen’s colour profile and choose battery saver settings, run quick diagnostic tests, check for software updates, and contact customer support.
There’s an AppDeals section within MyAsus with several promotional offers, and Asus has wisely highlighted apps that can take advantage of the second screen, including Overwolf which shows stats and for competitive onine gaming, and several apps for creativity and productivity.

Both screens are anti-reflective to prevent them from interfering with each other
Asus ZenBook Duo UX481 ScreenPad Plus displays
So let’s talk about the lower screen. The whole idea is that by making it exactly as wide as the primary screen and using the same horizontal resolution, you can move content around and multitask easily without bothering about alignment and without constantly swivelling your head. The angle does lead to a bit of hunching, though, which some people will find problematic.
Asus has gone with a matte texture for both screens, specifically in order to avoid reflections, which would have otherwise been a problem because they’re mounted at an angle to each other. We were surprised that the two screens seemed to have different colour temperatures – the primary one had a warm pink tinge compared to the lower one. Brightness also has to be adjusted independently.
What’s odder is that the lower screen recognises touch, but the primary one doesn’t. We took a while to get used to this, and eventually settled for just using the trackpad across both. On the other hand, it’s nice that Asus includes a stylus in the box with the ZenBook Duo UX481, which might come in handy for scribbling, sketching, signing, or just tapping things at a more convenient angle. You can disable the keyboard and trackpad with Fn key shortcuts to rest your wrist below the ScreenPad, but it isn’t exactly comfortable.
The lower screen is essentially recognised as a second monitor by Windows 10, and you’re in Extended Desktop mode by default. That means you can just drag and drop windows from one screen to another. It also means that when the ZenBook Duo UX481 wakes up from sleep, everything jumps back to the primary screen.
Asus has come up with one clever Windows UI enhancement. Whenever you drag a window by its title bar to move it anywhere, a set of three targets appears next to your cursor. You can “drop” the window onto any of these to either pop it directly onto the lower screen, force it to span both screens, or add a shortcut to Asus’ touch-enabled ScreenPad launcher (more on this in a minute). Additionally, three bars appear at the top of the lower screen allowing you to snap a window to exactly one-third its width.

Asus’ own apps let you take advantage of the touch-enabled ScreenPad Plus
You’ll notice a semi-transparent arrow button overlay at the left edge of the lower screen. This pulls up a menu that Asus has implemented to manage the ScreenPad Plus. The main panel shows quick shortcuts to applets such as a virtual number pad and handwriting input panel, which are thoughtful ways to use the hardware. These are ideal when docked to use one-third of the available space.
You also have a brightness slider, followed by a few buttons for Task Groups, an App Navigator, and a few quick controls. Task Groups let you define the positions and sizes of multiple program windows across both screens, and triggering any of them will launch those programs and snap them into place. There are four of these Task Group slots, and the feature works well enough. App Navigator is a kind of task manager that shows all open apps. Quick Key is a panel that lets you turn keyboard shortcut combinations into tappable buttons with clear labels. You can create your own shortcuts and define multiple pages of them. Each page can then be linked to a particular program so that contextually appropriate shortcuts appear when needed.
Asus has touted the ScreenPad Plus as a control surface, and despite the quirks of such an implementation, we can see how it could be useful. You can work on a photo or video full-screen while having various tool panels and pop-up boxes on the lower panel, or you could use it to display reference material while working on a document. You can have a music player’s controls visible and not too distracting, and you can also use it while gaming to display statistics or maps.
In short, anything you could do on a secondary monitor, you can do on the ScreenPlad Plus. Some programs are designed to exploit this, and others might still benefit because you can multitask more easily. You can even stretch a window to display across both screens if that helps you in any way. One quirk to be aware of is that when you take screenshots, both screens’ content is captured in one contiguous image.

The keyboard layout is compromised and the vertical trackpad is uncomfortable to use
Asus ZenBook Duo UX481 performance
Ergonomics aside, we had no problems with the performance of the ZenBook Duo UX481. We found that Windows 10 was very snappy, and there were no slowdowns even when streaming video with several programs running in the background and a dozen or so other browser tabs open. This laptop was also quick to wake from sleep, but it takes an additional second or two for the ScreenPad Plus to come to life. The generous amounts of RAM and PCIe storage are undoubtedly key to the good performance, and the brand new 10th Gen Intel Core CPU can’t hurt either.
One advantage of having the keyboard so far forward is that it isn’t affected by heat at all when the laptop is in use, whereas the ScreenPad Plus did get very warm. Fan noise was also generally well under control, and we only ever really heard anything when running our heaviest gaming benchmarks.
As we’ve said earlier, we found a warm tone on the primary screen, which might be an issue isolated to our review unit, and we were satisfied after tweaking the colour temperature manually using the Asus Splendid adjustment feature. Other than this issue, the screen was fine for productivity work as well as entertainment. Viewing angles are good and we always like a non-reflective panel. The ZenBook Duo UX481’s ErgoLift hinge allows the speakers more room to breathe. The sound is quite loud and expansive, but it does distort quite badly at full volume.
PCMark 10 returned scores of 4,072 and 3,618 in its standard and extended runs. Cinebench R20 showed a single-core score of 367 and multi-core score of 1,449. We used CrystalDiskMark to check out how the SSD performs, and measured excellent sequential read and write speeds of 3499.8MBps and 2385.9MBps, along with random speeds of 754.6MBps and 337.6MBps respectively.
The Blender 3D workload benchmark failed to complete, but POVRay ran its render in 3 minutes, 35 seconds and the Corona benchmark took 5 minutes, 50 seconds which are both decent scores. In our real-world tests, we were able to compress a 3.24GB folder of assorted files in 3 minutes, 49 seconds, while a 1.3GB AVI file took 1 minute, 39 seconds to be transcoded into H.265.
3DMark’s Time Spy test posted a score of 1,013, and the Fire Strike Extreme test managed 1,357. This isn’t really a gaming laptop, and even the discrete Nvidia GeForce MX250 GPU is barely adequate for 3D graphics, so we weren’t expecting great results in games. We tried Shadow of the Tomb Raider at 1920×1080 with the High preset, and got only 12fps on average. That went up to 20fps at 1280×720 using the Medium preset. Things were much the same in Far Cry 5, which gave us averages of 16fps and 34fps under the same conditions.
We weren’t expecting good battery life, considering the size of the ScreenPad Plus, but we were very pleasantly surprised. Our intense Battery Eater Pro drain test went on for 3 hours, 30 minutes, which is a lot better than many laptops can manage. With real-world usage including a lot of video streaming and Web browsing, we got nearly eight hours on a single charge. The ScreenPad Plus was active the entire time, set to 50 percent brightness.

The benefits of the ScreenPad Plus are outweighed by ergonomic flaws on this laptop
Verdict
So did we find any use for the secondary screen? Actually, we did. We used it for reference material as we were typing, and found it quite convenient. We liked having a Windows Explorer window open and handy all the time. Over time, we could easily see ourselves leaving our email and messaging apps open on the ScreenPad for quick updates while we get work done on the main screen. We hope that if this concept catches on, software makers will start designing apps that specifically take advantage of a second screen in this position.
Some of this functionality can be achieved using Windows 10’s built-in virtual desktops feature. There’s also the possibility of buying a small portable external monitor, such as Asus’ own ZenScreen, though of course that wouldn’t be nearly as convenient or portable. So that leads us to ask, is having the ScreenPad Plus worth the ergonomic tradeoffs?
Sadly, the answer to that question is no. The keyboard and trackpad are just too awkward and uncomfortable. We had a very hard time getting basic work done, and our productivity did not increase. We had to prevent the ZenBook Duo UX481 from going to sleep so that windows would stay in position. Not being able to touch one of the two screens was also frustrating.
The larger 15-inch ZenBook Pro Duo UX581 model has space for a better keyboard layout, and with 4K resolutions as well as full touch support on both screens, it would seem to do more justice to this concept. With an external keyboard and mouse, you could have yourself a powerful, versatile mobile workstation. The smaller ZenBook Duo UX481 just feels like too much has been shoved into too little space.
Still, given what we’ve seen so far this year, this laptop could be the first example of many similar concepts and designs from multiple manufacturers. Innovation like this is what keeps pushing the industry forward, and with tighter hardware and software integration, we could see a lot of use cases emerging around secondary screens. Finally, if none of that matters to you and you just want a cool-looking laptop that everyone will want to see and play with, there’s really nothing else like the ZenBook Duo right now.
0 notes
Photo

Yamaha DTX2U http://bit.ly/2f5R0en
A Versatile and Responsive Drum Trigger. A Powerful and Flexible Sequencer.
[easyazon_block add_to_cart=”default” align=”left” asin=”B004BA48P8″ cloaking=”default” layout=”left” localization=”default” locale=”US” nofollow=”default” new_window=”default” tag=”electroni06ce-20″]
Silent Session Drum Trigger Module
The DTX2U supplies more sounds, more expressive power. New kits and sounds include 29 additional drum kits plus 12 new hi-hat and 33 new rim voices. Both rim and pad voices can be simultaneously triggered. A variable gate time can be assigned to each note in the alternate and stack modes.
A Complete Workstation
The click track is controlled with the start and stop buttons. Headphone only mode sends the click directly to the headphones. Volume and pan settings can be edited in the song job mode. The selected drum kit is always effective, even when a different song or pattern is selected, if rhythm track is muted.
Display
The large liquid crystal display (LCD) shows a wealth of data in a format that is both easy to see and understand. A large, double-digit LED display keeps you informed of the current drum kit number at a glance.
Transport Buttons
Large transport buttons on the front panel provide quick and easy access to playback, record, and other sequencer functions. The remaining buttons are clearly labeled for easy access to common functions. Now programming is easy!
4 Sliders
The basic function of the 4 sliders is for master, aux in, accompaniment and click volume controls. They can also be assigned to control four individual drum output levels, giving you more control over the DTX’s sound balance in live situations.
Data Scroll Wheel
Selecting your desired setting is quick and easy with the Data Scroll Wheel.
Input/Output
The DTX uses a 10 input and 4 output interface to provide enough capacity to handle complex pad setups. 8 of the 10 channels are dual trigger type; channels 9/10 and 11/12 are independent trigger types. 4 outputs-Stereo L/R and two auxiliary outputs offer extended output processing capabilities. Individual voices can even be assigned to the auxiliary out for further sound control.
AUX
A stereo AUX input allows an external sound source, such as a CD player, tape deck, etc., to be mixed with the DTX’s drum sound. Now you can play-along with your favorite recordings.
MIDI IN/OUT
Full MIDI compatibility makes the DTX perfect for any MIDI studio, and allows the option of adding on to the system in the future. Trigger external tone generators by playing pads through the DTX, or record from an external keyboard into the on-board sequencer.
Drum Kit Play Mode
The 928 drum and percussion voices, covering a wide range of musical styles, are set up into 61 preset drum kits. You can also edit kits to create your own original drum kits. With such a wide range of possibilities at your fingertips, it is easy to achieve the sound and set-up you want.
Voice Edit Mode
Create your own sounds using the easy modify function, or by changing pitch, or by adding reverb effects to voices. They can be saved to memory and stored in your own customized kits.
Polishing Your Technique
The DTX2U will also assist you in polishing your technique. Independent pattern parts can be muted or soloed, and with independent click track control, you can practice triplets and other polyrhythms easier than ever before.
Chain Mode
Specific kits or patterns can be recalled in a defined order during performance. A total of 16 chains can be saved and recalled at the touch of a button or the strike of a pad.
Trigger Edit Mode
Trigger Mode allows settings for velocity, sensitivity, and volume levels to be saved in user kit memory as your original set-ups.
Auto Set
A single pad’s input level and MIDI velocity is graphically displayed on the LCD. Strike the pad and optimum gain values are set.
Pad Gain
Use the graphic display as a reference to manually adjust the gain of individual pads in precise increments.
Rejection Mode
Interference from other pads (cross talk) can be eliminated using the Rejection Mode. Offering a totally new approach to playing, the DTXU2 also allows you to assign up to 5 MIDI notes to individual pads, which can then be played in various ways. This feature can add a whole new tonal palette to your sound.
Stack Mode
The 5 assigned MIDI notes are triggered simultaneously as a chord. Drum voices, layered percussion, orchestra hits, or full chords are all possible.
Alternate Mode
Assign up to five notes and play them back one per each stroke on the pad. This allows you to create and play melodic phrases from the same pad. Version 2.0 offers more flexibility with assignable gate times for each of the five notes, the ability to assign less than five notes, and simultaneous triggering of a bass drum voice and bass notes from the kick pad.
Hold Mode
Strike the pad, and the 5 assigned notes are sustained until the pad is hit again. This mode can be used in conjunction with both Stack and Alternate Modes.
Velocity Cross Fade
Simulate acoustic drum nuances by assigning soft and loud voices to the same pad, to be separately triggered according to how hard or soft you play. It is also possible to control the balance of stacked voices in the Stack Mode using Velocity Cross Fade. Pads can also be used as switches to start and stop playback of patterns and songs. You can connect the MIDI OUT of the DTX to play an external tone generator with the pads, or to record data to computer based sequencers for instance.
Pattern Play Mode
With a total of 660 preset patterns (110 x 6 sections) and 100 user patterns, the DTX2U is sure to exhilarate your artistic talent. Complete rhythm, bass and chord parts are arranged into sections such as intro, main, fill in, ending, etc., and can be used to make songs, or simply for jamming. You can also record your own original patterns for use in compositions or as a teaching or practice aid.
Song Play Mode
Choose from 100 preset songs or 30 user songs and jam away. Each track can be muted or soloed just as in the pattern mode. You can mute the drum part and play the drums yourself, mute the keyboard and play the keyboard, solo the bass part and play along with it, etc. Using the DTX as a training aid, you can better understand how your parts fit with the rest of the band.
Record and Playback
Songs are easy to record and playback so you can get your ideas recorded and hear how they sound quickly. The DTX2U is also General MIDI compatible. Connecting the DTX to a computer or external sequencers can access GM data.
Groove Check
If you want to improve you’re timing. Groove Check is the perfect training aid. Select a pad to play in the Single mode, and see just how accurate your timing is on that particular pad. The Average mode will give you an overall score on your accuracy over the entire kit.
More Power, More Playability
The DTX2U and the addition of some new pads like the PCY10 Cymbal Bell Pad, KP80S Kick Pad and the BP80 Bar Pad, make the Yamaha DTX electronic percussion system the most practical electronic percussion system ever. Techniques such as articulate buzz rolls, rim shots, double bass, percussion, and cymbal chokes, that were previously possible on acoustic drums only, can be played with the DTX system’s extended capabilities.
1056 On-Board Voices
Have fun practicing with the on-board training functions, and more. The DTX2U is one of the most interactive electronic drum systems and sets new standards for modern drumming. The 1056 on-board voices include: 880 drum and percussion voices, and effects, as well as 48 bass, brass and strings, and mallet voices and 128 GM (General MIDI) compatible keyboard sounds, all produced with Yamaha’s Advanced Wave Memory (AWM2) technology.
Techniques
Push your imagination by exploring the vast sonic palette and advanced functions. Layer up to 5 notes on one surface to play stacks of notes or alternating patterns. Trigger keyboard sounds from the pads.
On-Board 5-Track Sequencer
There’s also an on-board 5-track sequencer that lets you record MIDI data from the DTX system and external MIDI keyboards as well.
Studio or Live Performance
With its extensive capabilities and excellent voices, the DTX system is perfect for studio use or live performance. The system can be used alone or incorporated into acoustic drum systems. Whatever your skill level may be, the DTX system is the one system that meets the needs and requirements of every drummer.
Specs
Tone Generator 16 bit AWM 2 (PCM) Maximum Polyphony 32 Voices 880 drum, percussion voices and effects; 48 additional voices; 128 keyboard voices (AWM2) Sequencer Tracks 2 (TR1, TR2) Backing Tracks 3 (pattern, chord, tempo) Songs 100 preset plus 30 user memory locations. Patterns Style/110 preset plus 100 user memory locations; Section/INTRO, MAIN-A, MAIN-B, FILL-AB, FILL-BA, ENDING Record Modes Real-time and Step-time Controls: Push Switches 28(DRUM KIT, TRIGG, CHAIN, VOICE, SONG, PATTERN, UTILITY, STORE, NO/-1, YES/+1, PAGE-, PAGE+, CURSOR LEFT, CURSOR RIGHT, TEMPO, SHIFT, TR1, TR2, BASS, RHYTHM, CHORD, SOLO, CLICK, PAUSE, REWIND, PLAY/STOP, FORWARD, REC) Controls: Slide Volume 4 (MASTER VOLUME, ACCOMP. VOLUME, AUX VOLUME, CLICK VOLUME) Other Controls Data Scroll Wheel, LCD Contrast Control Display Custom LCD display; Double digit, large 7 segment LED; Mute, sequencer LED indicators: 8 Connections MIDI input, output; Foot controller (stereo phone jack); Foot switch (mono phone jack); Output L/MONO (mono phone jack);Output R (mono phone jack); Aux output L (mono phone jack); Aux output R (mono phone jack); Aux input (stereo mini jack); Head phone (stereo phone jack); Trigger input 1~8 (stereo phone jack-L: trigger, R: sw) :8; Trigger input 9~12 (stereo phone jack -L, R: trigger):2; Trigger attenuation switch 1~12 (DIP SW) Power Supply AX 12V/AC adaptor (PA-1207 or PA-3B) Dimensions (W x D x H) 300 x 220 x 57 mm (11 13/16″ x 8 11/16″ x 2 1/4″) Weight 1.4 kg (3 lbs. 2 oz.)
Source: http://usa.yamaha.com
[easyazon_block add_to_cart=”default” align=”left” asin=”B00FI2PDAM” cloaking=”default” layout=”left” localization=”default” locale=”US” nofollow=”default” new_window=”default” tag=”electroni06ce-20″]
The post Yamaha DTX2U appeared first on Electronic-drums.info.
June 13, 2019 at 06:36PM http://bit.ly/2uPZlHc
0 notes
Text
Swiss progressive folk rock trio Cellar Darling have recently released the follow up to their acclaimed debut, ‘This Is The Sound’. Album number two, ‘The Spell’, is a dark concept album that quietly draws the listener in as the tale of “Death And The Maiden” unfolds around them. How would these deeply personal songs sound when performed live? Before that question could be answered, there was the small matter of two opening acts.
First up, and swapping the folk aspect of the headliners in favour of a prog metal sound, were fellow Swiss proggers Appearance Of Nothing. Both lead guitarists, Manuel Meinen and Albert Ibrahimaj, opt for seven string guitars, while bassist/vocalist Omar Cuna goes with a five string weapon of choice. Plenty of low end then. Current album, ‘In Times Of Darkness’, naturally featured heavily in the set, and with good reason, it’s a bloody corker, mate! There are shades of Evergrey here and there during the album (and set), with Cuna’s soft vocals reminiscent of Tom S. Englund himself. ‘The Black Sea’ heralds in a blend of clean vocals and low growls, as well as some fretboard fireworks from both guitarists. Cuna’s friendly approachable on stage persona came across throughout the set. Tossing the progger’s playbook out by constantly smiling, he is beaming from ear to ear when he calls up Cellar Darling’s Anna Murphy to duet on the spellbinding ‘Storm’. Again, special mention has to go to his clean vocals. Outstanding. Ending on the epic ‘The Huntress’, Appearance Of Nothing exit the stage having made several new friends. Hopefully, a quick return to the UK in a headlining capacity is on the cards.
Providing the Blackpool rock between the Swiss roll (sorry, that door was open, had to go through it), would be post-rock outfit Blanket. 2018’s ‘How To Let Go’ was met with huge critical acclaim from everyone from Kerrang! to The Independent. Let’s face it, not many bands will get that sort of approval from such diverse publications. Their sound is expansive, cinematic, and at times, hypnotic. If you wanted a point of comparison, perhaps you could mention Mogwai… but with less harsh vocals. Their songs take you on a journey, best exemplified by the soaring ‘This Moment Right Here’ and set closer ‘Turn Ourselves To Stone’. A different band to what you might have expected on this bill tonight, and a break from the norm.
After a quick breakdown, with Appearance Of Nothing gallantly lending a hand in stripping the stage, the dry ice billows and Cellar Darling take to the stage. The chugging riffs from Ivo Henzi signal the intro to ‘Black Moon’ and we’re off. Anna Murphy is as engaging as ever, as she sets out to make eye contact with everyone in the room. A room that has filled up rather nicely, thank you. When she starts to play the hurdy gurdy, it’s impossible to take your eyes from her, simply because she makes what must be a very hard instrument to master, look easy.
‘Hullaballoo’ is still the same infectious few minutes that it was when Cellar Darling first played this venue in 2018. Merlin Sutter is incredible to watch behind his drum kit, totally lost in his playing on one of the stand out tracks from the debut album. Murphy pauses to soak up the applause and mentions that although they have a brand new album to try out, the first part of the show will be songs from ‘This Is The Sound’… and then bang! Straight into ‘Avalanche’, followed in quick succession by ‘Challenge’ and ‘Six Days’. Henzi is dressed in regulation black and, in all honesty, makes this guitar playing lark look easy. He has a fantastic poker face, giving nothing away, but every now and again you catch him smiling.
After thirty minutes or so, Murphy talks about the new album, and says that the band are going to play most of it. They then begin to play the vast majority of the album in order.It is a concept album after all, the pacing is crucial. ‘Pain’ and ‘Death’ lead into the magical ‘Love’. The arrangements on the latter are staggering, and the melodies sweep over everyone. After the title track blows everyone away, Anna pauses to say “Nice to see so many smiling faces, considering how depressing our new album is!”, before continuing with “It’s mind blowing to see so many of you singing along to the new songs. I’m speechless!” ‘The Spell’ is a dark album with a dark subject matter, but it clearly resonates on many fronts with those in the crowd.
With its heavy intro and trippy flute solo, ‘Insomnia’ is one of the stand out moments on ‘The Spell’. Live, it soars above the heads of the crowd and fills the room. It was one of the new tracks I was the most curious to see how it would work live. Damn, it blew me away! Difficult second album? Arse!
After closing the main set with ‘Love Pt II’ (“The only one on the new album with hope!”), it’s encore time with their bold cover of Queen’s ‘The Prophet Song’ followed by ‘Redemption’ from the debut. Murphy jokes that you are not supposed to cover Queen, but they did, and it’s perhaps the best Queen cover that I’ve ever heard. She also points out her cousins in the crowd as the loudest in the room, as well as joking that if anyone wanted to come say “Hi” afterwards and hang out, then to do so as “We’re very Swiss, we don’t bite!”
A fitting end to a memorable night. With ‘The Spell’, Cellar Darling are on to something very special indeed. I can see them performing the album in it’s entirety at some point, with the stunning cover illustrations from Costin Chioreanu projected onto a screen behind them. Film that in high definition and I’m in.
Check out all Cellar Darling live dates here.
Review: Dave S
Images: Dave J
#gallery-0-5 { margin: auto; } #gallery-0-5 .gallery-item { float: left; margin-top: 10px; text-align: center; width: 33%; } #gallery-0-5 img { border: 2px solid #cfcfcf; } #gallery-0-5 .gallery-caption { margin-left: 0; } /* see gallery_shortcode() in wp-includes/media.php */
Review: Cellar Darling – Audio, Glasgow Swiss progressive folk rock trio Cellar Darling have recently released the follow up to their acclaimed debut, ‘This Is The Sound’.
0 notes
Text
Choosing a gift for your loved ones at Christmas or on their birthday is sometimes the hardest decision. You care about them so you want to get it right. You want their face to light up when they unwrap your gift. But it’s not always easy to get it just right.
A good start is thinking about what hobbies they enjoy and with that in mind, I have written a travel gift guide with all the best gifts for photographers at all budgets.
If your loved one isn’t a photographer fanatic then you may want to read my Travel Gift Guide For Girls for ideas instead. Or if they are planning a big backpacking trip, you can read about my backpacking essentials.
But if you are looking for a comprehensive list of the best gifts for photographers at all budgets, you are already in the right place. There’s everything from budget photography themed stocking fillers to high-end flashy presents if you are looking to splash the cash.
**This post does contain affiliate links. This means if you purchase them through my link, I will get a small commission at no cost to yourself. This helps towards the running costs of this blog and it will put a big smile on my face! Thank you. **
Best Gifts for Photographers Under $20
A Smartphone Lens Kit
As much as I love photography, sometimes I just don’t want the weight of carrying my camera. Or perhaps I’m going somewhere where my camera might get ruined or stolen. In these circumstances, these smartphone lenses are a great compromise. They can turn your smartphone into a proper camera with interchangeable lenses for wide angle, macro or telephoto photography.
[button color=”pink” size=”big” alignment=”center” rel=”nofollow” openin=”newwindow” url=”https://amzn.to/2Q5MoWM”%5DCheck out these smartphone camera lenses here[/button]
The Lonely Planet Guide to Travel Photography
This is my absolute favourite photography book and would make a brilliant gift for photographers. It goes right from the basics of using a camera up to advanced techniques for a huge variety of types of photography. Each type of photography is covered in its own chapter eg festivals, landscapes, wildlife, night photography… It’s clear and easy to read cover to cover. The perfect book for someone who loves travel and taking photos to help them up their game!
[button color=”pink” size=”big” alignment=”center” rel=”nofollow” openin=”newwindow” url=”https://amzn.to/2Pa02mB”%5DCheck it out here[/button]
A Fancy New Camera Strap
The camera strap that most cameras come with are, let’s face it, a bit ugly. And not always very comfortable! Buy your photography loving friend a fancy new camera strap as it’s something they will use a lot but might not think to buy themselves! I love this one. [button color=”pink” size=”big” alignment=”center” rel=”nofollow” openin=”newwindow” url=”https://amzn.to/2Eb9sx9″%5DCheck out this leather camera strap here[/button]
A camera mug
For your photography obsessed friend, this may be the perfect stocking filler present! A mug shaped like a camera lens!
[button color=”pink” size=”big” alignment=”center” rel=”nofollow” openin=”newwindow” url=”https://www.amazon.com/STRATA-CUPS-Stainless-Retractable-Photographer/dp/B01N1WYQYT/ref=sr_1_1_sspa?ie=UTF8&qid=1543780895&sr=8-1-spons&keywords=camera+mug&psc=1″%5DBuy this mug here[/button]
A Sneaky Spy Lens
If you are a photographer yourself, you will know how frustrating it is trying to get candid natural photos and getting sussed. Your model suddenly looks anything but natural and the moment is gone. Here lies the solution, a sneaky spy lens.
Point your camera in one direction but the mirror inside will allow you to take a photo in a completely different direction. Just make sure you check first what brand of camera they are using!
[button color=”pink” size=”big” alignment=”center” rel=”nofollow” openin=”newwindow” url=”https://www.amazon.com/Opteka-Digital-Cameras-Attaches-Threaded/dp/B000F49052/ref=sr_1_3?ie=UTF8&qid=1543781453&sr=8-3&keywords=spy+lens”%5DCheck out this spy lens here[/button]
A Waterproof Hand Grip / Selfie Stick for a GoPro
If your travel photography loving friend has a GoPro or action camera, then they’ll need one of these. It’s waterproof and anti-rust too so easy to use for snorkelling and diving trips as well as more day to day use.
Best Gifts for Photographers Under $50
A Dome Port Lens for Underwater Photography
If your loved one has a GoPro, they’ll love this Dome port lens which will allow them to take those super cool photos which are split with above and below the water scenes. [button color=”pink” size=”big” alignment=”center” rel=”nofollow” openin=”newwindow” url=”https://www.amazon.com/TELESIN-Transparent-Waterproof-Underwater-Accessories/dp/B01N1WN5LF/ref=sr_1_3?ie=UTF8&qid=1543766890&sr=8-3&keywords=gopro+underwater+dome&refinements=p_n_condition-type%3A6461716011%2Cp_72%3A2661618011″%5DCheck out GoPro domes here[/button]
A Gorillapod
This is possibly the perfect tripod for travellers. Light weight and compact and can be used to hold any camera up to 3Kg in weight.
The main advantage of a gorillapod (apart from it’s price and size) is that it can be maniupulated to attach itself to railing or trees so it can be used from different angles!
Whilst it’s not quite as useful as a full sized tripod, its a brilliant compromise where size and weight matters as it does for most travel photographers! [button color=”pink” size=”big” alignment=”center” rel=”nofollow” openin=”newwindow” url=”https://amzn.to/2PhytaP”%5DCheck out this Joby Gorillapod here[/button]
A Polarizing Filter
Polarizing filters polarize the light to help boost the colours in a photo – especially washed out skies! They are also great for photos where there are a lot of reflections eg glass or water and allow you to show details under the water for example pebbles on a river bed.
They are invaluable to any photographers and one of the cheapest accessories you can get which makes a huge impact on the photo.
There are lots of brands that sell these filters but I recommend choosing a reputable brand like Hoya. There is no point in having a lovely lens only to cover it with poor quality filters!
You will also need to check which lens your loved one has already as the filter will only fit certain sized lenses. If you can find out what lens they have, do a quick internet search and you’ll find the lens diameter really easily. It’ll be the figure in mm. [button color=”pink” size=”big” alignment=”center” rel=”nofollow” openin=”newwindow” url=”https://amzn.to/2zHWCT0″%5DCheck out Hoya filters here[/button]
An ND Filter
This is another really useful filter for any photographer. This allows you to slow the shutter speed down even in bright light. For example, if you are taking a photo of a waterfall and want that lovely milky appearance of the water, you will want to slow your shutter speed to 1 second or longer. In daylight, this is only possible with an ND filter. These are a must have for any landscape photographer.
They come in different grades depending on how much you want to slow the shutter speed. I find ND 8 is about perfect. You can also buy sets which have several different filters in. [button color=”pink” size=”big” alignment=”center” rel=”nofollow” openin=”newwindow” url=”https://amzn.to/2EbjE8U”%5DCheck out ND filter sets here[/button]
An Intervalometer
Timelapse Photography is really popular these days but it’s actually pretty tricky to do without an intervalometer. With this handy tool, you can set your camera up on a tripod to record one photo every minute or so. This is how you can create great timelapse where the clouds appear to move or the crowds are moving. They are also brilliant for astrophotography.
[button color=”pink” size=”big” alignment=”center” rel=”nofollow” openin=”newwindow” url=”https://amzn.to/2rkIp9X”%5DClick here for a Sony Intervalometer[/button]
[button color=”pink” size=”big” alignment=”center” rel=”nofollow” openin=”newwindow” url=”https://amzn.to/2U7pe0R”%5DClick here for Canon and Pentax Intervalometers[/button]
[button color=”pink” size=”big” alignment=”center” rel=”nofollow” openin=”newwindow” url=”https://amzn.to/2RqQKnX”%5DClic here for Nikon Intervalometers[/button]
Best Gifts for Photographers Under $100
A Photography Magazine Subscription
The photography gift that keeps on giving… Well for 12 months anyway! Every month your loved one will receive a new copy of a photography magazine packed with gear review, photography tips and photoshop tutorials. My personal favourite magazine is this one.
If your photography friend is a Nikon user then this magazine is great and all the gear reviews and tutorials are targetted at Nikon photographers. This is the Canon Equivalent. [button color=”pink” size=”big” alignment=”center” rel=”nofollow” openin=”newwindow” url=”https://amzn.to/2Q7xpM5″%5DClick here to see Photography magazine subscriptions[/button]
A Polaroid Camera
This ones a bit of fun! How about a polaroid camera for their next trip? I love the idea of taking some really quirky polaroid snaps then stringing them up on my wall. It could create some really pretty wall art! [button color=”pink” size=”big” alignment=”center” rel=”nofollow” openin=”newwindow” url=”https://amzn.to/2PiAvrg”%5DCheck out Polaroid Camera’s here[/button]
A Gimbal for Videography
If your travel photography loving friend also happens to lie making videos then a gimbal would be an absolute game changer for them. This device rotates smoothly to counteract your own movements so you can record super smooth professional looking videos. I personally have this one and have been really pleased with it. It takes a while to get the hang of but when you do – GAMECHANGER!
[button color=”pink” size=”big” alignment=”center” rel=”nofollow” openin=”newwindow” url=”https://amzn.to/2Pdn23X”%5DCheck out my favourite gimbal here[/button]
A Wireless Photo Printer
Hands up who has a laptop full of photos they never ever use?! I’m sure we’re all guilty of that from time to time! Make sure your loved one puts their photos to good use with this mobile wireless photo printer. You could also get them a nice photo album, like this one, to put their printed photos in! [button color=”pink” size=”big” alignment=”center” rel=”nofollow” openin=”newwindow” url=”https://amzn.to/2RuXIsd”%5DCheck out this photo printer here[/button]
A Smart Camera Bag
After the camera itself an perhaps a few lenses, your most next most important photography item is probably your bag! It needs to be spacious, well organised and distribute the weight evenly.
A lot of photography bags are really ugly but fortunately, there are some really nice ones about these days. I love this one and this one.
[button color=”pink” size=”big” alignment=”center” rel=”nofollow” openin=”newwindow” url=”https://amzn.to/2QaDdV1″%5DShop camera bags for women[/button]
[button color=”pink” size=”big” alignment=”center” rel=”nofollow” openin=”newwindow” url=”https://amzn.to/2PerRKp”%5DShop Camera Bags For Men[/button]
Best Gifts for Photographers Under $250
An Adobe Photo Editing Subscription
All serious photographers will need a decent photo editing software programme to make their photos really stand out. My personal go-to is Lightroom CC where I bring out details in the highlights and shadows and alter the colour balance. This leads to photos that ‘pop’ and landscapes with dramatic skies.
I love the fact that you can save your alterations as a preset (a bit like an instagram filter) which can then be applied to all the relevant photos for super fast editing! You can even access it on a phone app now making it easy to edit on the go! You can see an example of one of my photos produced with Light room below.
var uri = 'https://impgb.tradedoubler.com/imp?type(img)g(24067036)a(3028345)' + new String (Math.random()).substring (2, 11); document.write('<a href="https://clkuk.tradedoubler.com/click?p=265883&a=3028345&g=24067036" target="_BLANK"><img src="'+uri+'" border=0>');
Photoshop is also a useful tool especially if your loved one likes taking portrait photos or likes to play around with arty effects.
With Adobe, you can select a subscription to just one tool or buy a photography bundle. There are also bundles for aspiring videographers.
[button color=”pink” size=”big” alignment=”center” rel=”nofollow” openin=”newwindow” url=”http://clkuk.tradedoubler.com/click?p(265883)a(3028345)g(22913796)”%5DCheck out adobe subscription options here[/button]
A Travel Tripod
There are certain requirements for a good travel tripod. It must be
Lightweight
Sturdy
Compact
Affordable
Therefore I spent a long time researching which one to get and asking for recommendations. I eventually settled on the very affordable Benro carbon fibre travel tripod and have been really pleased with it. The carbon fibre makes it sturdier yet lighter and it’s easy and quick to set up.
[button color=”pink” size=”big” alignment=”center” rel=”nofollow” openin=”newwindow” url=”https://amzn.to/2riQR9G”%5DClick here to check out the price for this tripod[/button]
[button color=”pink” size=”big” alignment=”center” rel=”nofollow” openin=”newwindow” url=”https://amzn.to/2DVMLMs”%5DHere’s another great option – affordable, lightweight, sturdy with great reviews[/button]
A 50mm Prime Lens
If this lens is not already in your loved one’s photography bag, then it should be. Coined the ‘nifty fifty’ for good reason. This is a brilliant focal length for a huge variety of topics from portrait to street photography.
Its wide aperture also allows you to take photos in low light without a tripod and allows you to get really creative with the beautiful bokeh effect.
As another little bonus for a travel photographer, this lens is both small and light so you’ll barely notice it in your camera bag! This is one lens I would never be without.
[button color=”pink” size=”big” alignment=”center” rel=”nofollow” openin=”newwindow” url=”https://www.amazon.com/Nikon-AF-S-NIKKOR-1-8G-Cameras/dp/B004Y1AYAC/ref=sr_1_3?rps=1&ie=UTF8&qid=1543782570&sr=8-3&keywords=50mm+prime+nikon”%5DClick here for the Nikon nifty fifty[/button]
[button color=”pink” size=”big” alignment=”center” rel=”nofollow” openin=”newwindow” url=”https://www.amazon.com/Canon-50mm-1-8-STM-Lens/dp/B00X8MRBCW/ref=sr_1_3?rps=1&ie=UTF8&qid=1543782842&sr=8-3&keywords=50mm+prime+canon”%5DClick here for the Canon nifty fifty[/button]
[button color=”pink” size=”big” alignment=”center” rel=”nofollow” openin=”newwindow” url=”https://www.amazon.com/Sony-Full-frame-SEL50F18F-Essential-Accessory/dp/B01EM3AW9E/ref=sr_1_1_sspa?rps=1&ie=UTF8&qid=1543782924&sr=8-1-spons&keywords=50mm+prime+sony+e+mount&psc=1″%5DClick here for Sony Mirrorless nifty fifties[/button]
Best Gifts For Photographers over $250
A Drone
Take their phootgraphy to new heights – literally! I’m absolutely in love with my little drone. It weighs only 300g and fits in the palm of my hand so it’s no where near as big as you’d imagine!
It takes beautiful ariel photos and record fabulous HD videos. Drones can be really pricey but I felt mine, the DJI Spark, was really affordable.
With drones, you do get what you pay for so yes, technically you can get drones for < $100. These are fine as fun outdoor toys but if your loved one is serious about photography I’d recommend a DJI drone as they are well known for their quality.
If you get the DJI Spark like I did, I’d recommend buying the Fly More Combo. It comes with spare batteries, a remote controller and various other accessories. I bought it without and regretted it immediately! I’ve since gone on to buy extra batteries, chargers and a remote controller and it cost me a lot more buying them seperately! [button color=”pink” size=”big” alignment=”center” rel=”nofollow” openin=”newwindow” url=”https://amzn.to/2KQbwLt”%5DClick here to see the DJI spark Fly More Combo[/button]
If you want to go faster, higher and further or if you think your friend may want to take more professional photos, then I’d recommend the DJI Mavic Pro. My friend has this one and wow, those photos are INCREDIBLE! The Mavic Pro also comes with a Fly More Combo and again, I wouldn’t buy it without as it’ll end up costing more in the long run!
[button color=”pink” size=”big” alignment=”center” rel=”nofollow” openin=”newwindow” url=”https://amzn.to/2DY7xuM”%5DClick here to see the Mavic Pro Fly More Combo[/button]
A Laptop
Every photographer needs a decent laptop to edit and store their photos. I personally use a Macbook. It’s light as a feather so fits in my hand luggage without barely noticing it in there! It’s fast and the screen is brilliant allowing me to edit my photos with ease!
Oh and did I tell you it comes in a really pretty rose pink colour?! [button color=”pink” size=”big” alignment=”center” rel=”nofollow” openin=”newwindow” url=”https://amzn.to/2QwT2F0″%5DCheck out the Macbook here.[/button]
If you can’t quite stretch to the cost of a Macbook, then here are the best rated (atleast 4/5stars) lightweight laptops under $1000
A GoPro
I love my GoPro. It’s great for recording action videos and so far I’ve used it for snorkelling and for a skiing trip and got brilliant footage for both. Also because it’s so small, I sometimes put it in my bag on a night out to get some photos without having to carry a bulky camera about.
Whilst GoPros are brilliant quality and they are front leaders in action cameras, there are plenty of cheaper versions if your budget can’t stretch to an actual GoPro. Also, I have the GoPro 6 which can be found at a bargain price now since the GoPro Hero 7 has been released. For me, the Hero 6 does all I need it to and more. [button color=”pink” size=”big” alignment=”center” rel=”nofollow” openin=”newwindow” url=”https://amzn.to/2EaYvvo”%5DShop for the latest GoPro Hero 7[/button]
[button color=”pink” size=”big” alignment=”center” rel=”nofollow” openin=”newwindow” url=”https://amzn.to/2EaMbLF”%5DShop for the GoPro Hero 6 here[/button]
[button color=”pink” size=”big” alignment=”center” rel=”nofollow” openin=”newwindow” url=”https://amzn.to/2rjbNxn”%5DShop GoPro Cheaper Alternatives[/button]
A New Camera
Surely the best gift for photographers would be a brand new camera?!
When it comes to choosing a camera, the following things are important factors;
Camera Size. Point and shoots are the most compact and mirrorless cameras are the best of both worlds, small yet powerful! However, many photographers are still loyal to the traditional DSLR.
Sensor Size. The larger the sensor, the more information the camera can take in. Most professionals will use full frame cameras but many amateurs are happy with an APS-C camera.
Number of Megapixels. This is important for photos which may need to be blown up big for wall pictures or on large screen computers. Many modern cameras have around 20MP now which is more than adequate for most photographers. Whilst you can get 40MP cameras, I suggest you think twice as every photo will take up more space and load slowly onto your computer!
Frames per second / Continuous shooting. If your friend enjoys action photography, you’ll want a camera which manages at least 5 frames per second if needed.
Video Quality. Some flashy cameras offer 4K videography these days but you should look for at least 1080 HD video capability.
[button color=”pink” size=”big” alignment=”center” rel=”nofollow” openin=”newwindow” url=”https://amzn.to/2E9ZWu5″%5DSee cameras with at least 4/5stars with HD video and plenty of megapixels [/button]
In the past, I used the Nikon d5500. I loved that camera so much. As budget entry-level DSLRs go, I don’t think it can be beaten for quality or price. There is, however, a new model available the Nikon D5600 which I’m sure is even better.
Recently, I made the switch to a mirrorless camera, the Sony a7iii. I wanted something slightly lighter and felt it was time I got a full frame camera as I’m hoping to seel some of my photos so I wanted something professional quality. It’s not cheap, but it is fantastic. I would say only get this model if your friend is a photography enthusiast.
If they are still just dipping their toe into the world of photography then another brilliant lightweight option which is a little cheaper is the Sony A6500. My friend has this one and the photos are fantastic. It’s also so so light compared to either of my cameras!
[button color=”pink” size=”big” alignment=”center” rel=”nofollow” openin=”newwindow” url=”https://amzn.to/2RwkTCv”%5DShop for the Nikon D5600 here[/button]
[button color=”pink” size=”big” alignment=”center” rel=”nofollow” openin=”newwindow” url=”https://amzn.to/2PizCiy”%5DShop for the Sony A6500 here[/button]
[button color=”pink” size=”big” alignment=”center” rel=”nofollow” openin=”newwindow” url=”https://amzn.to/2KOUux5″%5DShop here for the Sony A7iii[/button]
Hopefully you have got some great ideas for gifts for photographers now. Or perhaps you’re looking for treats for yourself?! Go on… you deserve it!
Read More
Travel Gift Guide For Girls
Backpacking Essentials.
If you have any other suggestions, please let me know so I can include them as this post will be constantly updated!
If you’ve enjoyed this article, please share it with your friends on social media or Pinterest – you never know they might see it and treat you to something off it too!
Best Gifts for Travel Photographers for ALL Budgets Choosing a gift for your loved ones at Christmas or on their birthday is sometimes the hardest decision.
0 notes